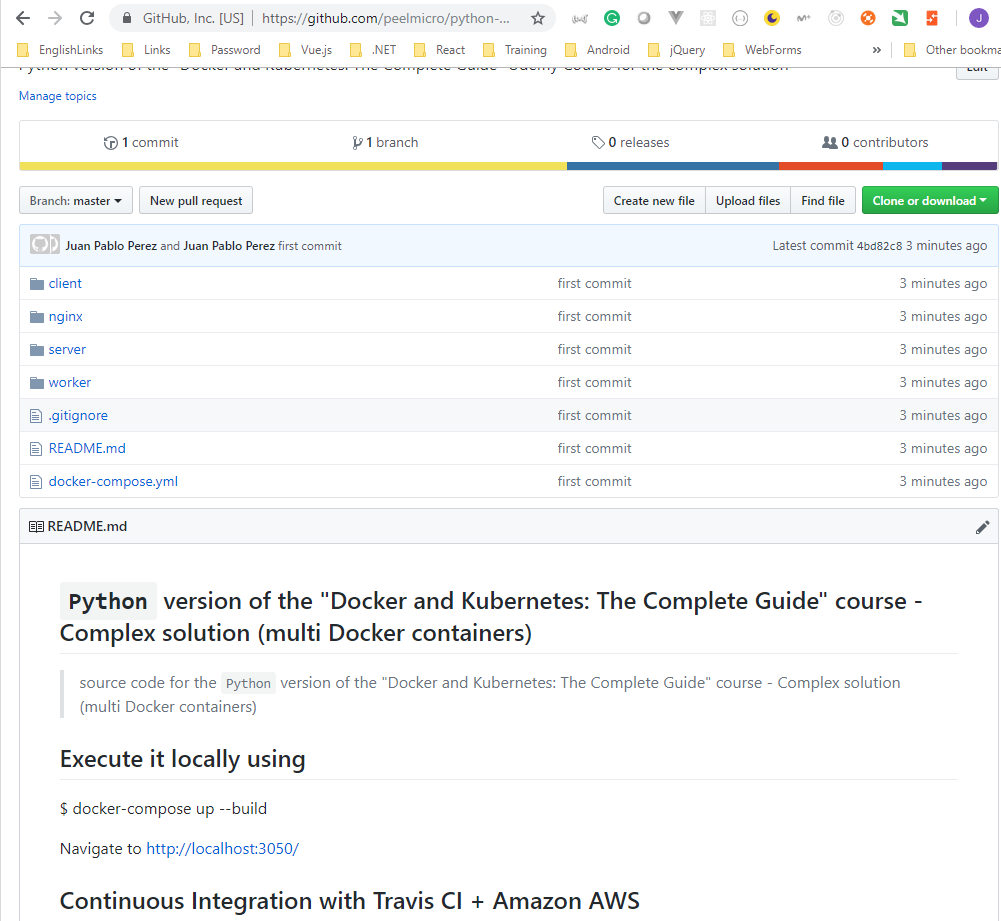
Python version of the "Docker and Kubernetes: The Complete Guide" Udemy course
Github Repositories
Source code for the Python version of the Docker and Kubernetes: The Complete Guide Udemy course
Within the code you can see how to:
- Create different Docker Container Types and relate all of them:
- React Client App
- .NET Core Web API
- .NET Core Console
- Postgres
- Redis
- NGINX
- Use Postgres from a Docker Container with Python
- Use Redis from a Docker Container with Python creating a subscription on the Web API App and subscribe to it on the Console App.
- Send dynamic JSON responses from the Python Flask Framework Web API
- Use Docker Compose to run and relate easily different Docker Components
- Use NIGIX Container to run the React Client App
- Use NIGIX Container as Reverse Proxy with Python Flask Framework Web API
- Work with different AWS Amazon service types to deploy a multi-container Docker application using AWS Elastic Beanstalk
- Upload own Containers to Docker Hub and download them with the deployment
- Use Travis CI for the Continuous Integration Workflow
- Use Kubernetes to run the same multi-container application
- Use Minikube to run Kubernetes locally
- Use Kubectl CLI for interacting with Kubernetes Master
- Use Google Kubernetes Engine to run the Kubernetes Cluster on the Cloud
- Run the Ruby Travis CI CLI from a Docker container locally
- Manage the automatic creation and renewal of a TLS certificate using Kubernetes to run the application with HTTPS
Table of contents
- Create the server application using python
- Create the worker application using python
- Complete the solution copying the client and nginx projects from the original NodeJS solution and the Docker Compose file
- Onwards to Kubernetes!
- Maintaining Sets of Containers with Deployments
- A Multi-Container App with Kubernetes
- Kubernetes Production Deployment
You can find more information on Docker and Kubernetes: The Complete Guide.
Create the server application using python
- Create the
serverfolder from the mainpython-complexfolder
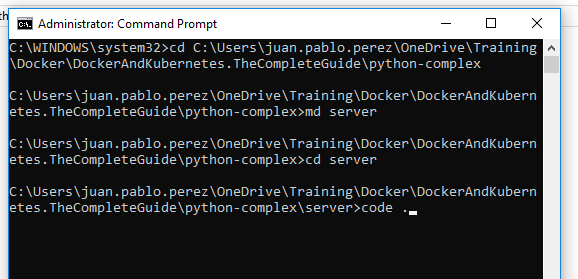
- Open the
Visual Studio Codefrom the new folder created usingcode .

- Execute the command to install Flask
Juan.Pablo.Perez@RIMDUB-0232 MINGW64 ~/OneDrive/Training/Docker/DockerAndKubernetes.TheCompleteGuide/python-complex/server$ pip install -U Flask
Collecting Flask
  Downloading https://files.pythonhosted.org/packages/7f/e7/08578774ed4536d3242b14dacb4696386634607af824ea997202cd0edb4b/Flask-1.0.2-py2.py3-none-any.whl (91kB)
    100% |████████████████████████████████| 92kB 308kB/s
Collecting itsdangerous>=0.24 (from Flask)
  Downloading https://files.pythonhosted.org/packages/76/ae/44b03b253d6fade317f32c24d100b3b35c2239807046a4c953c7b89fa49e/itsdangerous-1.1.0-py2.py3-none-any.whl
Collecting Werkzeug>=0.14 (from Flask)
  Downloading https://files.pythonhosted.org/packages/20/c4/12e3e56473e52375aa29c4764e70d1b8f3efa6682bef8d0aae04fe335243/Werkzeug-0.14.1-py2.py3-none-any.whl (322kB)
    100% |████████████████████████████████| 327kB 635kB/s
Collecting click>=5.1 (from Flask)
  Downloading https://files.pythonhosted.org/packages/fa/37/45185cb5abbc30d7257104c434fe0b07e5a195a6847506c074527aa599ec/Click-7.0-py2.py3-none-any.whl (81kB)
    100% |████████████████████████████████| 81kB 1.4MB/s
Collecting Jinja2>=2.10 (from Flask)
  Downloading https://files.pythonhosted.org/packages/7f/ff/ae64bacdfc95f27a016a7bed8e8686763ba4d277a78ca76f32659220a731/Jinja2-2.10-py2.py3-none-any.whl (126kB)
    100% |████████████████████████████████| 133kB 1.7MB/s
Collecting MarkupSafe>=0.23 (from Jinja2>=2.10->Flask)
  Downloading https://files.pythonhosted.org/packages/44/6e/41ac9266e3db762dfd9089f6b0d2298c84160f54ef2a7257c17b0e7ec2ec/MarkupSafe-1.1.0-cp37-cp37m-win_amd64.whl
Installing collected packages: itsdangerous, Werkzeug, click, MarkupSafe, Jinja2, Flask
Successfully installed Flask-1.0.2 Jinja2-2.10 MarkupSafe-1.1.0 Werkzeug-0.14.1 click-7.0 itsdangerous-1.1.0
You are using pip version 10.0.1, however version 18.1 is available.
You should consider upgrading via the 'python -m pip install --upgrade pip' command.
- Upgrade the
pipapplication as suggested
Juan.Pablo.Perez@RIMDUB-0232 MINGW64 ~/OneDrive/Training/Docker/DockerAndKubernetes.TheCompleteGuide/python-complex/server
$ python -m pip install --upgrade pip
Collecting pip
  Downloading https://files.pythonhosted.org/packages/c2/d7/90f34cb0d83a6c5631cf71dfe64cc1054598c843a92b400e55675cc2ac37/pip-18.1-py2.py3-none-any.whl (1.3MB)
    100% |████████████████████████████████| 1.3MB 1.4MB/s
Installing collected packages: pip
  Found existing installation: pip 10.0.1
    Uninstalling pip-10.0.1:
      Successfully uninstalled pip-10.0.1
Successfully installed pip-18.1
- Create the main
app.pyprogram with the standardHello, World!Fluskcode.
from flask import Flask

app = Flask(__name__)

@app.route('/')
def hello():
    return 'Hello, World!'

if __name__=="__main__":
    app.run(host='0.0.0.0')
- Run the application with the
flask runcommand to ensure it is valid
Juan.Pablo.Perez@RIMDUB-0232 MINGW64 ~/OneDrive/Training/Docker/DockerAndKubernetes.TheCompleteGuide/python-complex/server
$ FLASK_APP=app.py flask run
 * Serving Flask app "app.py"
 * Environment: production
   WARNING: Do not use the development server in a production environment.
   Use a production WSGI server instead.
 * Debug mode: off
 * Running on http://127.0.0.1:5000/ (Press CTRL+C to quit)
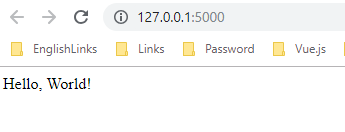
- Execute
curl localhost:5000on another terminal to ensure it works
Juan.Pablo.Perez@RIMDUB-0232 MINGW64 ~/OneDrive/Training/Docker/DockerAndKubernetes.TheCompleteGuide/python-complex/server
$ curl localhost:5000
Hello, World!
- Open a browser and go to
http://127.0.0.1:5000/
- Create the
requirements.txtdocument with thepiprequirements for the solution
Flask
- Create a
Dockerfileto generate aDocker image
FROM python:3-alpine

WORKDIR /app

COPY requirements.txt .
RUN pip install --no-cache-dir -r requirements.txt

COPY . .

CMD ["python", "app.py"]
- Generate the
Dockerimage
Juan.Pablo.Perez@RIMDUB-0232 MINGW64 ~/OneDrive/Training/Docker/DockerAndKubernetes.TheCompleteGuide/python-complex/server
$ docker build .
Sending build context to Docker daemon  5.632kB
Step 1/6 : FROM python:3-alpine
 ---> aadc3feb2b19
Step 2/6 : WORKDIR /app
 ---> Using cache
 ---> 7d8ce9ebb580
Step 3/6 : COPY requirements.txt .
 ---> a804e0b71065
Step 4/6 : RUN pip install --no-cache-dir -r requirements.txt
 ---> Running in 0ad8d07814d2
Collecting Flask (from -r requirements.txt (line 1))
  Downloading https://files.pythonhosted.org/packages/7f/e7/08578774ed4536d3242b14dacb4696386634607af824ea997202cd0edb4b/Flask-1.0.2-py2.py3-none-any.whl (91kB)
Collecting Werkzeug>=0.14 (from Flask->-r requirements.txt (line 1))
  Downloading https://files.pythonhosted.org/packages/20/c4/12e3e56473e52375aa29c4764e70d1b8f3efa6682bef8d0aae04fe335243/Werkzeug-0.14.1-py2.py3-none-any.whl (322kB)
Collecting itsdangerous>=0.24 (from Flask->-r requirements.txt (line 1))
  Downloading https://files.pythonhosted.org/packages/76/ae/44b03b253d6fade317f32c24d100b3b35c2239807046a4c953c7b89fa49e/itsdangerous-1.1.0-py2.py3-none-any.whl
Collecting Jinja2>=2.10 (from Flask->-r requirements.txt (line 1))
  Downloading https://files.pythonhosted.org/packages/7f/ff/ae64bacdfc95f27a016a7bed8e8686763ba4d277a78ca76f32659220a731/Jinja2-2.10-py2.py3-none-any.whl (126kB)
Collecting click>=5.1 (from Flask->-r requirements.txt (line 1))
  Downloading https://files.pythonhosted.org/packages/fa/37/45185cb5abbc30d7257104c434fe0b07e5a195a6847506c074527aa599ec/Click-7.0-py2.py3-none-any.whl (81kB)
Collecting MarkupSafe>=0.23 (from Jinja2>=2.10->Flask->-r requirements.txt (line 1))
  Downloading https://files.pythonhosted.org/packages/ac/7e/1b4c2e05809a4414ebce0892fe1e32c14ace86ca7d50c70f00979ca9b3a3/MarkupSafe-1.1.0.tar.gz
Installing collected packages: Werkzeug, itsdangerous, MarkupSafe, Jinja2, click, Flask
  Running setup.py install for MarkupSafe: started
    Running setup.py install for MarkupSafe: finished with status 'done'
Successfully installed Flask-1.0.2 Jinja2-2.10 MarkupSafe-1.1.0 Werkzeug-0.14.1 click-7.0 itsdangerous-1.1.0
Removing intermediate container 0ad8d07814d2
 ---> c79c7cc534fb
Step 5/6 : COPY . .
 ---> 1f8a407dbe02
Step 6/6 : CMD ["python", "app.py"]
 ---> Running in fab10b4244cd
Removing intermediate container fab10b4244cd
 ---> fbdca0c3bbda
Successfully built fbdca0c3bbda
SECURITY WARNING: You are building a Docker image from Windows against a non-Windows Docker host. All files and directories added to build context will have '-rwxr-xr-x' permissions. It is recommended to double check and reset permissions for sensitive files and directories.
- Execute the new
Dockerimage
Juan.Pablo.Perez@RIMDUB-0232 MINGW64 ~/OneDrive/Training/Docker/DockerAndKubernetes.TheCompleteGuide/python-complex/server
$ docker run -p 5000:5000 fbdca0c3bbda
 * Serving Flask app "app" (lazy loading)
 * Environment: production
   WARNING: Do not use the development server in a production environment.
   Use a production WSGI server instead.
 * Debug mode: off
 * Running on http://0.0.0.0:5000/ (Press CTRL+C to quit)
172.17.0.1 - - [23/Nov/2018 06:56:54] "GET / HTTP/1.1" 200 -
- Execute
curl localhost:5000on another terminal to ensure it works
Juan.Pablo.Perez@RIMDUB-0232 MINGW64 ~/OneDrive/Training/Docker/DockerAndKubernetes.TheCompleteGuide/python-complex/server
$ curl localhost:5000
Hello, World!
- Install the
psycopg2 Postgres clientexecuting thepip install psycopg2
Juan.Pablo.Perez@RIMDUB-0232 MINGW64 ~/OneDrive/Training/Docker/DockerAndKubernetes.TheCompleteGuide/python-complex/server
$ pip install psycopg2
Collecting psycopg2
  Downloading https://files.pythonhosted.org/packages/12/c0/ddd4b3bde5b8012e262c5dcac570aac5cd934c643641f924fd10e3c7b27f/psycopg2-2.7.6.1-cp37-cp37m-win_amd64.whl (996kB)
    100% |████████████████████████████████| 1.0MB 2.0MB/s
Installing collected packages: psycopg2
Successfully installed psycopg2-2.7.6.1
- Modify the 'app.py' program to make it work as expected
from flask import Flask, jsonify, request, make_response
import redis
import os
import psycopg2

app = Flask(__name__)
# global Redis
redisHost = os.getenv("REDIS_HOST", "localhost")
redisPort = int(os.getenv("REDIS_PORT", "6379"))
setKey = "values"

# Postgres
pgUser = os.getenv("PGUSER")
pgHost = os.getenv("PGHOST")
pgDatabase = os.getenv("PGDATABASE")
pgPassword = os.getenv("PGPASSWORD")
pgPort = int(os.getenv("PGPORT","5432"))
try:
  pgConnection = psycopg2.connect(host=pgHost,database=pgDatabase, user=pgUser, password=pgPassword, port=pgPort)
  pgCursor = pgConnection.cursor()
  pgCursor.execute('CREATE TABLE IF NOT EXISTS values (number INT)')
  pgCursor.close()
except Exception as e:
  print(str(e))

@app.route('/')
def hello():
    return 'Hi'

@app.route('/values/all')
def getAll():
  values = []
  pgCursor = pgConnection.cursor()
  pgCursor.execute('SELECT number from values')
  for record in pgCursor.fetchall():
    result = {
      "number": record[0]
    }
    values.append(result)
  pgCursor.close()
  return jsonify(values)

@app.route('/values/current')
def getCurrent():
  redisGet = redis.Redis(host=redisHost, port=redisPort, db=0)
  result = {}
  for item in redisGet.smembers(setKey):
    value = redisGet.get(item)
    key = item.decode().replace(setKey, "")
    result[key] = value.decode()
  return jsonify(result)

@app.route('/values', methods = ['POST'])
def post():
  postedData = request.get_json()
  validIndex = True
  number = 0

  if "index" not in postedData:
    validIndex = False
  else:
    index = postedData["index"]
    try:
      number = int(index)
      if (number > 40):
        validIndex = False
    except:
      validIndex = False

  if (validIndex == False):
    response = {
      "working": False,
      "message": "Invalid Index!"
    }
    return make_response(jsonify(response), 422)

  pgCursor = pgConnection.cursor()
  pgCursor.execute('INSERT INTO values(number) VALUES(%s)', [number])
  pgCursor.close()

  redisKey = setKey + index
  redisSet = redis.Redis(host=redisHost, port=redisPort, db=0)
  redisSet.set(redisKey, "Nothing yet!")
  redisSet.sadd(setKey, redisKey)
  redisSet.publish("message", index)

  response = {
    "working": True
  }
  return jsonify(response)

if __name__=="__main__":
  app.run(host='0.0.0.0')
15 modify the 'requirements.txt` dependecies document
Flask
redis
python-psycopg2
- Test if the
docker imagecan be built with success
Juan.Pablo.Perez@RIMDUB-0232 MINGW64 ~/OneDrive/Training/Docker/DockerAndKubernetes.TheCompleteGuide/python-complex/server
$ docker build .
Sending build context to Docker daemon   12.8kB
Step 1/6 : FROM python:3-alpine
 ---> aadc3feb2b19
Step 2/6 : WORKDIR /app
 ---> Using cache
 ---> 7d8ce9ebb580
Step 3/6 : COPY requirements.txt .
 ---> Using cache
 ---> a804e0b71065
Step 4/6 : RUN pip install --no-cache-dir -r requirements.txt
 ---> Using cache
 ---> c79c7cc534fb
Step 5/6 : COPY . .
 ---> 5bc6844d029c
Step 6/6 : CMD ["python", "app.py"]
 ---> Running in a661a3e071e2
Removing intermediate container a661a3e071e2
 ---> f0345cefcd7b
Successfully built f0345cefcd7b
SECURITY WARNING: You are building a Docker image from Windows against a non-Windows Docker host. All files and directories added to build context will have '-rwxr-xr-x' permissions. It is recommended to double check and reset permissions for sensitive files and directories.
Create the worker application using python
- Create the
workerfolder from the mainpython-complexfolder
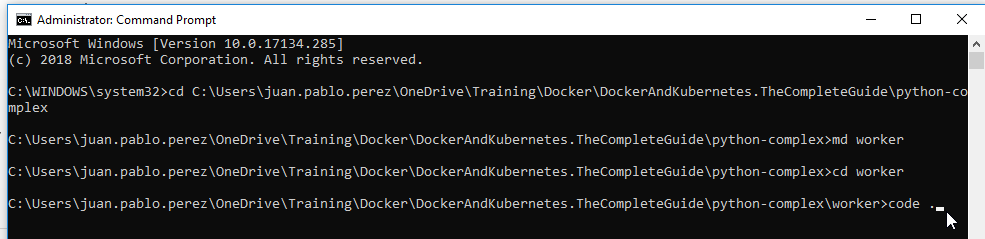
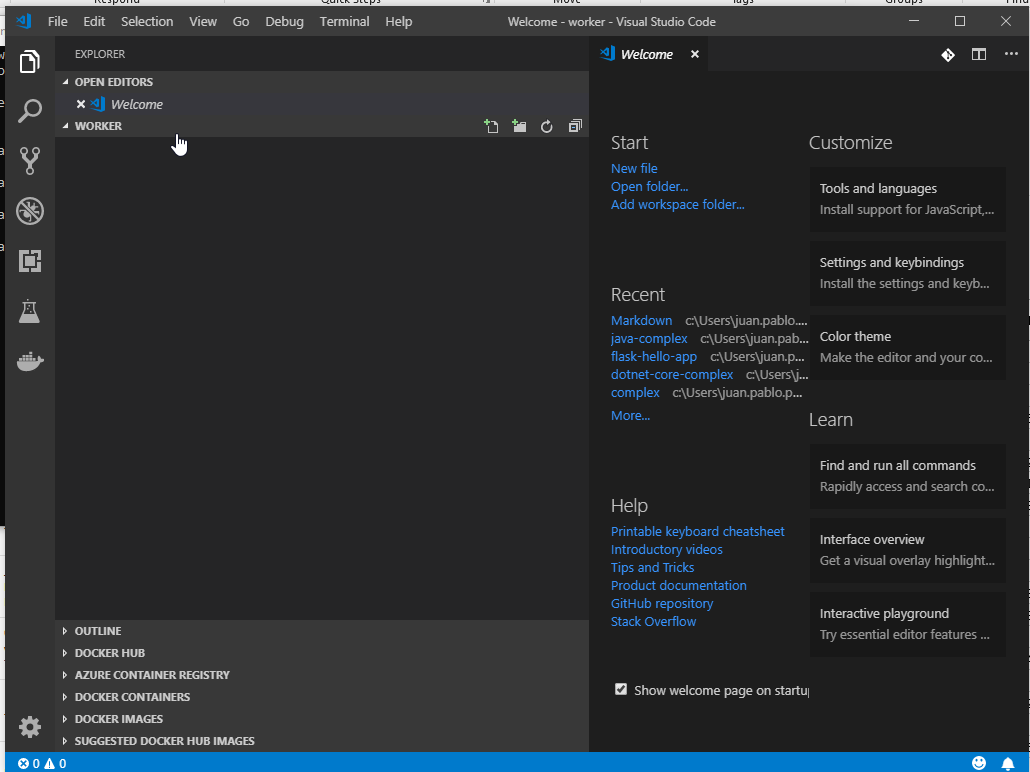
- Open the
Visual Studio Codefrom the new folder created usingcode .
- Create the main
app.pywith the standardHello, World!code.
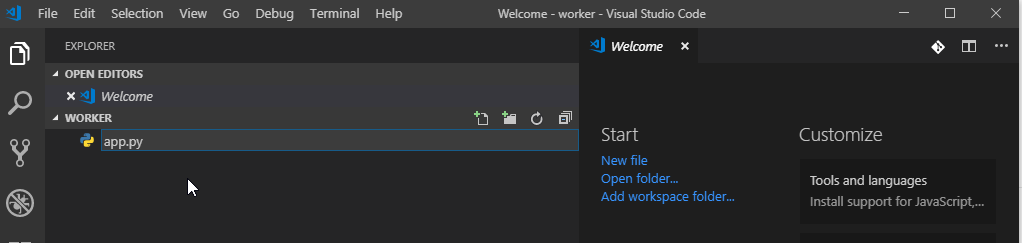
app.py
print("Hello World")
- Execute the new program created
Juan.Pablo.Perez@RIMDUB-0232 MINGW64 ~/OneDrive/Training/Docker/DockerAndKubernetes.TheCompleteGuide/python-complex/worker
$ python app.py
Hello World
- Create a
Dockerfilethat will be use to generate a Docker image with the application
FROM python:3

WORKDIR /usr/src/app

COPY . .

CMD [ "python", "./app.py" ]
- Build the
Dockerimage with theDocker build .command
Juan.Pablo.Perez@RIMDUB-0232 MINGW64 ~/OneDrive/Training/Docker/DockerAndKubernetes.TheCompleteGuide/python-complex/worker
$ docker build .
Sending build context to Docker daemon  6.144kB
Step 1/4 : FROM python:3
3: Pulling from library/python
54f7e8ac135a: Pull complete
d6341e30912f: Pull complete
087a57faf949: Pull complete
5d71636fb824: Pull complete
0c1db9598990: Pull complete
bfb904e99f24: Pull complete
78a3d3a96a32: Pull complete
885a0ed92c89: Pull complete
dd7cc9ace242: Pull complete
Digest: sha256:3870d35b962a943df72d948580fc66ceaaee1c4fbd205930f32e0f0760eb1077
Status: Downloaded newer image for python:3
 ---> 1e80caffd59e
Step 2/4 : WORKDIR /usr/src/app
 ---> Running in 66ab64209a57
Removing intermediate container 66ab64209a57
 ---> 7f366981f588
Step 3/4 : COPY . .
 ---> 8e5001d6065b
Step 4/4 : CMD [ "python", "./app.py" ]
 ---> Running in 9230bccf9beb
Removing intermediate container 9230bccf9beb
 ---> 1f55013313a3
Successfully built 1f55013313a3
SECURITY WARNING: You are building a Docker image from Windows against a non-Windows Docker host. All files and directories added to build context will have '-rwxr-xr-x' permissions. It is recommended to double check and reset permissions for sensitive files and directories.
- Run the
Dockerimage locally using thedocker runcommand
Juan.Pablo.Perez@RIMDUB-0232 MINGW64 ~/OneDrive/Training/Docker/DockerAndKubernetes.TheCompleteGuide/python-complex/worker
$ docker run 1f55013313a3
Hello World
- Use the
slimversion
FROM python:3-slim

WORKDIR /usr/src/app

COPY . .

CMD [ "python", "./app.py" ]
Juan.Pablo.Perez@RIMDUB-0232 MINGW64 ~/OneDrive/Training/Docker/DockerAndKubernetes.TheCompleteGuide/python-complex/worker
$ docker build .
Sending build context to Docker daemon  6.144kB
Step 1/4 : FROM python:3-slim
3-slim: Pulling from library/python
a5a6f2f73cd8: Already exists
3a6fba040982: Pull complete
738ebe0cf907: Pull complete
a4b11c375c52: Pull complete
02c57c00f1bc: Pull complete
Digest: sha256:a12ff381e851ef3a0d9e03d9c31c0fa638bde3ec3b072589e549e472f43db867
Status: Downloaded newer image for python:3-slim
 ---> eda33421b45b
Step 2/4 : WORKDIR /usr/src/app
 ---> Running in ffc17fee8b20
Removing intermediate container ffc17fee8b20
 ---> bae9e829bdc0
Step 3/4 : COPY . .
 ---> 6dbaf6f3611a
Step 4/4 : CMD [ "python", "./app.py" ]
 ---> Running in f56a476dd684
Removing intermediate container f56a476dd684
 ---> 4517ea5587fc
Successfully built 4517ea5587fc
SECURITY WARNING: You are building a Docker image from Windows against a non-Windows Docker host. All files and directories added to build context will have '-rwxr-xr-x' permissions. It is recommended to double check and reset permissions for sensitive files and directories.

Juan.Pablo.Perez@RIMDUB-0232 MINGW64 ~/OneDrive/Training/Docker/DockerAndKubernetes.TheCompleteGuide/python-complex/worker
$ docker run 4517ea5587fc
Hello World
- Use the
alpineversion
FROM python:3-alpine

WORKDIR /app

COPY . .

CMD [ "python", "./app.py" ]
Juan.Pablo.Perez@RIMDUB-0232 MINGW64 ~/OneDrive/Training/Docker/DockerAndKubernetes.TheCompleteGuide/python-complex/worker
$ docker build .
Sending build context to Docker daemon  6.144kB
Step 1/4 : FROM python:3-alpine
3-alpine: Pulling from library/python
4fe2ade4980c: Already exists
7cf6a1d62200: Pull complete
d16bb326b4ba: Pull complete
ed7df901e9a8: Pull complete
d7e55b1728aa: Pull complete
Digest: sha256:abc2a66d8ce0ddf14b1d51d4c1fe83f21059fa1c4952c02116cb9fd8d5cfd5c4
Status: Downloaded newer image for python:3-alpine
 ---> aadc3feb2b19
Step 2/4 : WORKDIR /app
 ---> Running in 88049447a6e0
Removing intermediate container 88049447a6e0
 ---> 7d8ce9ebb580
Step 3/4 : COPY . .
 ---> 924f452c8247
Step 4/4 : CMD [ "python", "./app.py" ]
 ---> Running in a430bd3385d8
Removing intermediate container a430bd3385d8
 ---> b1909c07e9e8
Successfully built b1909c07e9e8
SECURITY WARNING: You are building a Docker image from Windows against a non-Windows Docker host. All files and directories added to build context will have '-rwxr-xr-x' permissions. It is recommended to double check and reset permissions for sensitive files and directories.

Juan.Pablo.Perez@RIMDUB-0232 MINGW64 ~/OneDrive/Training/Docker/DockerAndKubernetes.TheCompleteGuide/python-complex/worker
$

Juan.Pablo.Perez@RIMDUB-0232 MINGW64 ~/OneDrive/Training/Docker/DockerAndKubernetes.TheCompleteGuide/python-complex/worker
$ docker run b1909c07e9e8
Hello World
- Install
redisexecuting thepip install redis
Juan.Pablo.Perez@RIMDUB-0232 MINGW64 ~/OneDrive/Training/Docker/DockerAndKubernetes.TheCompleteGuide/python-complex/worker$ pip install redisCollecting redis
  Downloading https://files.pythonhosted.org/packages/f5/00/5253aff5e747faf10d8ceb35fb5569b848cde2fdc13685d42fcf63118bbc/redis-3.0.1-py2.py3-none-any.whl (61kB)
    100% |████████████████████████████████| 71kB 613kB/s
Installing collected packages: redis
Successfully installed redis-3.0.1
- Modify
app.pyto include an example of the use ofredis
import redis
import os
redisHost = os.getenv("REDIS_HOST", "localhost")
redisPort = int(os.getenv("REDIS_PORT", "6379"))
r = redis.Redis(host=redisHost, port=redisPort, db=0)
r.set("foo", "bar")
get = r.get("foo")
print(get)
- Ensure
Redis Serveris running
C:\WINDOWS\system32>redis-server
[15568] 21 Nov 16:59:34.290 # Warning: no config file specified, using the default config. In order to specify a config file use redis-server /path/to/redis.conf
[15568] 21 Nov 16:59:34.296 # Creating Server TCP listening socket *:6379: bind: No such file or directory
- Execute the new
app.pyapplication
Juan.Pablo.Perez@RIMDUB-0232 MINGW64 ~/OneDrive/Training/Docker/DockerAndKubernetes.TheCompleteGuide/python-complex/worker
$ python app.py
b'bar'
By default, all responses are returned as bytes in Python 3 and str in Python 2. The user is responsible for decoding to Python 3 strings or Python 2 unicode objects.
- Modify the
app.pydocument to include the use of Redis with a subscriber
import redis
import os
import time

def fib(index):
  if (index < 2):
    return 1
  return fib(index - 1) + fib(index - 2)

def main():
  redisHost = os.getenv("REDIS_HOST", "localhost")
  redisPort = int(os.getenv("REDIS_PORT", "6379"))
  try:
    redisSubscription = redis.Redis(host=redisHost, port=redisPort, db=0)
    publishSubscription = redisSubscription.pubsub()
    publishSubscription.subscribe('message')
    while True:
      message = publishSubscription.get_message(ignore_subscribe_messages=True)
      if (message):
        data = message["data"]
        setKey = "values"
        redisKey = setKey + data
        redisSet = redis.Redis(host=redisHost, port=redisPort, db=0)
        redisSet.set(redisKey, str(fib(int(data))))
        redisSet.sadd(setKey, redisKey)
      time.sleep(1)
  except Exception as e:
    print(str(e))

if __name__=="__main__":
  main()
- Create the
requirements.txtdocument where all thepipdependencies will be included
redis
- Create the
Dockerdocument that will be used to create theDocker image
FROM python:3-alpine

WORKDIR /app

COPY requirements.txt .
RUN pip install --no-cache-dir -r requirements.txt

COPY . .

CMD [ "python", "app.py" ]
- Test if the
Docker imagecan be built with success
Juan.Pablo.Perez@RIMDUB-0232 MINGW64 ~/OneDrive/Training/Docker/DockerAndKubernetes.TheCompleteGuide/python-complex/worker
$ docker build .
Sending build context to Docker daemon   7.68kBStep 1/6 : FROM python:3-alpine ---> aadc3feb2b19
Step 2/6 : WORKDIR /app
 ---> Using cache
 ---> 7d8ce9ebb580
Step 3/6 : COPY requirements.txt .
 ---> 905139c1dedd
Step 4/6 : RUN pip install --no-cache-dir -r requirements.txt
 ---> Running in 86e927107bad
Collecting redis (from -r requirements.txt (line 1))
  Downloading https://files.pythonhosted.org/packages/f5/00/5253aff5e747faf10d8ceb35fb5569b848cde2fdc13685d42fcf63118bbc/redis-3.0.1-py2.py3-none-any.whl (61kB)
Installing collected packages: redis
Successfully installed redis-3.0.1
Removing intermediate container 86e927107bad
 ---> 328fdf573eb3
Step 5/6 : COPY . .
 ---> 316a91a3b984
Step 6/6 : CMD [ "python", "app.py" ]
 ---> Running in ce762db4b882
Removing intermediate container ce762db4b882
 ---> dbbdd10ceeb4
Successfully built dbbdd10ceeb4
SECURITY WARNING: You are building a Docker image from Windows against a non-Windows Docker host. All files and directories added to build context will have '-rwxr-xr-x' permissions. It is recommended to double check and reset permissions for sensitive files and directories.
Complete the solution copying the client and nginx projects from the original NodeJS solution and the Docker Compose file
- Copy the client and nginx projects from the original NodeJS solution without changing anything

- Initialite the
gitrepository
Juan.Pablo.Perez@RIMDUB-0232 MINGW64 ~/OneDrive/Training/Docker/DockerAndKubernetes.TheCompleteGuide/python-complex
$ git init
Initialized empty Git repository in C:/Users/juan.pablo.perez/OneDrive/Training/Docker/DockerAndKubernetes.TheCompleteGuide/python-complex/.git/
- Copy and modify the
.gitignoredocument
/client/node_modules
/server/__pycache__
/worker/__pycache__
- Ensure the Docker image for the
clientproject can be created with success
Juan.Pablo.Perez@RIMDUB-0232 MINGW64 ~/OneDrive/Training/Docker/DockerAndKubernetes.TheCompleteGuide/python-complex/client (master)
$ docker build .
Sending build context to Docker daemon    341kB
Step 1/10 : FROM node:alpine as builder
 ---> 4b3c025f5508
Step 2/10 : WORKDIR /app
 ---> Using cache
 ---> 1a05d05e0b5b
Step 3/10 : COPY ./package.json ./
 ---> 829609b8e407
Step 4/10 : RUN npm install
 ---> Running in e7f5850d65e0
npm WARN deprecated circular-json@0.3.3: CircularJSON is in maintenance only, flatted is its successor.
npm WARN deprecated kleur@2.0.2: Please upgrade to kleur@3 or migrate to 'ansi-colors' if you prefer the old syntax. Visit <https://github.com/lukeed/kleur/releases/tag/v3.0.0\> for migration path(s).
npm notice created a lockfile as package-lock.json. You should commit this file.
npm WARN optional SKIPPING OPTIONAL DEPENDENCY: fsevents@1.2.4 (node_modules/fsevents):
npm WARN notsup SKIPPING OPTIONAL DEPENDENCY: Unsupported platform for fsevents@1.2.4: wanted {"os":"darwin","arch":"any"} (current: {"os":"linux","arch":"x64"})

added 1687 packages from 666 contributors and audited 35695 packages in 71.602s
found 0 vulnerabilities

Removing intermediate container e7f5850d65e0
 ---> a2ca727a111e
Step 5/10 : COPY . .
 ---> 36ab04cab8d9
Step 6/10 : RUN npm run build
 ---> Running in 6ec55ef09faf

> client@0.1.0 build /app
> react-scripts build

Creating an optimized production build...
Compiled successfully.

File sizes after gzip:

  47.2 KB  build/static/js/1.7b85cb19.chunk.js
  1.37 KB  build/static/js/main.33dd28be.chunk.js
  763 B    build/static/js/runtime~main.229c360f.js
  510 B    build/static/css/main.0b4a1755.chunk.css

The project was built assuming it is hosted at the server root.
You can control this with the homepage field in your package.json.
For example, add this to build it for GitHub Pages:

  "homepage" : "http://myname.github.io/myapp",

The build folder is ready to be deployed.
You may serve it with a static server:

  yarn global add serve
  serve -s build

Find out more about deployment here:

  http://bit.ly/CRA-deploy

Removing intermediate container 6ec55ef09faf
 ---> 2172a22958f6
Step 7/10 : FROM nginx
 ---> e81eb098537d
Step 8/10 : EXPOSE 3000
 ---> Running in 38a46f74b42a
Removing intermediate container 38a46f74b42a
 ---> 021956dfacb6
Step 9/10 : COPY ./nginx/default.conf /etc/nginx/conf.d/default.conf
 ---> 8d1cbe255762
Step 10/10 : COPY --from=builder /app/build /usr/share/nginx/html
 ---> 0392d3cc41b7
Successfully built 0392d3cc41b7
SECURITY WARNING: You are building a Docker image from Windows against a non-Windows Docker host. All files and directories added to build context will have '-rwxr-xr-x' permissions. It is recommended to double check and reset permissions for sensitive files and directories.
- Ensure the Docker image for the
nginxproject can be created with success
Juan.Pablo.Perez@RIMDUB-0232 MINGW64 ~/OneDrive/Training/Docker/DockerAndKubernetes.TheCompleteGuide/python-complex/nginx (master)
$ docker build .
Sending build context to Docker daemon  4.096kB
Step 1/2 : FROM nginx
 ---> e81eb098537d
Step 2/2 : COPY ./default.conf /etc/nginx/conf.d/default.conf
 ---> 50d10a957186
Successfully built 50d10a957186
SECURITY WARNING: You are building a Docker image from Windows against a non-Windows Docker host. All files and directories added to build context will have '-rwxr-xr-x' permissions. It is recommended to double check and reset permissions for sensitive files and directories.
- Copy the 'docker-compose.yml' file from the NodeJs solution, modify it and execute it
version: '3'
services:
  postgres:
    image: 'postgres:latest'
  redis:
    image: 'redis:latest'
  nginx:
    restart: always
    build:
      dockerfile: Dockerfile.dev
      context: ./nginx
    ports:
      - '3050:80'
  api:
    build:
      dockerfile: Dockerfile
      context: ./server
    environment:
      - REDIS_HOST=redis
      - REDIS_PORT=6379
      - PGUSER=postgres
      - PGHOST=postgres
      - PGDATABASE=postgres
      - PGPASSWORD=postgres_password
      - PGPORT=5432
  client:
    build:
      dockerfile: Dockerfile.dev
      context: ./client
    volumes:
      - /app/node_modules
      - ./client:/app
  worker:
    build:
      dockerfile: Dockerfile
      context: ./worker
    environment:
        - REDIS_HOST=redis
        - REDIS_PORT=6379
Juan.Pablo.Perez@RIMDUB-0232 MINGW64 ~/OneDrive/Training/Docker/DockerAndKubernetes.TheCompleteGuide/python-complex (master)
$ docker-compose build
postgres uses an image, skipping
redis uses an image, skipping
Building nginx
Step 1/2 : FROM nginx
 ---> e81eb098537d
Step 2/2 : COPY ./default.conf /etc/nginx/conf.d/default.conf
 ---> Using cache
 ---> a94da78131c1
Successfully built a94da78131c1
Successfully tagged python-complex_nginx:latest
Building api
Step 1/6 : FROM python:3-alpine
 ---> aadc3feb2b19
Step 2/6 : WORKDIR /app
 ---> Using cache
 ---> 7d8ce9ebb580
Step 3/6 : COPY requirements.txt .
 ---> 3d4da674f53e
Step 4/6 : RUN pip install --no-cache-dir -r requirements.txt
 ---> Running in 19865d97f7a1
Collecting Flask (from -r requirements.txt (line 1))
  Downloading https://files.pythonhosted.org/packages/7f/e7/08578774ed4536d3242b14dacb4696386634607af824ea997202cd0edb4b/Flask-1.0.2-py2.py3-none-any.whl (91kB)
Collecting redis (from -r requirements.txt (line 2))
  Downloading https://files.pythonhosted.org/packages/f5/00/5253aff5e747faf10d8ceb35fb5569b848cde2fdc13685d42fcf63118bbc/redis-3.0.1-py2.py3-none-any.whl (61kB)
Collecting psycopg2 (from -r requirements.txt (line 3))
  Downloading https://files.pythonhosted.org/packages/c0/07/93573b97ed61b6fb907c8439bf58f09957564cf7c39612cef36c547e68c6/psycopg2-2.7.6.1.tar.gz (427kB)
    Complete output from command python setup.py egg_info:
    running egg_info
    creating pip-egg-info/psycopg2.egg-info
    writing pip-egg-info/psycopg2.egg-info/PKG-INFO
    writing dependency_links to pip-egg-info/psycopg2.egg-info/dependency_links.txt
    writing top-level names to pip-egg-info/psycopg2.egg-info/top_level.txt
    writing manifest file 'pip-egg-info/psycopg2.egg-info/SOURCES.txt'

    Error: pg_config executable not found.

    pg_config is required to build psycopg2 from source.  Please add the directory
    containing pg_config to the $PATH or specify the full executable path with the
    option:

        python setup.py build_ext --pg-config /path/to/pg_config build ...

    or with the pg_config option in 'setup.cfg'.

    If you prefer to avoid building psycopg2 from source, please install the PyPI
    'psycopg2-binary' package instead.

    For further information please check the 'doc/src/install.rst' file (also at
    <http://initd.org/psycopg/docs/install.html>).


    ----------------------------------------
Command "python setup.py egg_info" failed with error code 1 in /tmp/pip-install-ypurcf1a/psycopg2/
ERROR: Service 'api' failed to build: The command '/bin/sh -c pip install --no-cache-dir -r requirements.txt' returned a non-zero code: 1
- Modify the
Dockerfilefrom theserverproject, as explained in Error: pg_config executable not found when installing psycopg2 on Alpine in Docker and try again
FROM python:3-alpine

WORKDIR /app

COPY requirements.txt .

# https://stackoverflow.com/a/47871121/1059286
RUN apk update && \
 apk add postgresql-libs && \
 apk add --virtual .build-deps gcc musl-dev postgresql-dev && \
 python3 -m pip install -r requirements.txt --no-cache-dir && \
 apk --purge del .build-deps


COPY . .

CMD ["python3", "app.py"]
Juan.Pablo.Perez@RIMDUB-0232 MINGW64 ~/OneDrive/Training/Docker/DockerAndKubernetes.TheCompleteGuide/python-complex (master)
$ docker-compose build
postgres uses an image, skipping
redis uses an image, skipping
Building nginx
Step 1/2 : FROM nginx
 ---> e81eb098537d
Step 2/2 : COPY ./default.conf /etc/nginx/conf.d/default.conf
 ---> Using cache
 ---> a94da78131c1
Successfully built a94da78131c1
Successfully tagged python-complex_nginx:latest
Building api
Step 1/6 : FROM python:3-alpine
 ---> aadc3feb2b19
Step 2/6 : WORKDIR /app
 ---> Using cache
 ---> 7d8ce9ebb580
Step 3/6 : COPY requirements.txt .
 ---> 56f805df00d2
Step 4/6 : RUN apk update &&  apk add postgresql-libs &&  apk add --virtual .build-deps gcc musl-dev postgresql-dev &&  python3 -m pip install -r requirements.txt --no-cache-dir &&  apk --purge del .build-deps
 ---> Running in 021992f68479
fetch http://dl-cdn.alpinelinux.org/alpine/v3.8/main/x86_64/APKINDEX.tar.gz
fetch http://dl-cdn.alpinelinux.org/alpine/v3.8/community/x86_64/APKINDEX.tar.gz
v3.8.1-85-g6dd49eeff4 [http://dl-cdn.alpinelinux.org/alpine/v3.8/main]
v3.8.1-82-gde46139a22 [http://dl-cdn.alpinelinux.org/alpine/v3.8/community]
OK: 9547 distinct packages available
(1/5) Installing db (5.3.28-r0)
(2/5) Installing libsasl (2.1.26-r13)
(3/5) Installing libldap (2.4.46-r0)
(4/5) Installing libpq (10.5-r0)
(5/5) Installing postgresql-libs (10.5-r0)
OK: 19 MiB in 39 packages
(1/15) Installing binutils (2.30-r5)
(2/15) Installing gmp (6.1.2-r1)
(3/15) Installing isl (0.18-r0)
(4/15) Installing libgomp (6.4.0-r9)
(5/15) Installing libatomic (6.4.0-r9)
(6/15) Installing pkgconf (1.5.3-r0)
(7/15) Installing libgcc (6.4.0-r9)
(8/15) Installing mpfr3 (3.1.5-r1)
(9/15) Installing mpc1 (1.0.3-r1)
(10/15) Installing libstdc++ (6.4.0-r9)
(11/15) Installing gcc (6.4.0-r9)
(12/15) Installing musl-dev (1.1.19-r10)
(13/15) Installing libressl-dev (2.7.4-r0)
(14/15) Installing postgresql-dev (10.5-r0)
(15/15) Installing .build-deps (0)
Executing busybox-1.28.4-r1.trigger
OK: 137 MiB in 54 packages
Collecting Flask (from -r requirements.txt (line 1))
  Downloading https://files.pythonhosted.org/packages/7f/e7/08578774ed4536d3242b14dacb4696386634607af824ea997202cd0edb4b/Flask-1.0.2-py2.py3-none-any.whl (91kB)
Collecting redis (from -r requirements.txt (line 2))
  Downloading https://files.pythonhosted.org/packages/f5/00/5253aff5e747faf10d8ceb35fb5569b848cde2fdc13685d42fcf63118bbc/redis-3.0.1-py2.py3-none-any.whl (61kB)
Collecting psycopg2==2.7.3.1 (from -r requirements.txt (line 3))
  Downloading https://files.pythonhosted.org/packages/6b/fb/15c687eda2f925f0ff59373063fdb408471b4284714a7761daaa65c01f15/psycopg2-2.7.3.1.tar.gz (425kB)
Collecting Jinja2>=2.10 (from Flask->-r requirements.txt (line 1))
  Downloading https://files.pythonhosted.org/packages/7f/ff/ae64bacdfc95f27a016a7bed8e8686763ba4d277a78ca76f32659220a731/Jinja2-2.10-py2.py3-none-any.whl (126kB)
Collecting click>=5.1 (from Flask->-r requirements.txt (line 1))
  Downloading https://files.pythonhosted.org/packages/fa/37/45185cb5abbc30d7257104c434fe0b07e5a195a6847506c074527aa599ec/Click-7.0-py2.py3-none-any.whl (81kB)
Collecting itsdangerous>=0.24 (from Flask->-r requirements.txt (line 1))
  Downloading https://files.pythonhosted.org/packages/76/ae/44b03b253d6fade317f32c24d100b3b35c2239807046a4c953c7b89fa49e/itsdangerous-1.1.0-py2.py3-none-any.whl
Collecting Werkzeug>=0.14 (from Flask->-r requirements.txt (line 1))
  Downloading https://files.pythonhosted.org/packages/20/c4/12e3e56473e52375aa29c4764e70d1b8f3efa6682bef8d0aae04fe335243/Werkzeug-0.14.1-py2.py3-none-any.whl (322kB)
Collecting MarkupSafe>=0.23 (from Jinja2>=2.10->Flask->-r requirements.txt (line 1))
  Downloading https://files.pythonhosted.org/packages/ac/7e/1b4c2e05809a4414ebce0892fe1e32c14ace86ca7d50c70f00979ca9b3a3/MarkupSafe-1.1.0.tar.gz
Installing collected packages: MarkupSafe, Jinja2, click, itsdangerous, Werkzeug, Flask, redis, psycopg2
  Running setup.py install for MarkupSafe: started
    Running setup.py install for MarkupSafe: finished with status 'done'
  Running setup.py install for psycopg2: started
    Running setup.py install for psycopg2: finished with status 'done'
Successfully installed Flask-1.0.2 Jinja2-2.10 MarkupSafe-1.1.0 Werkzeug-0.14.1 click-7.0 itsdangerous-1.1.0 psycopg2-2.7.3.1 redis-3.0.1
(1/15) Purging .build-deps (0)
(2/15) Purging gcc (6.4.0-r9)
(3/15) Purging binutils (2.30-r5)
(4/15) Purging libatomic (6.4.0-r9)
(5/15) Purging libgomp (6.4.0-r9)
(6/15) Purging musl-dev (1.1.19-r10)
(7/15) Purging postgresql-dev (10.5-r0)
(8/15) Purging libressl-dev (2.7.4-r0)
(9/15) Purging mpc1 (1.0.3-r1)
(10/15) Purging mpfr3 (3.1.5-r1)
(11/15) Purging isl (0.18-r0)
(12/15) Purging gmp (6.1.2-r1)
(13/15) Purging pkgconf (1.5.3-r0)
(14/15) Purging libstdc++ (6.4.0-r9)
(15/15) Purging libgcc (6.4.0-r9)
Executing busybox-1.28.4-r1.trigger
OK: 19 MiB in 39 packages
Removing intermediate container 021992f68479
 ---> 687d69286785
Step 5/6 : COPY . .
 ---> c17a7501c88a
Step 6/6 : CMD ["python3", "app.py"]
 ---> Running in e732e0a4a3fa
Removing intermediate container e732e0a4a3fa
 ---> 389d7f455cf3
Successfully built 389d7f455cf3
Successfully tagged python-complex_api:latest
Building client
Step 1/6 : FROM node:alpine
 ---> 4b3c025f5508
Step 2/6 : WORKDIR /app
 ---> Using cache
 ---> 1a05d05e0b5b
Step 3/6 : COPY package.json .
 ---> Using cache
 ---> 15dd7c6bc9bd
Step 4/6 : RUN npm install
 ---> Using cache
 ---> 810576e9d194
Step 5/6 : COPY . .
 ---> 2a8d4e9da941
Step 6/6 : CMD ["npm", "run", "start"]
 ---> Running in 0554258f7a94
Removing intermediate container 0554258f7a94
 ---> d78e004ac5aa
Successfully built d78e004ac5aa
Successfully tagged python-complex_client:latest
Building worker
Step 1/6 : FROM python:3-alpine
 ---> aadc3feb2b19
Step 2/6 : WORKDIR /app
 ---> Using cache
 ---> 7d8ce9ebb580
Step 3/6 : COPY requirements.txt .
 ---> Using cache
 ---> 42e8728945af
Step 4/6 : RUN pip install --no-cache-dir -r requirements.txt
 ---> Using cache
 ---> 7b21e35b2ecc
Step 5/6 : COPY . .
 ---> Using cache
 ---> 654dd2035173
Step 6/6 : CMD [ "python", "app.py" ]
 ---> Using cache
 ---> 60c28185a387
Successfully built 60c28185a387
Successfully tagged python-complex_worker:latest
Juan.Pablo.Perez@RIMDUB-0232 MINGW64 ~/OneDrive/Training/Docker/DockerAndKubernetes.TheCompleteGuide/python-complex (master)
$ docker-compose up
Starting python-complex_worker_1_b7f440906f5e   ... done
Recreating python-complex_client_1_b0d6ee0fd79d ... done
Starting python-complex_redis_1_7b9d17a31a18    ... done
Starting python-complex_postgres_1_2e15e0bcc6c1 ... done
Starting python-complex_nginx_1_a950d41c6d03    ... done
Recreating python-complex_api_1_69e256d22996    ... done
Attaching to python-complex_redis_1_7b9d17a31a18, python-complex_postgres_1_2e15e0bcc6c1, python-complex_worker_1_b7f440906f5e, python-complex_nginx_1_a950d41c6d03, python-complex_api_1_69e256d22996, python-complex_client_1_b0d6ee0fd79d
redis_1_7b9d17a31a18 | 1:C 24 Nov 2018 06:06:20.031 # oO0OoO0OoO0Oo Redis is starting oO0OoO0OoO0Oo
redis_1_7b9d17a31a18 | 1:C 24 Nov 2018 06:06:20.042 # Redis version=5.0.1, bits=64, commit=00000000, modified=0, pid=1, just started
redis_1_7b9d17a31a18 | 1:C 24 Nov 2018 06:06:20.042 # Warning: no config file specified, using the default config. In order to specify a config file use redis-server /path/to/redis.conf
redis_1_7b9d17a31a18 | 1:M 24 Nov 2018 06:06:20.043 * Running mode=standalone, port=6379.
redis_1_7b9d17a31a18 | 1:M 24 Nov 2018 06:06:20.044 # WARNING: The TCP backlog setting of 511 cannot be enforced because /proc/sys/net/core/somaxconn is set to the lower value of 128.
redis_1_7b9d17a31a18 | 1:M 24 Nov 2018 06:06:20.044 # Server initialized
redis_1_7b9d17a31a18 | 1:M 24 Nov 2018 06:06:20.044 # WARNING you have Transparent Huge Pages (THP) support enabled in your kernel. This will create latency and memory usage issues with Redis. To fix this issue run the command 'echo never > /sys/kernel/mm/transparent_hugepage/enabled' as root, and add it to your /etc/rc.local in order to retain the setting after a reboot. Redis must be restarted after THP is disabled.
redis_1_7b9d17a31a18 | 1:M 24 Nov 2018 06:06:20.044 * DB loaded from disk: 0.000 seconds
redis_1_7b9d17a31a18 | 1:M 24 Nov 2018 06:06:20.044 * Ready to accept connections
postgres_1_2e15e0bcc6c1 | 2018-11-24 06:06:21.419 UTC [1] LOG:  listening on IPv4 address "0.0.0.0", port 5432
postgres_1_2e15e0bcc6c1 | 2018-11-24 06:06:21.419 UTC [1] LOG:  listening on IPv6 address "::", port 5432
postgres_1_2e15e0bcc6c1 | 2018-11-24 06:06:21.463 UTC [1] LOG:  listening on Unix socket "/var/run/postgresql/.s.PGSQL.5432"
postgres_1_2e15e0bcc6c1 | 2018-11-24 06:06:21.992 UTC [22] LOG:  database system was shut down at 2018-11-24 05:32:45 UTC
postgres_1_2e15e0bcc6c1 | 2018-11-24 06:06:22.001 UTC [1] LOG:  database system is ready to accept connections
client_1_b0d6ee0fd79d |
client_1_b0d6ee0fd79d | > client@0.1.0 start /app
client_1_b0d6ee0fd79d | > react-scripts start
client_1_b0d6ee0fd79d |
api_1_69e256d22996 |  * Serving Flask app "app" (lazy loading)
api_1_69e256d22996 |  * Environment: production
api_1_69e256d22996 |    WARNING: Do not use the development server in a production environment.
api_1_69e256d22996 |    Use a production WSGI server instead.
api_1_69e256d22996 |  * Debug mode: off
api_1_69e256d22996 |  * Running on http://0.0.0.0:5000/ (Press CTRL+C to quit)
client_1_b0d6ee0fd79d | Starting the development server...
client_1_b0d6ee0fd79d |
client_1_b0d6ee0fd79d | Compiled successfully!
client_1_b0d6ee0fd79d |
client_1_b0d6ee0fd79d | You can now view client in the browser.
client_1_b0d6ee0fd79d |
client_1_b0d6ee0fd79d |   Local:            http://localhost:3000/
client_1_b0d6ee0fd79d |   On Your Network:  http://172.18.0.7:3000/
client_1_b0d6ee0fd79d |
client_1_b0d6ee0fd79d | Note that the development build is not optimized.
client_1_b0d6ee0fd79d | To create a production build, use yarn build.
client_1_b0d6ee0fd79d |
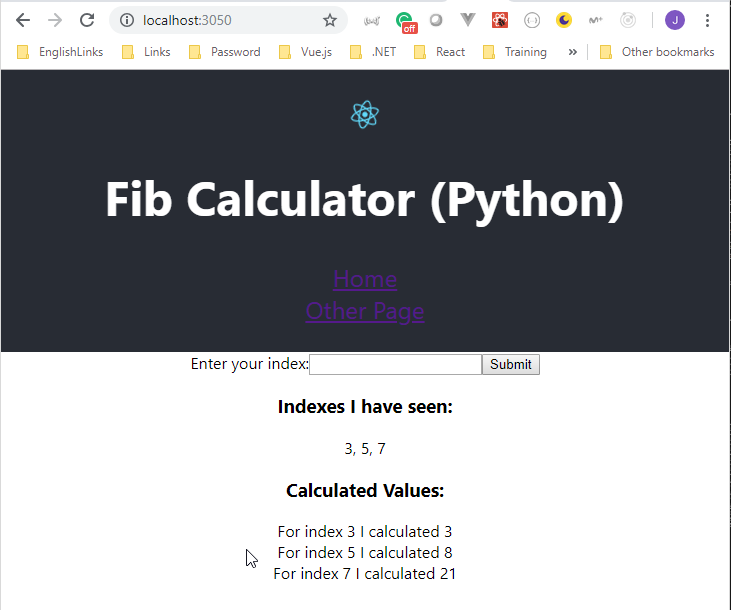
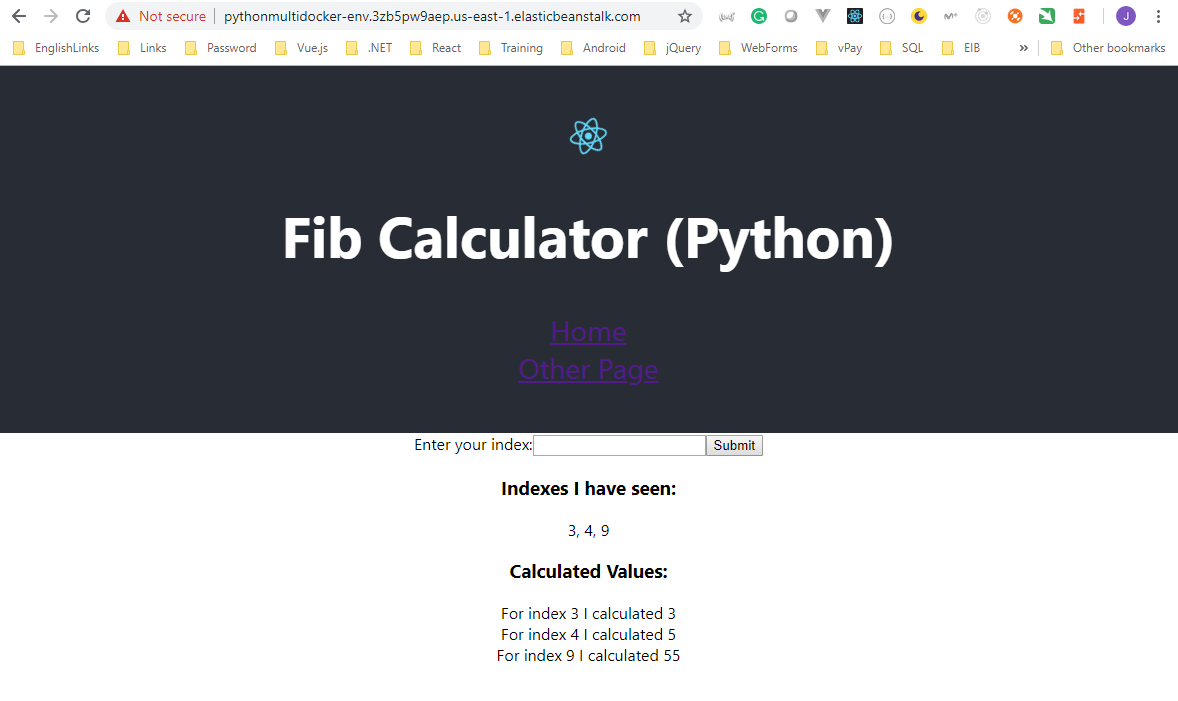
- Ensure the application is executed properly on
http://localhost:3050/
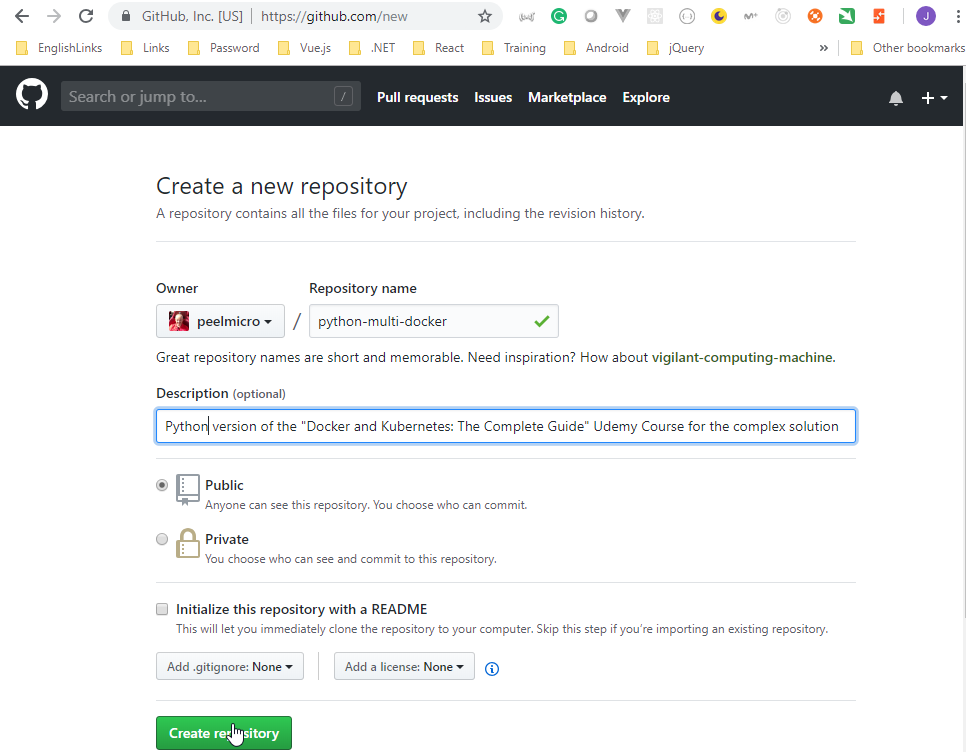
- Create the new
python-multi-dockerrepository
- Link the project to the new repository and push the first commit.
Juan.Pablo.Perez@RIMDUB-0232 MINGW64 ~/OneDrive/Training/Docker/DockerAndKubernetes.TheCompleteGuide/python-complex (master)
$ git status
On branch master

No commits yet

Untracked files:
  (use "git add <file>..." to include in what will be committed)

        .gitignore
        README.md
        client/
        docker-compose.yml
        nginx/
        server/
        worker/

nothing added to commit but untracked files present (use "git add" to track)
Juan.Pablo.Perez@RIMDUB-0232 MINGW64 ~/OneDrive/Training/Docker/DockerAndKubernetes.TheCompleteGuide/python-complex (master)
$ git add .
Juan.Pablo.Perez@RIMDUB-0232 MINGW64 ~/OneDrive/Training/Docker/DockerAndKubernetes.TheCompleteGuide/python-complex (master)
$ git status
On branch master

No commits yet

Changes to be committed:
  (use "git rm --cached <file>..." to unstage)

        new file:   .gitignore
        new file:   README.md
        new file:   client/.gitignore
        new file:   client/Dockerfile
        new file:   client/Dockerfile.dev
        new file:   client/README.md
        new file:   client/nginx/default.conf
        new file:   client/package.json
        new file:   client/public/favicon.ico
        new file:   client/public/index.html
        new file:   client/public/manifest.json
        new file:   client/src/App.css
        new file:   client/src/App.js
        new file:   client/src/App.test.js
        new file:   client/src/Fib.js
        new file:   client/src/OtherPage.js
        new file:   client/src/index.css
        new file:   client/src/index.js
        new file:   client/src/logo.svg
        new file:   client/src/serviceWorker.js
        new file:   client/yarn.lock
        new file:   docker-compose.yml
        new file:   nginx/Dockerfile
        new file:   nginx/Dockerfile.dev
        new file:   nginx/default.conf
        new file:   server/.vscode/launch.json
        new file:   server/Dockerfile
        new file:   server/app.py
        new file:   server/requirements.txt
        new file:   worker/.vscode/launch.json
        new file:   worker/Dockerfile
        new file:   worker/app.py
        new file:   worker/requirements.txt
Juan.Pablo.Perez@RIMDUB-0232 MINGW64 ~/OneDrive/Training/Docker/DockerAndKubernetes.TheCompleteGuide/python-complex (master)
$ git commit -m "first commit"
[master (root-commit) 4bd82c8] first commit
 33 files changed, 9464 insertions(+)
 create mode 100644 .gitignore
 create mode 100644 README.md
 create mode 100644 client/.gitignore
 create mode 100644 client/Dockerfile
 create mode 100644 client/Dockerfile.dev
 create mode 100644 client/README.md
 create mode 100644 client/nginx/default.conf
 create mode 100644 client/package.json
 create mode 100644 client/public/favicon.ico
 create mode 100644 client/public/index.html
 create mode 100644 client/public/manifest.json
 create mode 100644 client/src/App.css
 create mode 100644 client/src/App.js
 create mode 100644 client/src/App.test.js
 create mode 100644 client/src/Fib.js
 create mode 100644 client/src/OtherPage.js
 create mode 100644 client/src/index.css
 create mode 100644 client/src/index.js
 create mode 100644 client/src/logo.svg
 create mode 100644 client/src/serviceWorker.js
 create mode 100644 client/yarn.lock
 create mode 100644 docker-compose.yml
 create mode 100644 nginx/Dockerfile
 create mode 100644 nginx/Dockerfile.dev
 create mode 100644 nginx/default.conf
 create mode 100644 server/.vscode/launch.json
 create mode 100644 server/Dockerfile
 create mode 100644 server/app.py
 create mode 100644 server/requirements.txt
 create mode 100644 worker/.vscode/launch.json
 create mode 100644 worker/Dockerfile
 create mode 100644 worker/app.py
 create mode 100644 worker/requirements.txt
Juan.Pablo.Perez@RIMDUB-0232 MINGW64 ~/OneDrive/Training/Docker/DockerAndKubernetes.TheCompleteGuide/python-complex (master)
$ git remote add origin https://github.com/peelmicro/python-multi-docker.git
Juan.Pablo.Perez@RIMDUB-0232 MINGW64 ~/OneDrive/Training/Docker/DockerAndKubernetes.TheCompleteGuide/python-complex (master)
$ git push origin HEAD
Counting objects: 43, done.
Delta compression using up to 4 threads.
Compressing objects: 100% (38/38), done.
Writing objects: 100% (43/43), 93.81 KiB | 990.00 KiB/s, done.
Total 43 (delta 1), reused 0 (delta 0)
remote: Resolving deltas: 100% (1/1), done.
remote:
remote: Create a pull request for 'master' on GitHub by visiting:
remote:      https://github.com/peelmicro/python-multi-docker/pull/new/master
remote:
To https://github.com/peelmicro/python-multi-docker.git
 * [new branch]      HEAD -> master
- Prepare the integration with Travis CI
- Create the following
.travis.ymldocument (where the deployment on Amazon AWS is commented out)
sudo: required
language: node_js
node_js:
- "8"
services:
- docker
before_install:
- docker build -t peelmicro/test-client -f ./client/Dockerfile.dev ./client
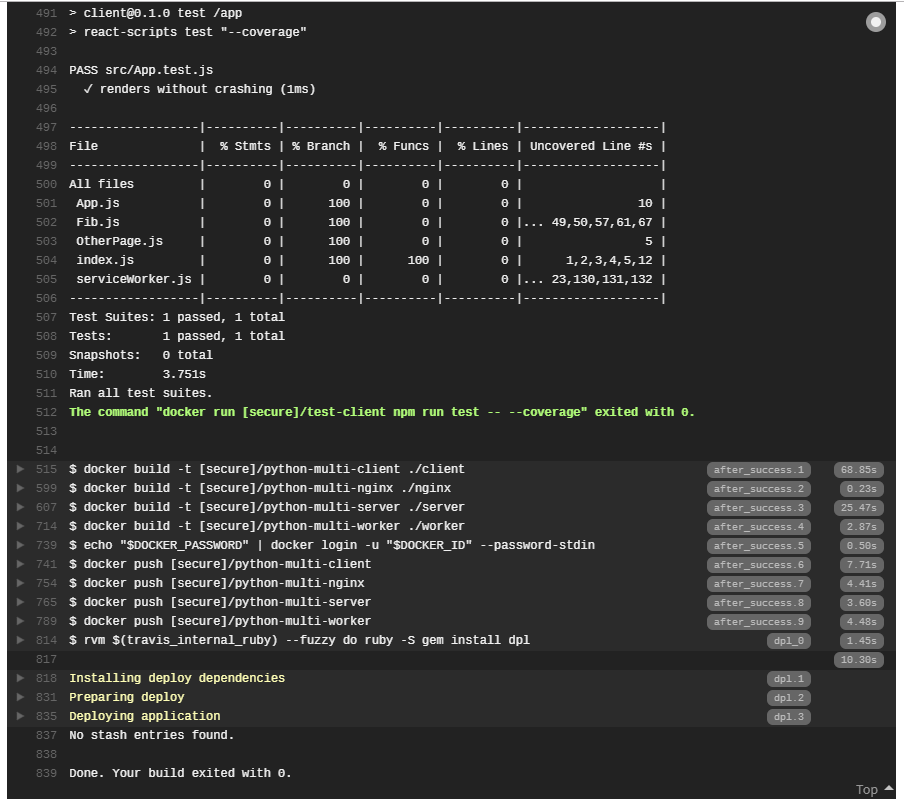
script:
- docker run peelmicro/test-client npm run test -- --coverage
after_success:
- docker build -t peelmicro/python-multi-client ./client
- docker build -t peelmicro/python-multi-nginx ./nginx
- docker build -t peelmicro/python-multi-server ./server
- docker build -t peelmicro/python-multi-worker ./worker
# Log in to the docker CLI
- echo "$DOCKER_PASSWORD" | docker login -u "$DOCKER_ID" --password-stdin
# Take those images and push them to docker hub
- docker push peelmicro/python-multi-client
- docker push peelmicro/python-multi-nginx
- docker push peelmicro/python-multi-server
- docker push peelmicro/python-multi-worker
# deploy:
# provider: elasticbeanstalk
# region: "us-east-1"
# app: "python-muti-docker"
# env: "pythonMutiDocker-env"
# bucket_name: "elasticbeanstalk-us-east-1-972569889348"
# #bucket_path: ""
# on:
# branch: "master"
# access_key_id: $AWS_ACCESS_KEY
# secret_access_key:
# secure: "$AWS_SECRET_KEY"
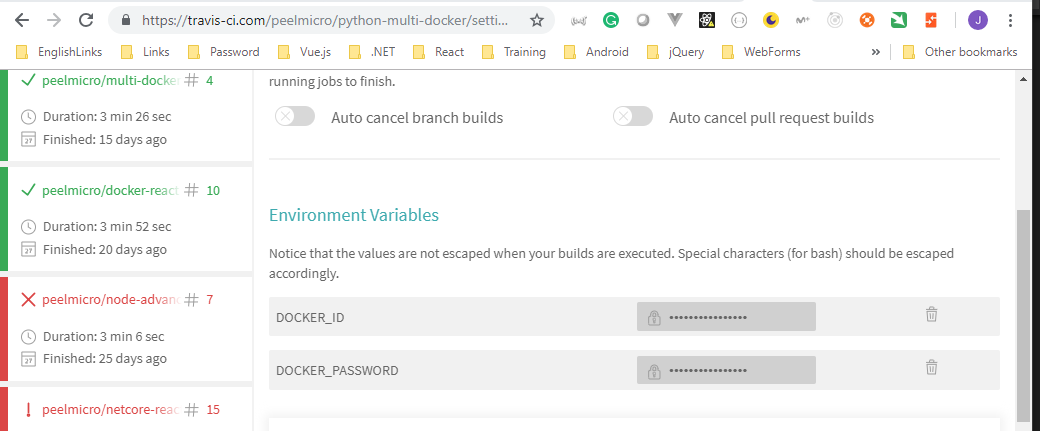
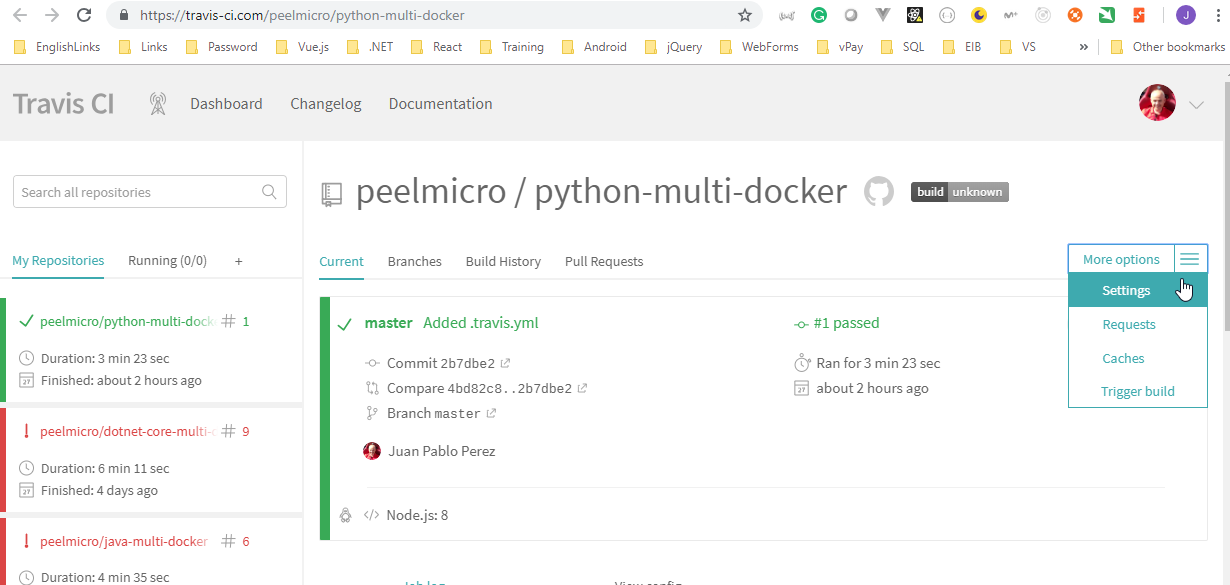
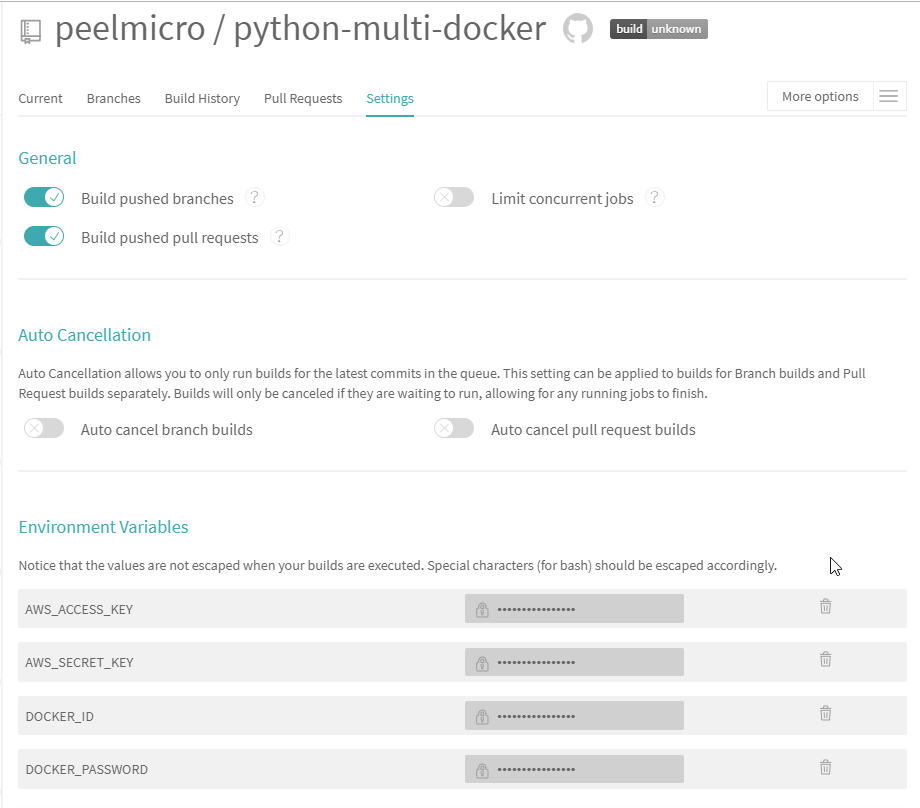
- Access the
python-multi-dockerrepository on Travis CI
- Click on
More Options -> Settingto add theDOCKER_PASSWORDandDOCKER_IDenvironment variables
- Create and push a new commit to include the new
.travis.ymlfile and force Travis to execute it.
Juan.Pablo.Perez@RIMDUB-0232 MINGW64 ~/OneDrive/Training/Docker/DockerAndKubernetes.TheCompleteGuide/python-complex (master)
$ git status
On branch master
Untracked files:
  (use "git add <file>..." to include in what will be committed)

        .travis.yml

nothing added to commit but untracked files present (use "git add" to track)
Juan.Pablo.Perez@RIMDUB-0232 MINGW64 ~/OneDrive/Training/Docker/DockerAndKubernetes.TheCompleteGuide/python-complex (master)
$ git add .
Juan.Pablo.Perez@RIMDUB-0232 MINGW64 ~/OneDrive/Training/Docker/DockerAndKubernetes.TheCompleteGuide/python-complex (master)
$ git commit -m "Added .travis.yml"
[master 2b7dbe2] Added .travis.yml
 1 file changed, 34 insertions(+)
 create mode 100644 .travis.yml
Juan.Pablo.Perez@RIMDUB-0232 MINGW64 ~/OneDrive/Training/Docker/DockerAndKubernetes.TheCompleteGuide/python-complex (master)
$ git push origin HEAD
Counting objects: 3, done.
Delta compression using up to 4 threads.
Compressing objects: 100% (3/3), done.
Writing objects: 100% (3/3), 770 bytes | 192.00 KiB/s, done.
Total 3 (delta 1), reused 0 (delta 0)
remote: Resolving deltas: 100% (1/1), completed with 1 local object.
To https://github.com/peelmicro/python-multi-docker.git
  4bd82c8..2b7dbe2  HEAD -> master
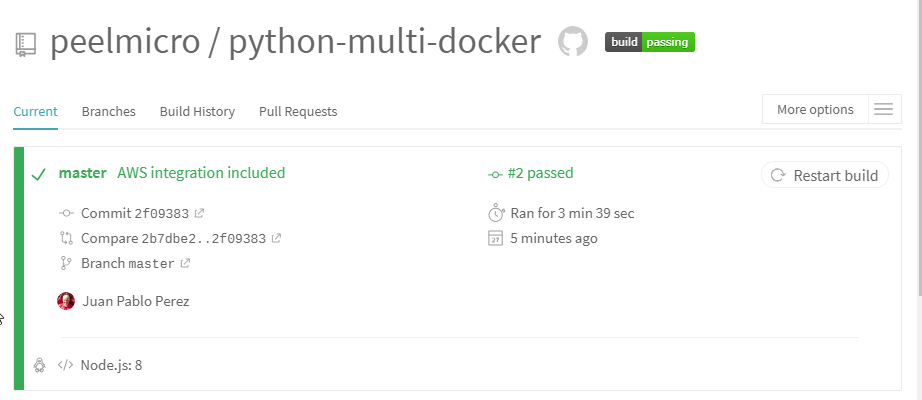
- Ensure the new Build has started on Travis CI.
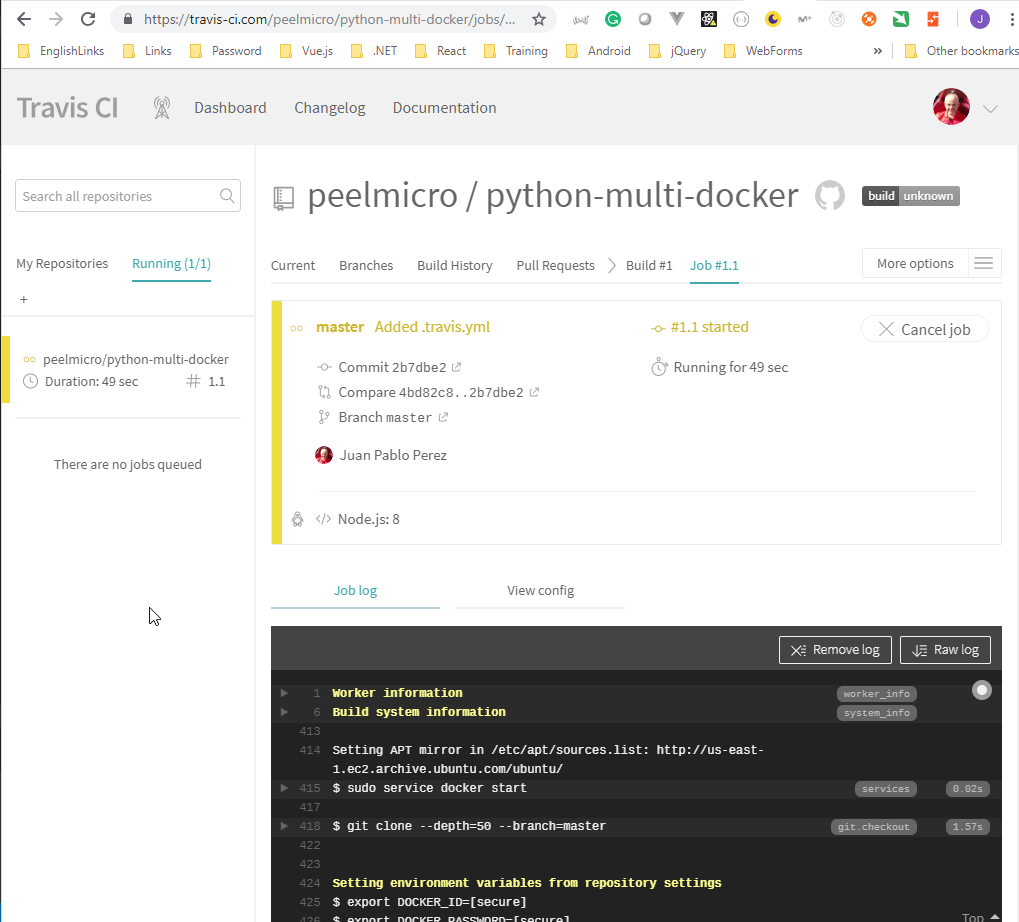
Travis CI View Config
{
  "os": "linux",
  "dist": "trusty",
  "sudo": "required",
  "group": "stable",
  "script": [
    "docker run peelmicro/test-client npm run test -- --coverage"
  ],
  "node_js": "8",
  "language": "node_js",
  "services": [
    "docker"
  ],
  "after_success": [
    "docker build -t peelmicro/python-multi-client ./client",
    "docker build -t peelmicro/python-multi-nginx ./nginx",
    "docker build -t peelmicro/python-multi-server ./server",
    "docker build -t peelmicro/python-multi-worker ./worker",
    "echo \"$DOCKER_PASSWORD\" | docker login -u \"$DOCKER_ID\" --password-stdin",
    "docker push peelmicro/python-multi-client",
    "docker push peelmicro/python-multi-nginx",
    "docker push peelmicro/python-multi-server",
    "docker push peelmicro/python-multi-worker"
  ],
  "before_install": [
    "docker build -t peelmicro/test-client -f ./client/Dockerfile.dev ./client"
  ]
}
- Ensure the new Build has been executed with success
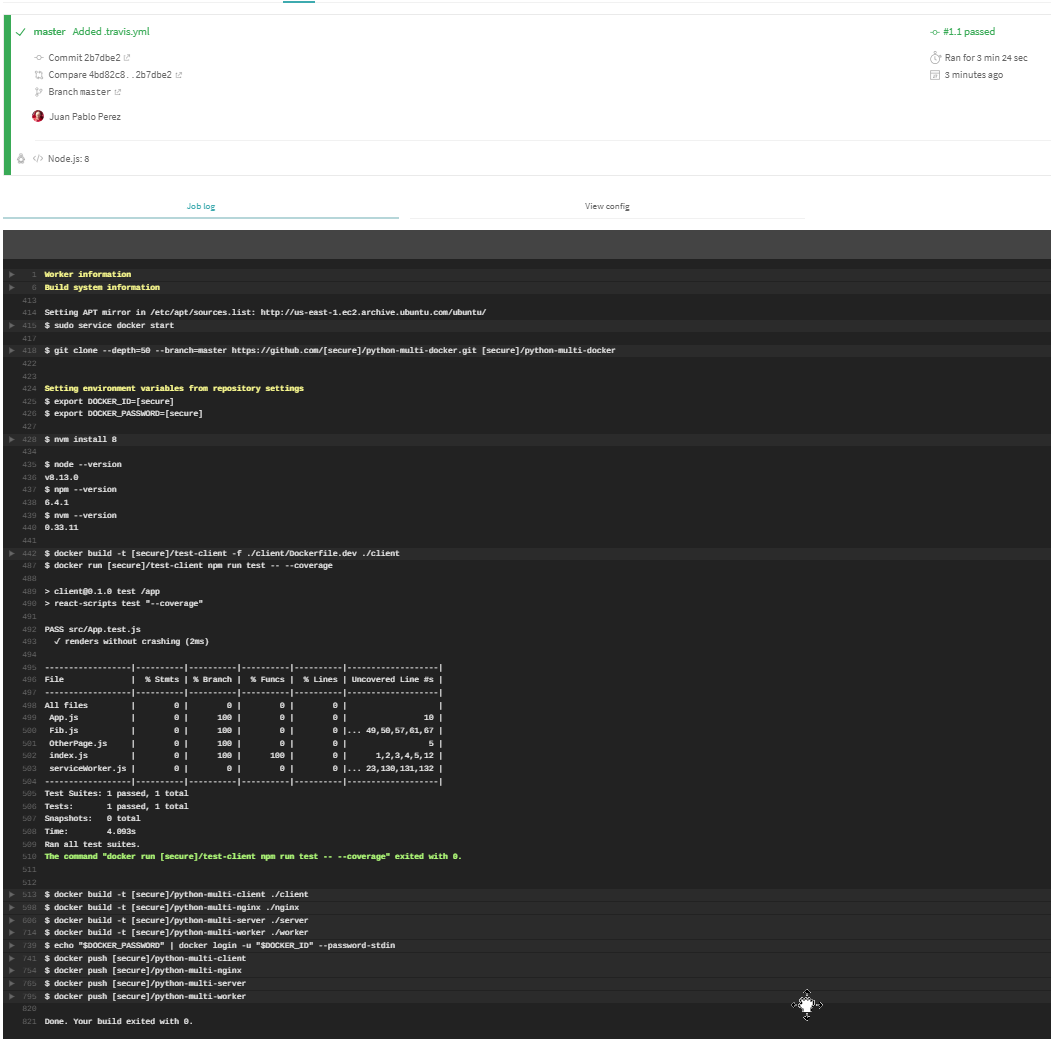
- Ensure the Docker images has been copied to the Docker Hub
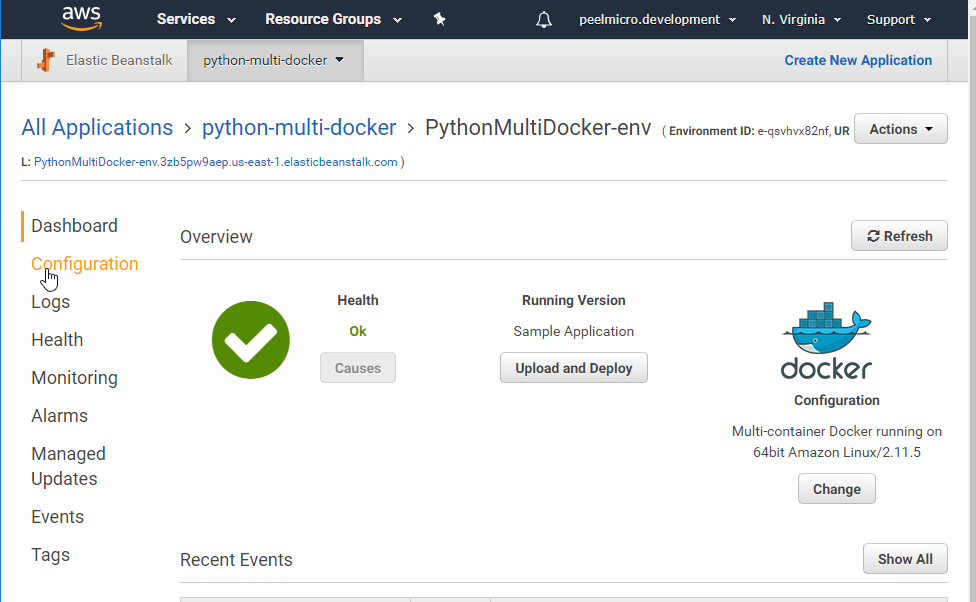
- Create a new application in AWS Elastic Beanstalk
- Go to AWS Elastic Beanstalk
- Click on
Create New Application
Application Name: python-multi-docker
Description:
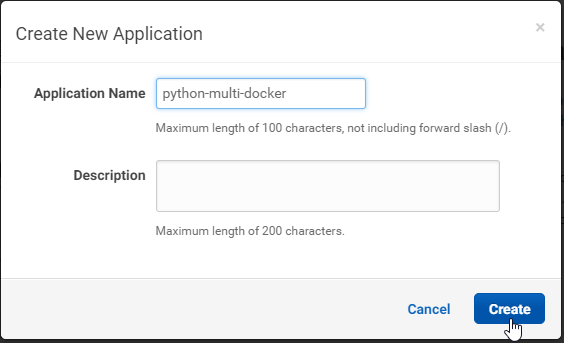
- Click on
Create
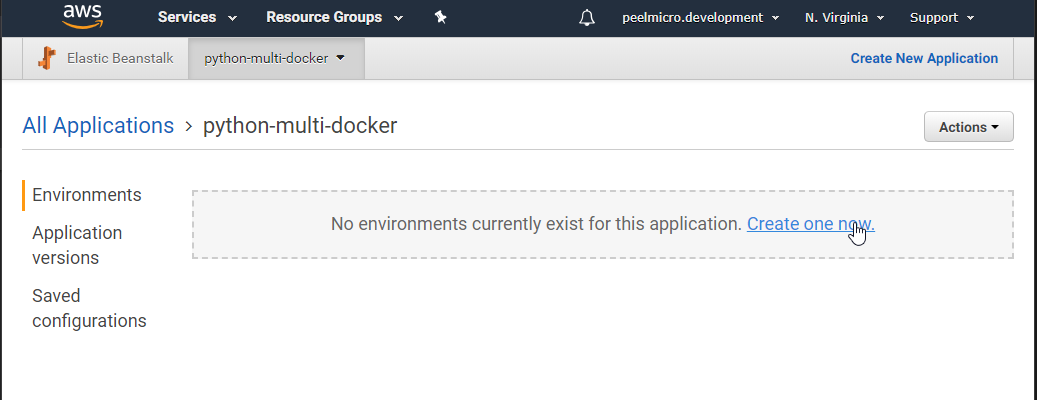
Click on
Create one nowSelect `Web server environment'
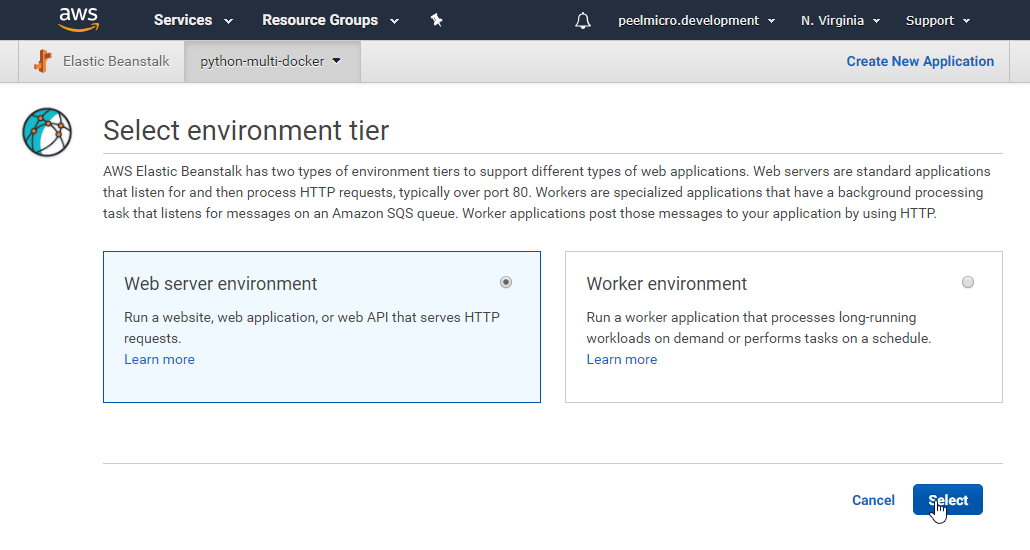
- Click on
Select
Application name: python-multi-docker
Environment name: JavaMutliDocker-env
- Select Platform: [X] Preconfigured platform -
Multi-container Docker
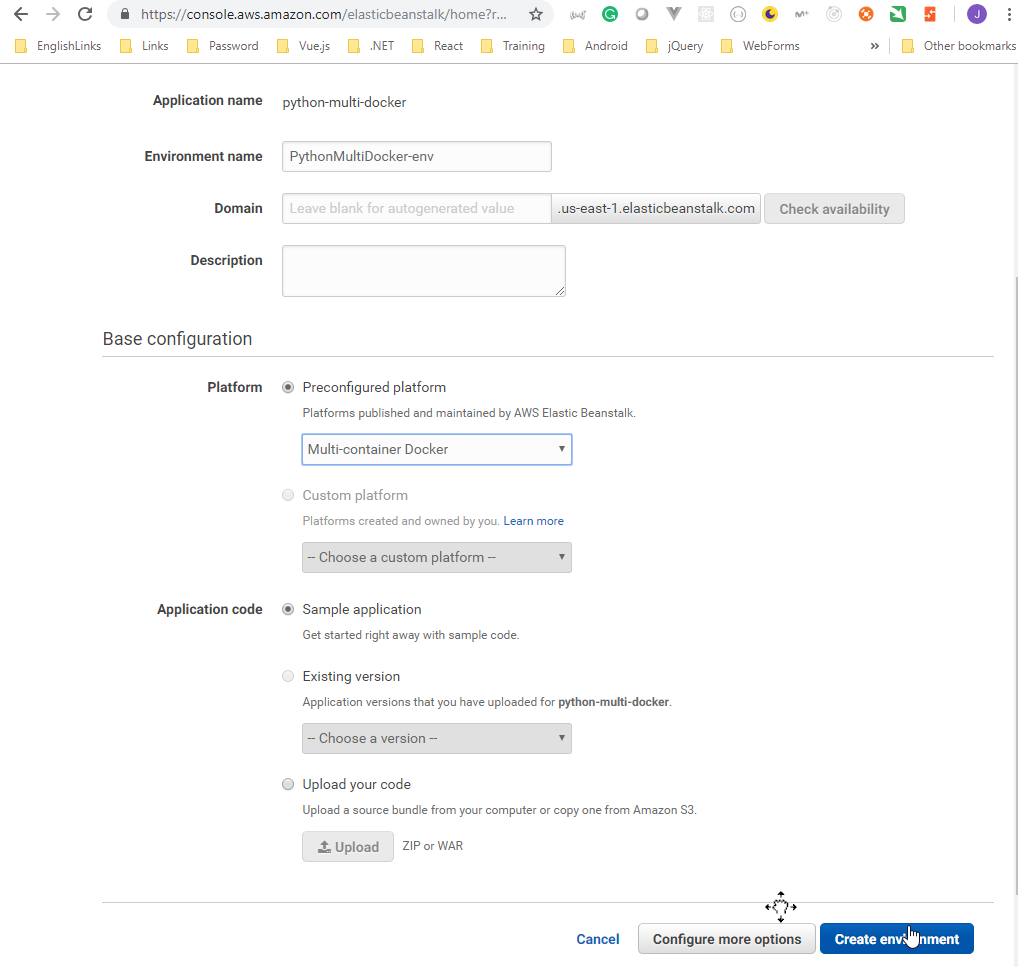
- Click on
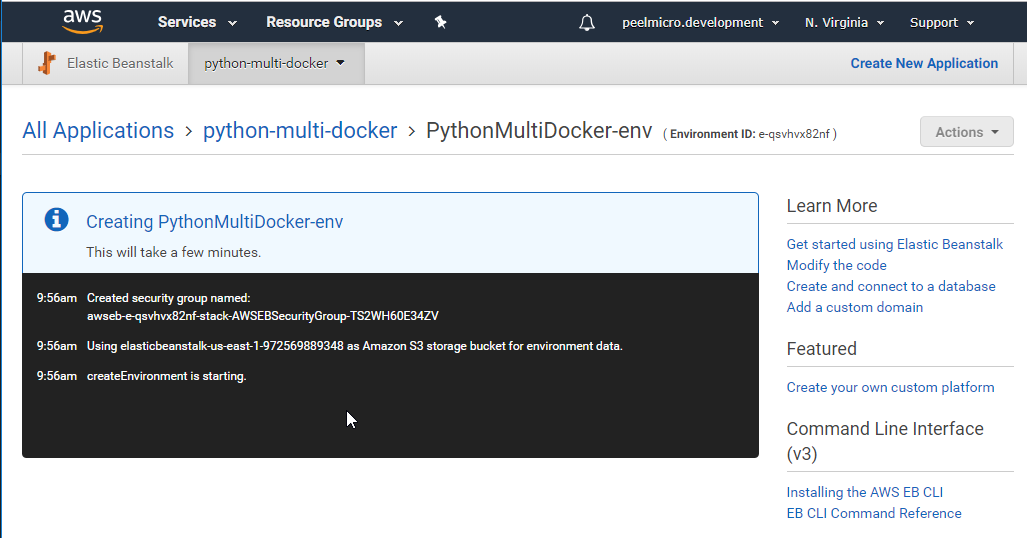
Create Environment
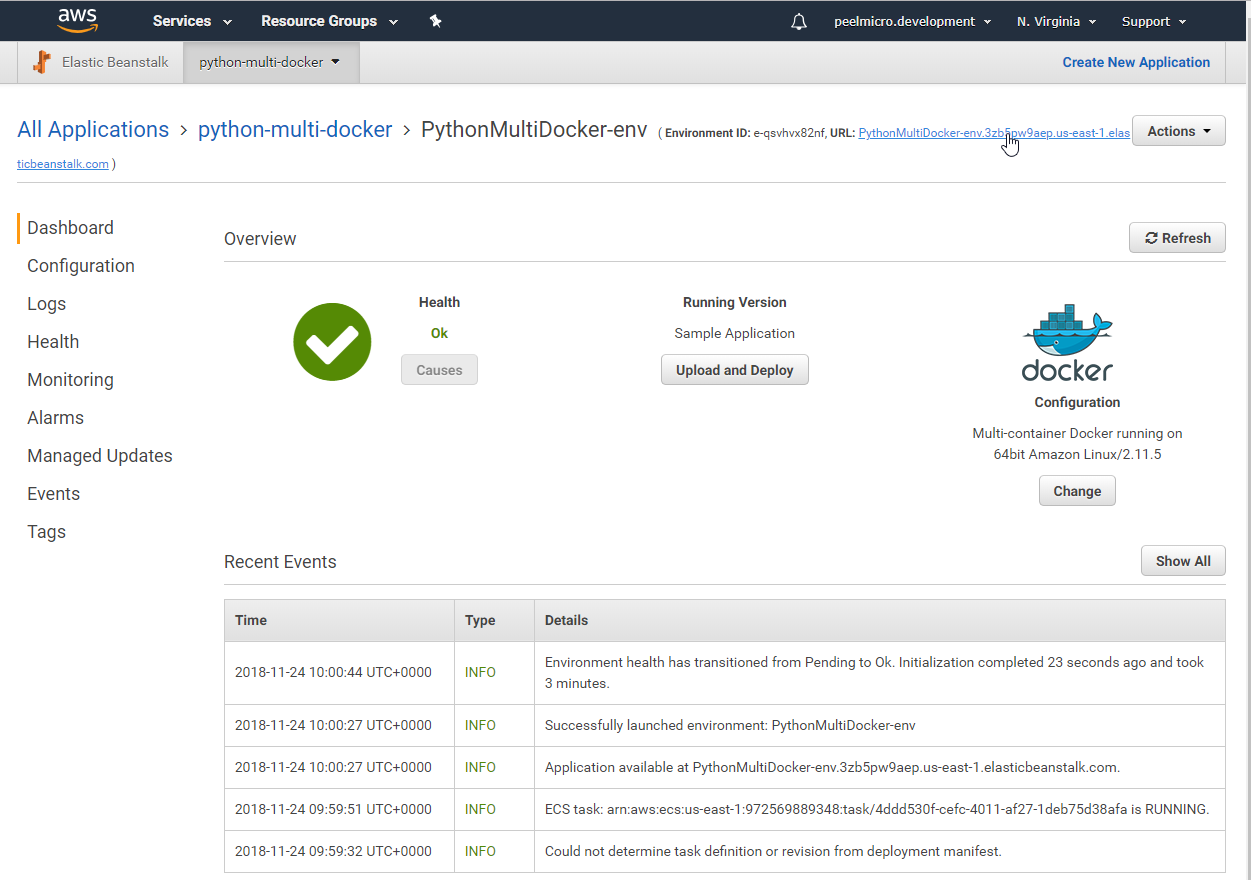
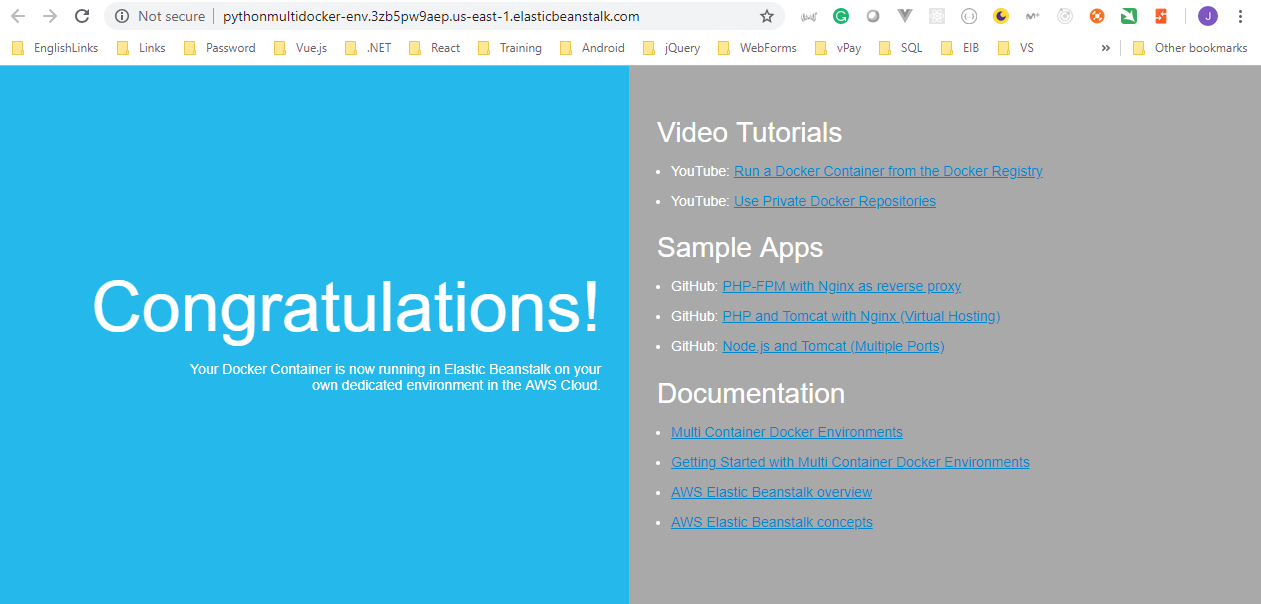
- Ensure the
test webis working properly
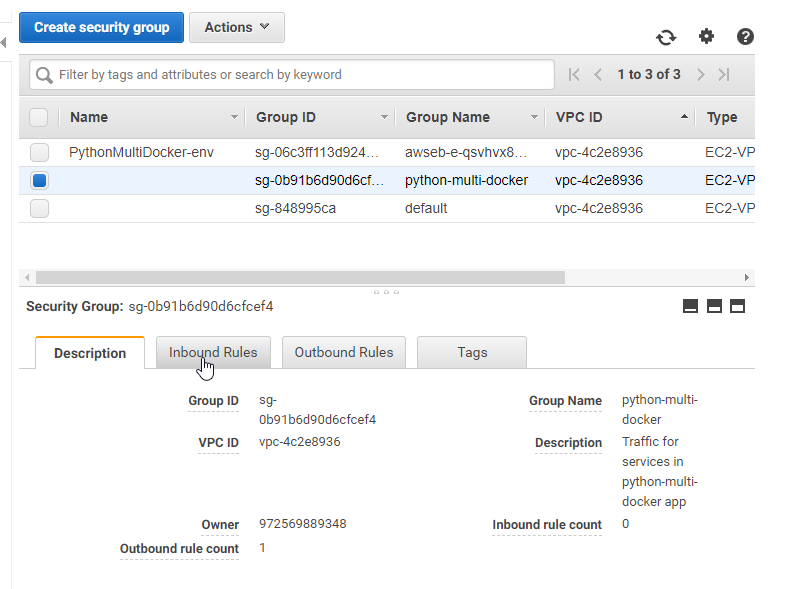
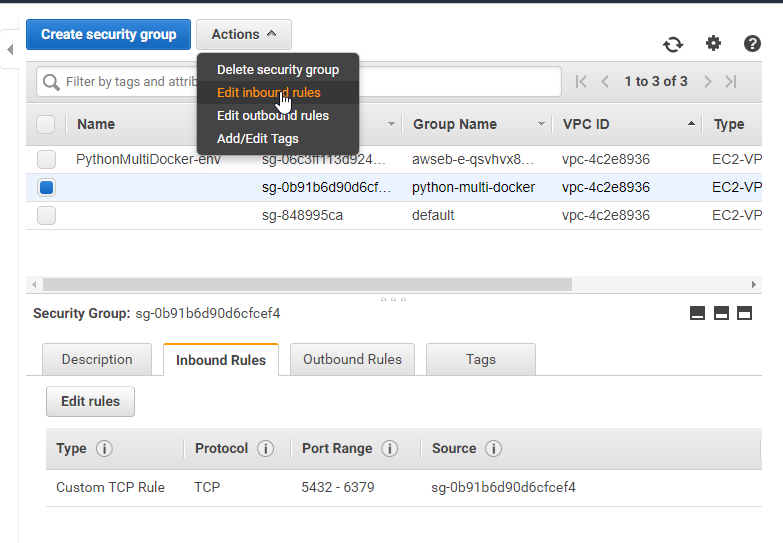
- Create a new Security Group
- Go to AWS Console
- Click on
Security Groups
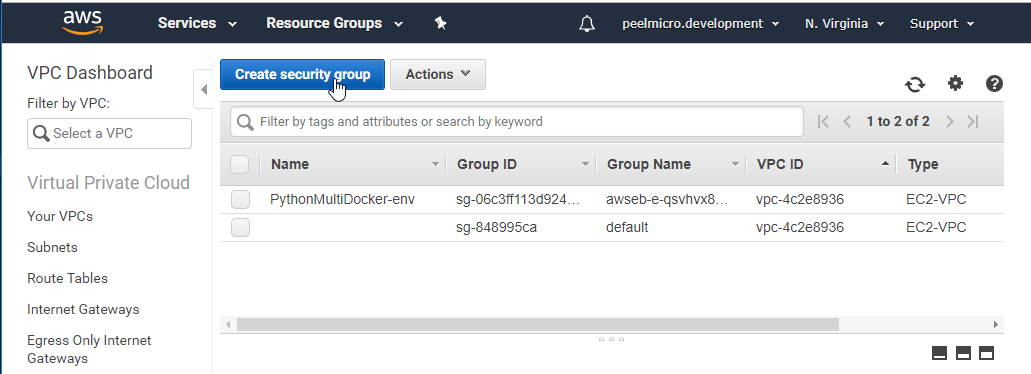
Group name: python-multi-docker
Description: Traffic for services in python-multi-docker app
VPC: vpc-4c2e8936
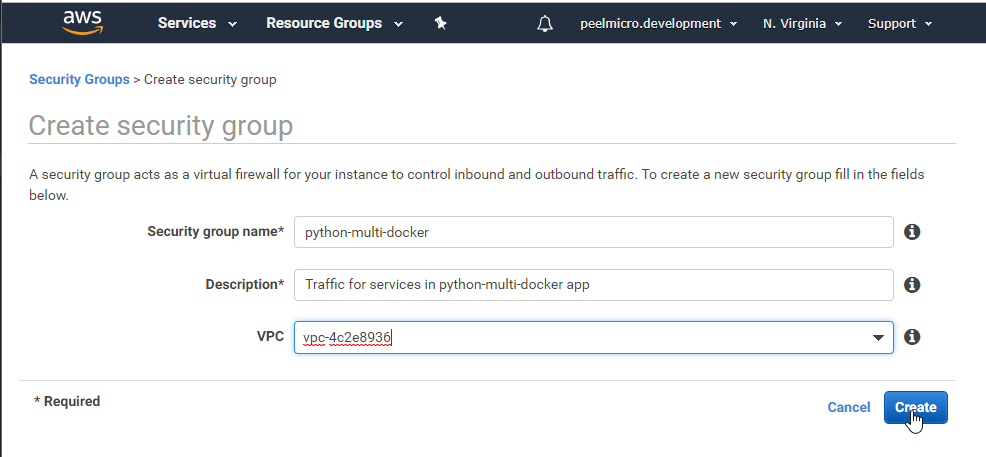
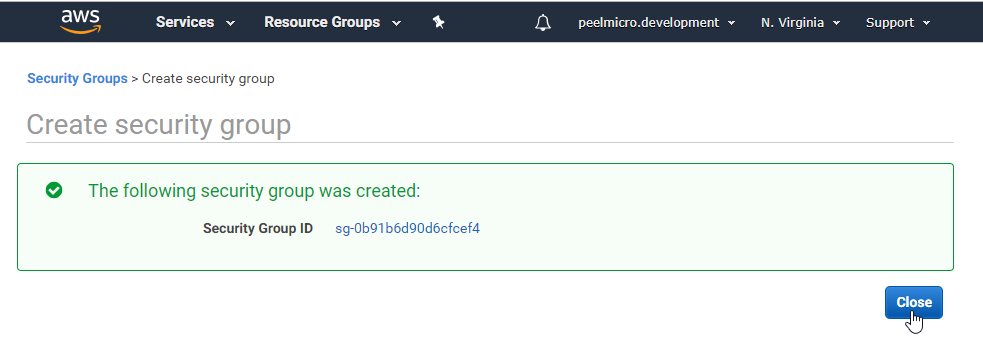
- Click on
Close
- Click on the
Inbound Rulestab on the bottom
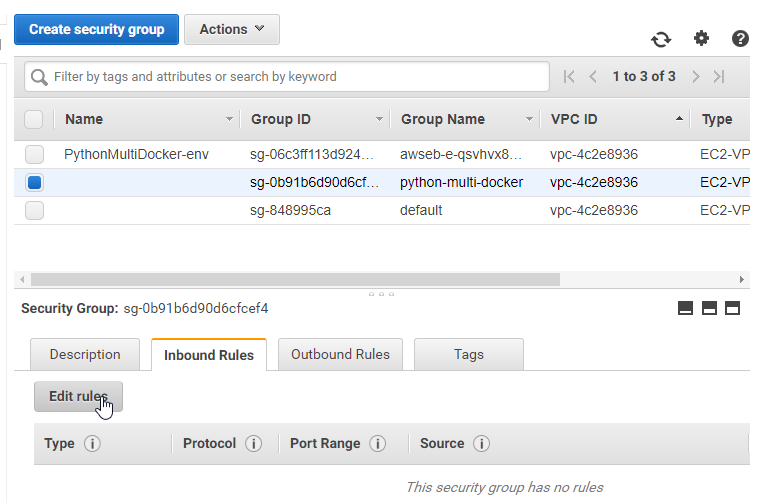
- Click on
Edit rules
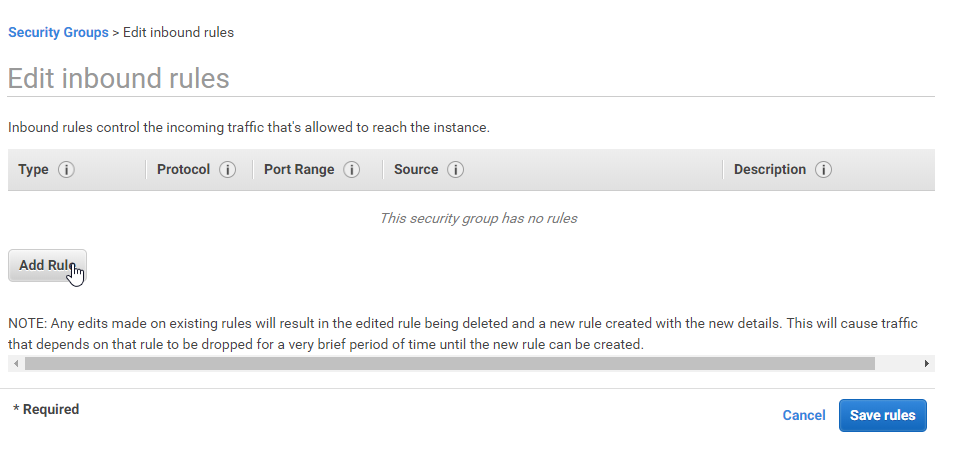
- Click on
Add Rule
Type: Custom TCP Rule
Protocol: TCP
Port Range: 5432-6379
Source: sg-0b91b6d90d6cfcef4 (the one for multi-docker)
Description:
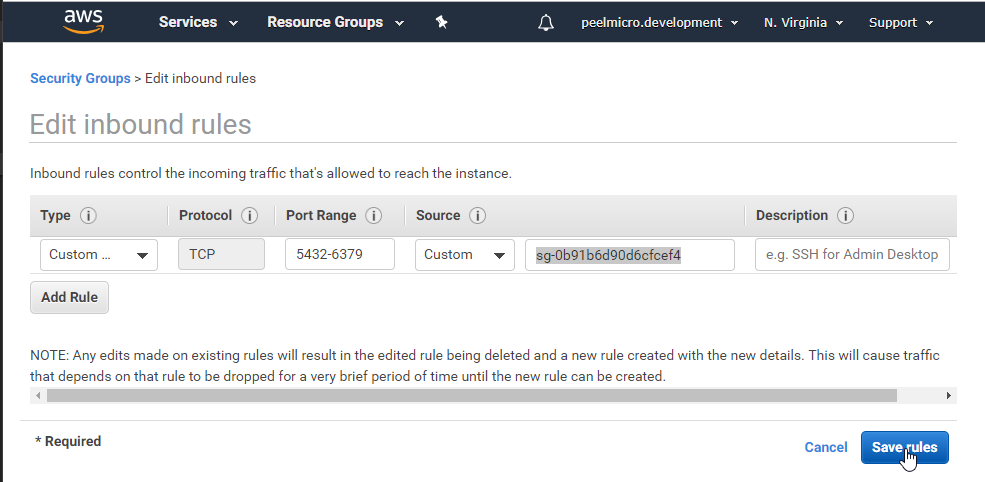
- Click on
Save rules
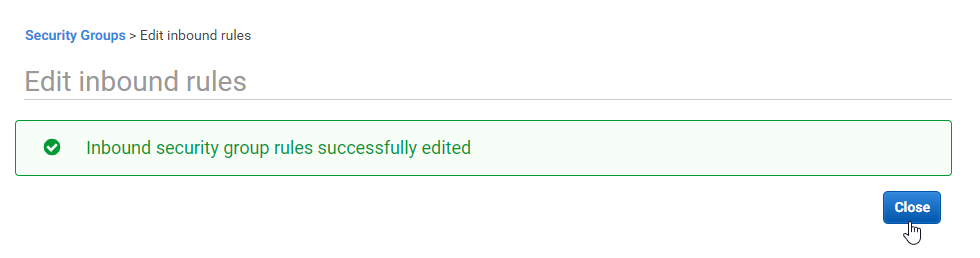
- Click on
Close
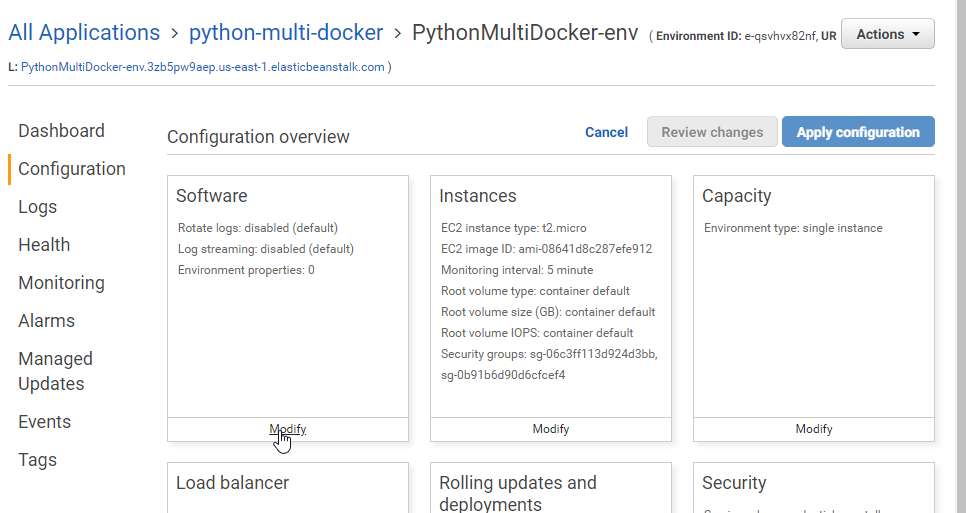
- Assign the new security group to the EB instance
- Go to to the New PythonMultiDocker-env EB
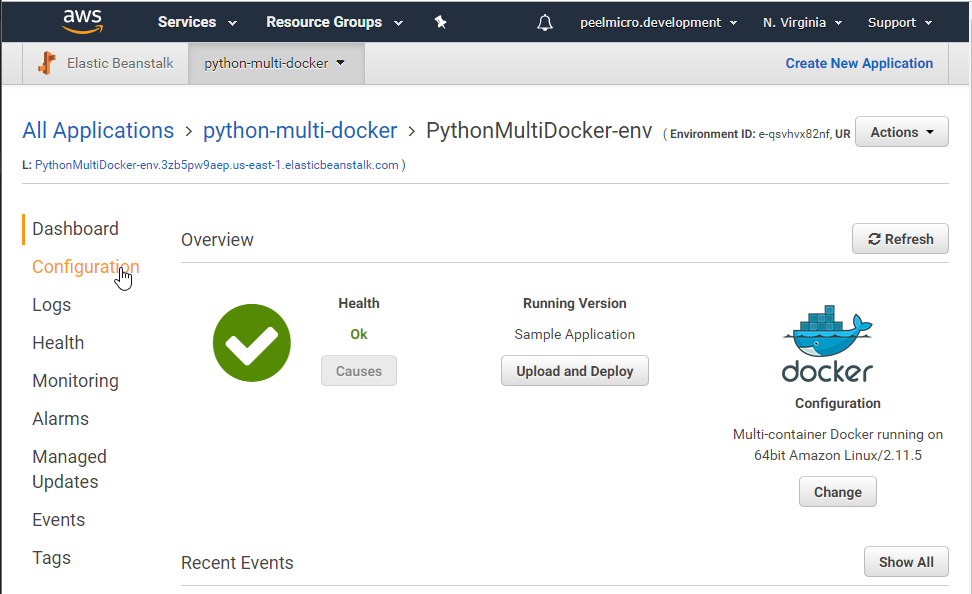
- Click on
Configuration
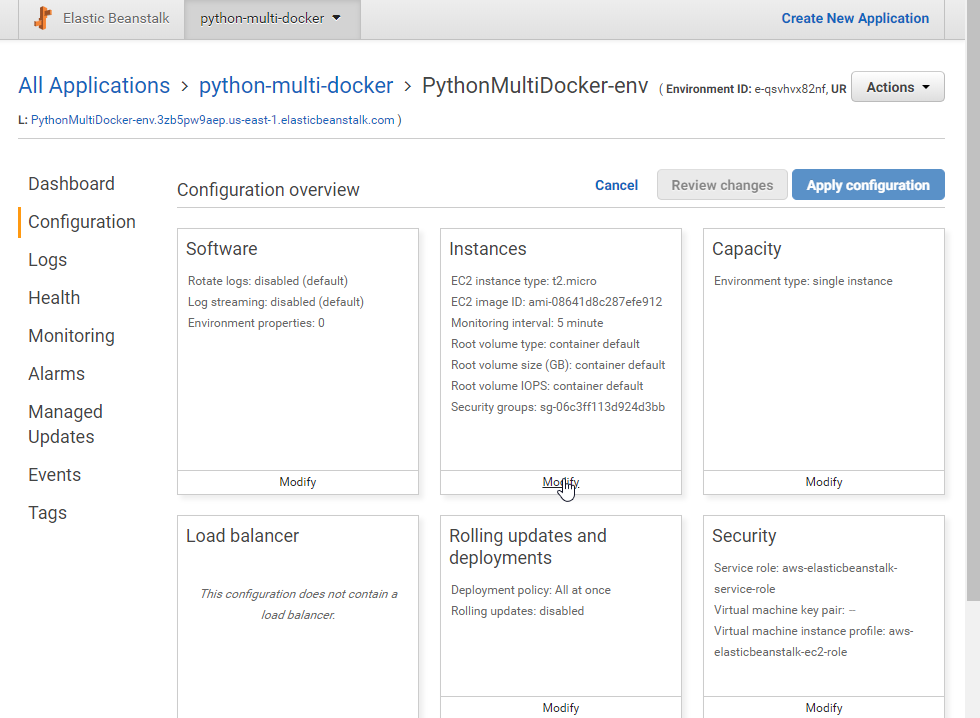
- Click on
Modify
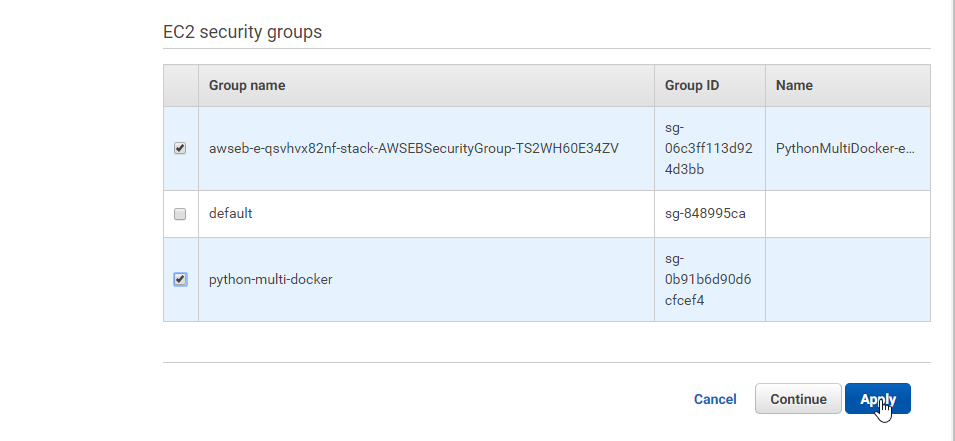
- Select the new
python-multi-dockersecurity group and then click onApply
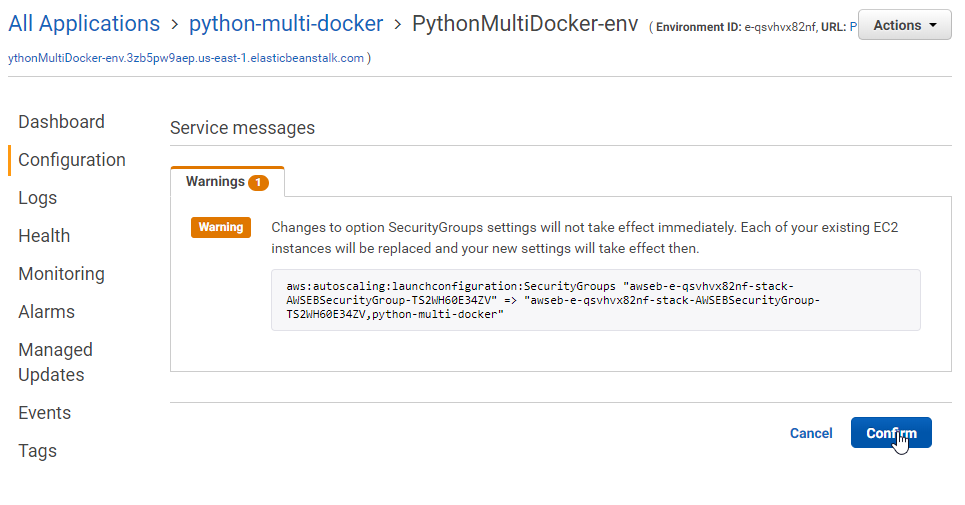
- Click on
Confirm
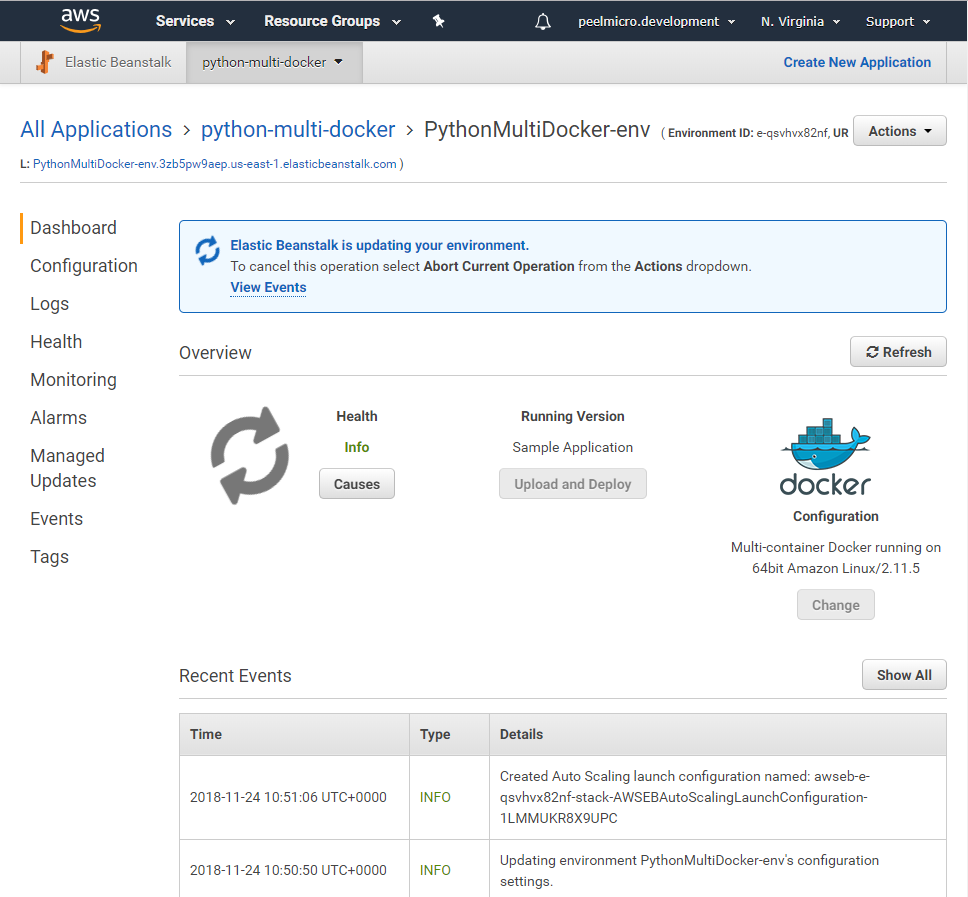
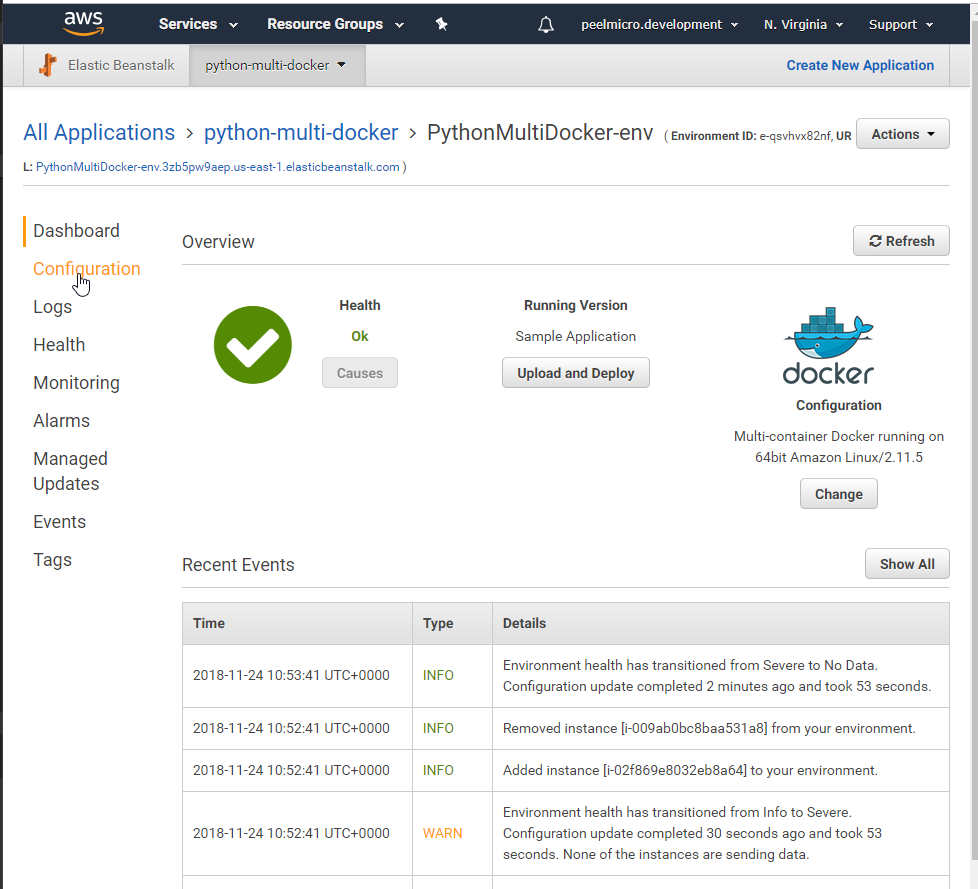
- Ensure the new security group has been added
- Add
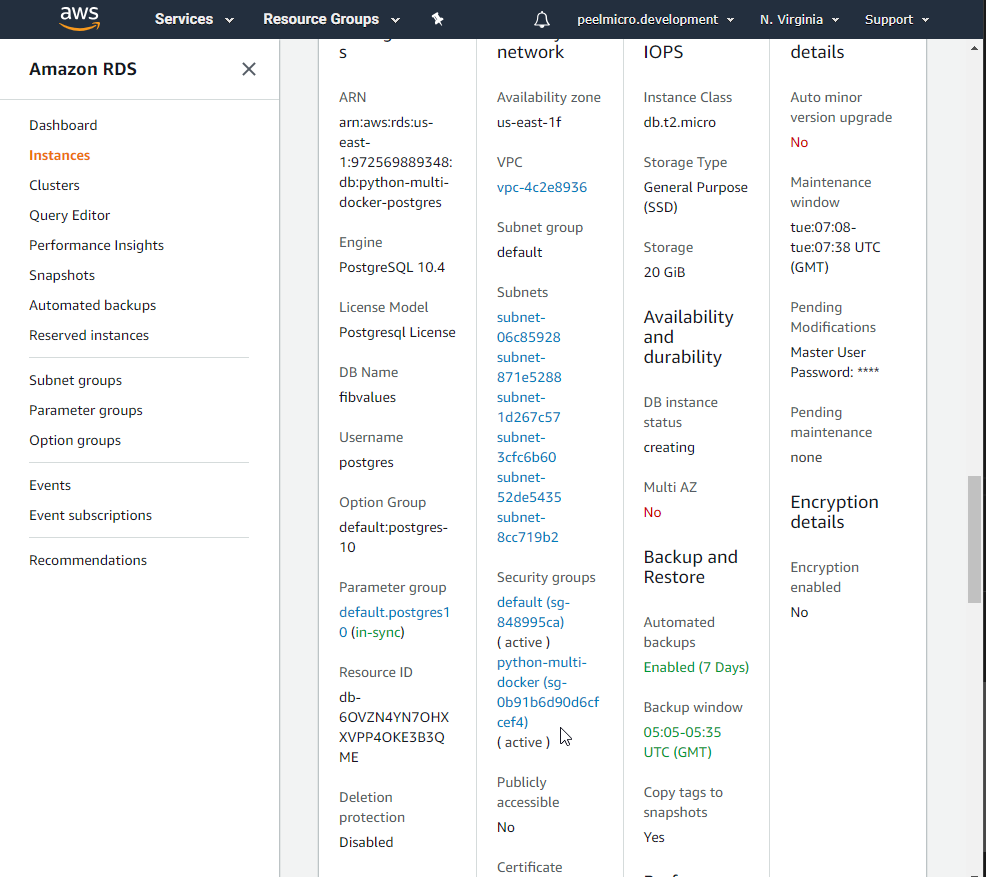
AWS Relational Database Service(RDS)
- Go to Amazon RDS
- Search for
Create databasesection and click onCreate Databasebutton.
- Select
[X] PostgreSQLand click onNext
- Select
[X] Dev/Testand click onNext
Instance specifications
License model: postgresql-license
Db engine version: PostgreSQL 10.4-R1
[X] Only enable options eligible for RDS Free Usage Tier
Db Instance class: db.t2.micro - 1 vCPU, 1 GiB RAM
Allocated storaged: 20 GiB
Settings
DB instance identifier: python-multi-docker-postgres
Master username: postgres
Master password: postgres_password
Confirm password: postgres_password
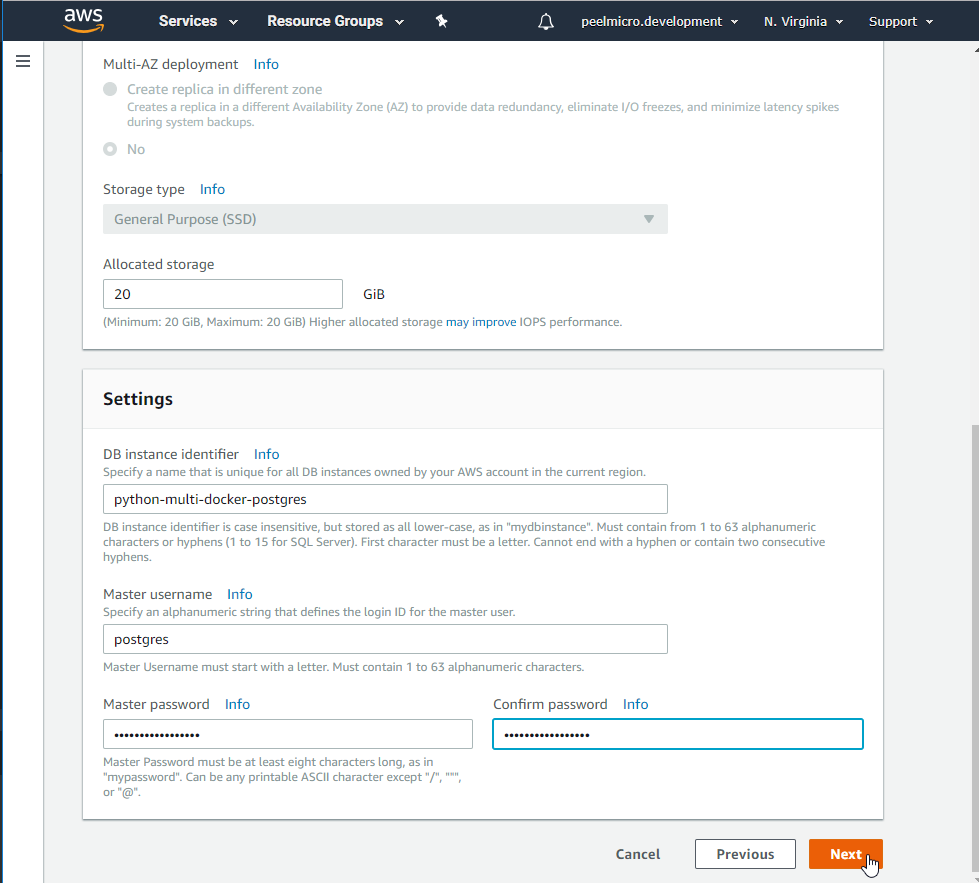
- Click on
Next
Network & Security
Virtual Private Cloud (VPC): Default VPC (vpc-2c2e8936)
Subnet group: default
Public accessibility: (No)
Availability zone: No preference
VPC segurity groups: ( ) Create new VPC security group (X) Choose existing VPC security groups
default python-multi-docker
Database options
Database name: fibvalues
Port: 5432
DB parameter group: default.postgres10
IAM Db authentication: ( ) Enable IAM DB authentication (X) Disable
Encryption
Nothing to be done.
Backup
Backup retention period: 7 days.
Backup window: ( ) Select Window (X) No preference
[X] Copy tags to snapshots
Monitoring
( ) Enable enhanced monitoring (X) Disable enhanced monitoring
Maintenance
Auto minor version upgrade: ( ) Enable auto minor version upgrade (X) Disable auto minor version upgrade
Maintenance window: ( ) Select Window (X) No Preference
Deletion protection
[ ] Enable deletion protection
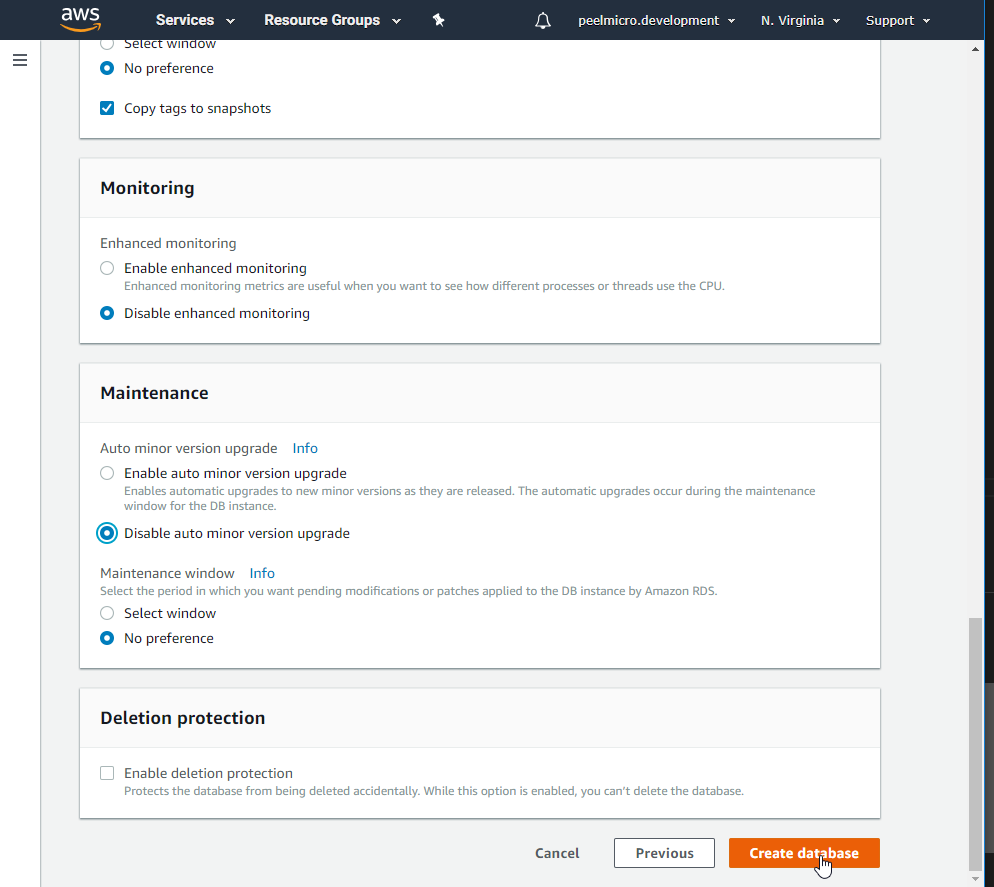
- Click on
Create Database
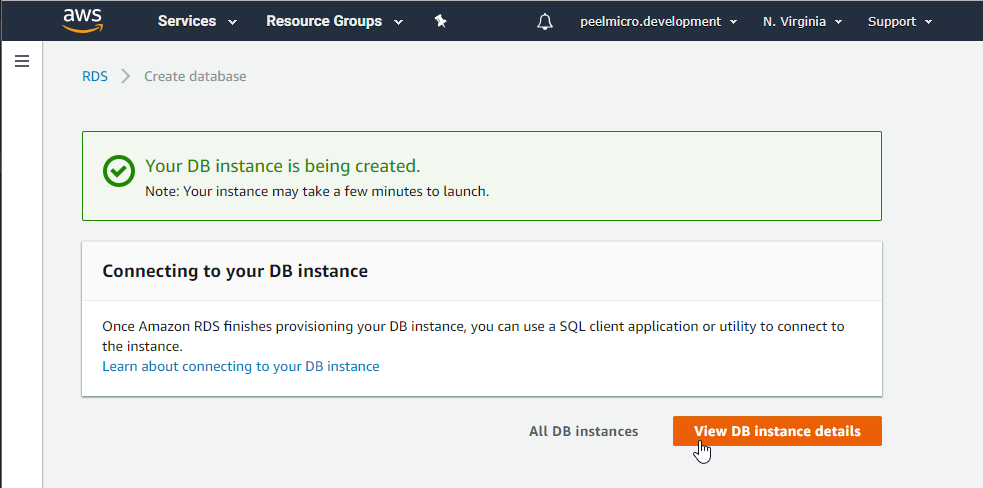
- Click on `View DB Instance details
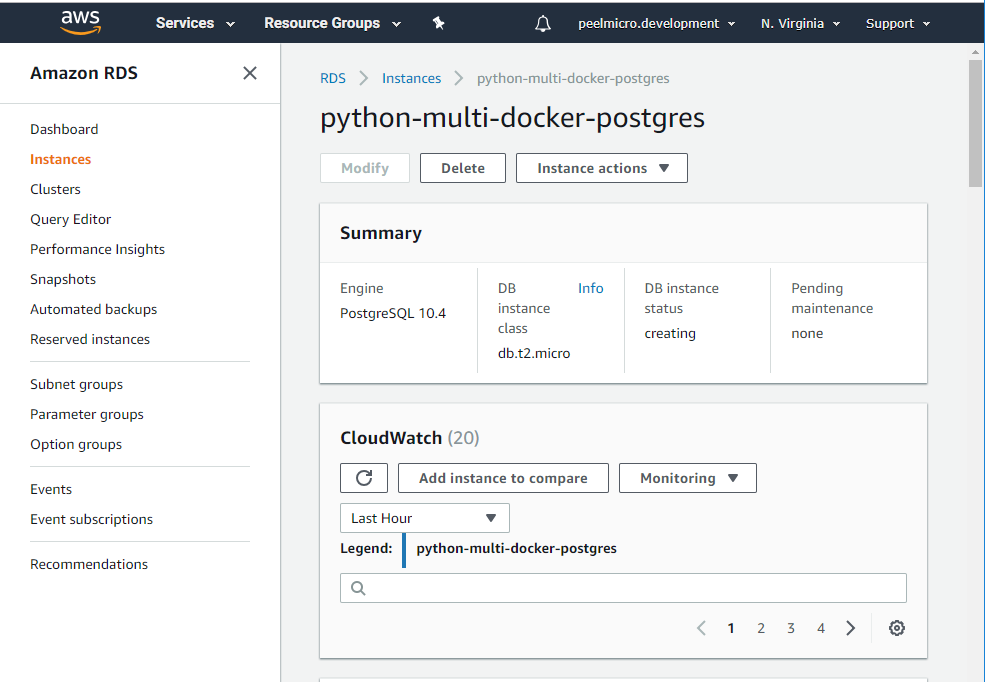
- Scroll down to ebsure the security group was added with success
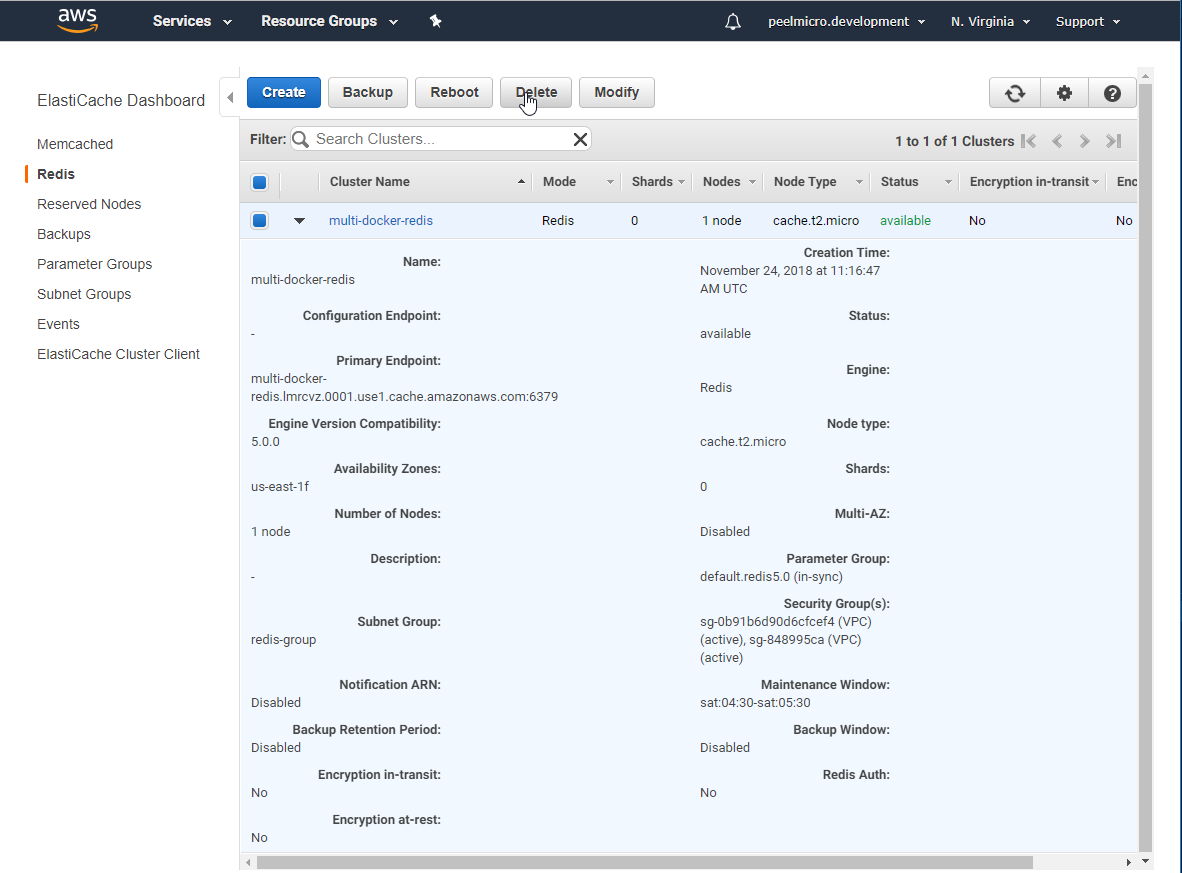
- Add
AWS ElastiCache(EC)
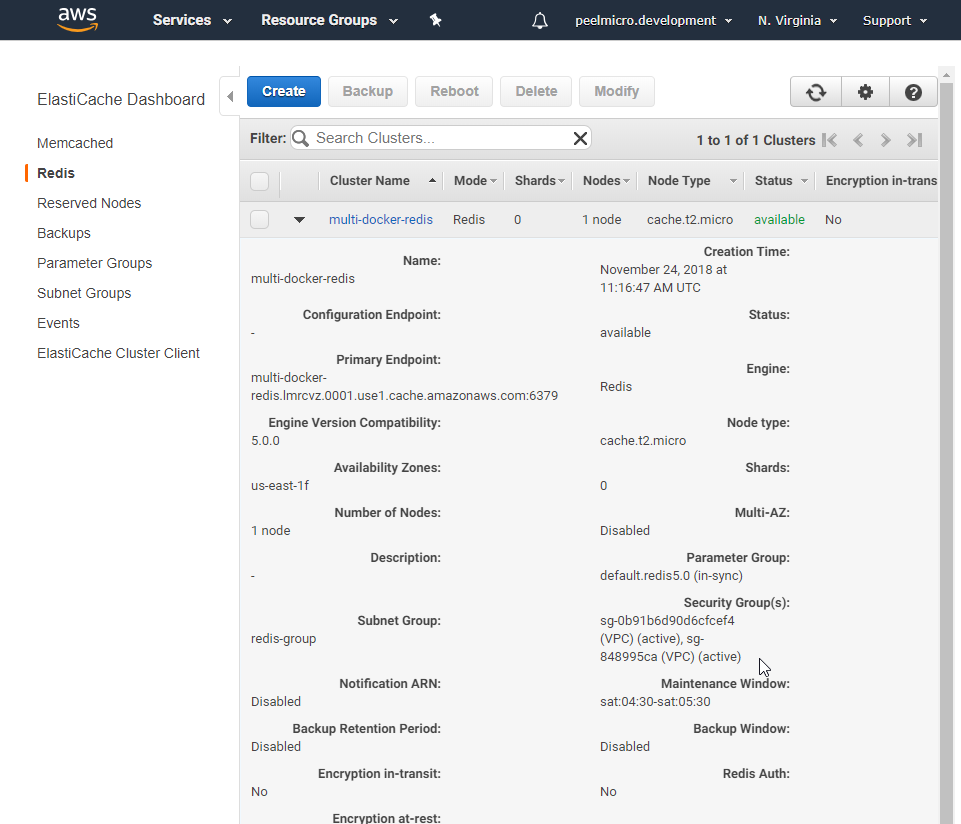
- Go to ElastiCache
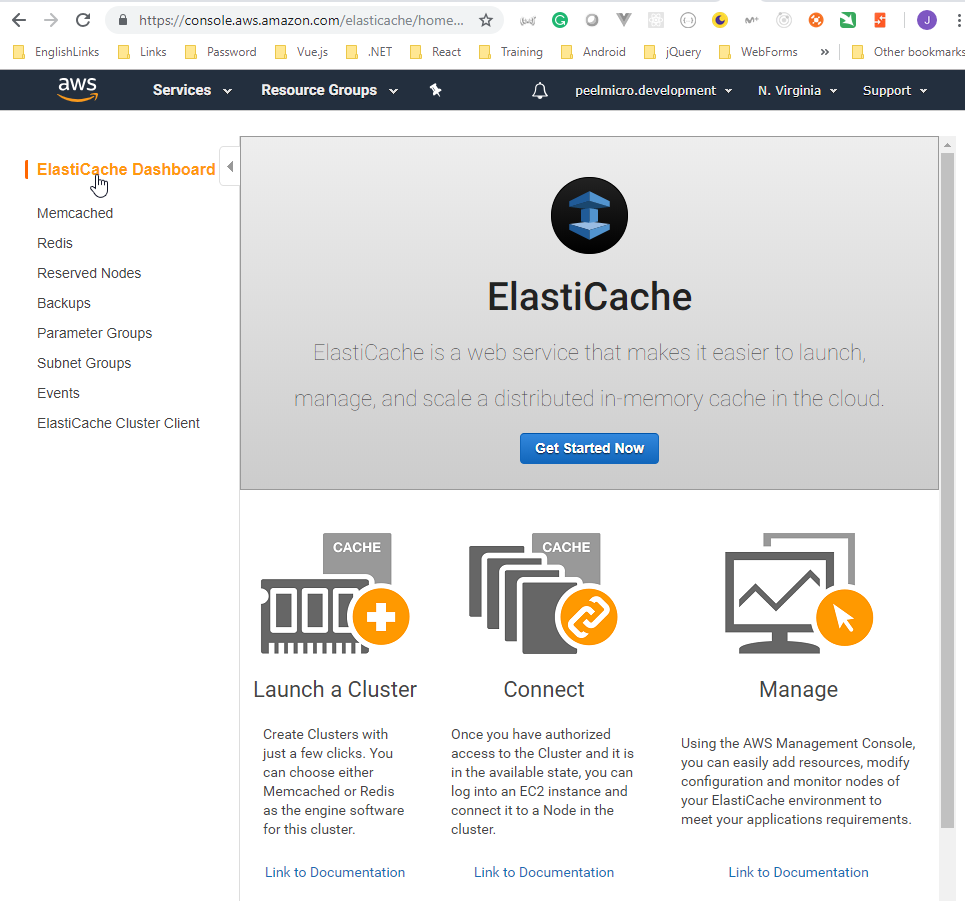
- Click on
Redis
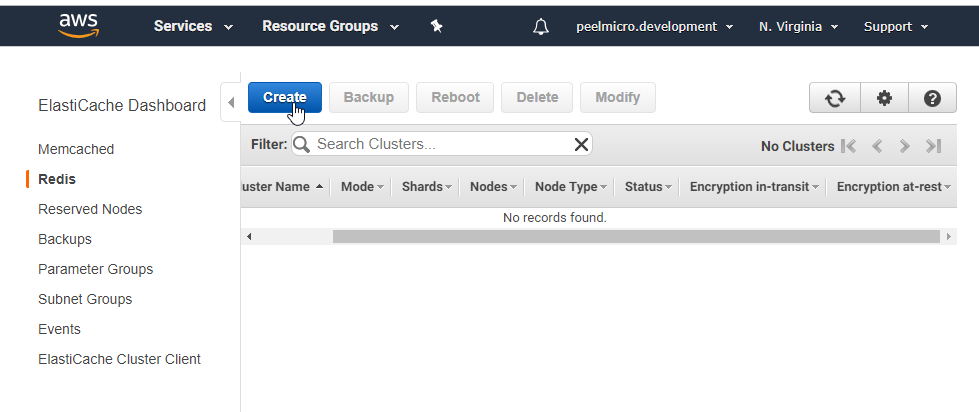
- Click on
Create
Create your Amazon ElastiCache cluster
Cluster engine (X) Redis [ ] Cluster mode enabled ( ) Memcached
Redis settings
Name: multi-docker-redis
Description:
Engine version compatibility: 5.0.0
Port: 6379
Parameter group: default.redis5.0
Node type: cache.t2.micro (0.5 GiB) (Ensure not to choose "cache.r5.large (13.07 GiB)")
Number of replicas: 0 (Ensure to not to choose 2)
Advanced Redis settings
Subnet group: redis-group (vpc-4c2e8936)
Preferred availability zone(s): (X) No preference ( ) Select zones
Security
Security groups: default (sg-848995ca), python-multi-docker (sg-0b91b6d90d6cfcef4) [Ensure to select the second one]
Encryption at-rest: [ ]
Encryption in-transit: [ ]
Import data to cluster
Seed RDB file S3 location:
Backup
Enable automatic backups: [ ]
Maintenance
Maintenance window: (X) No preference ( ) Specify maintenance window
Topic for SNS notification: Disable notifications
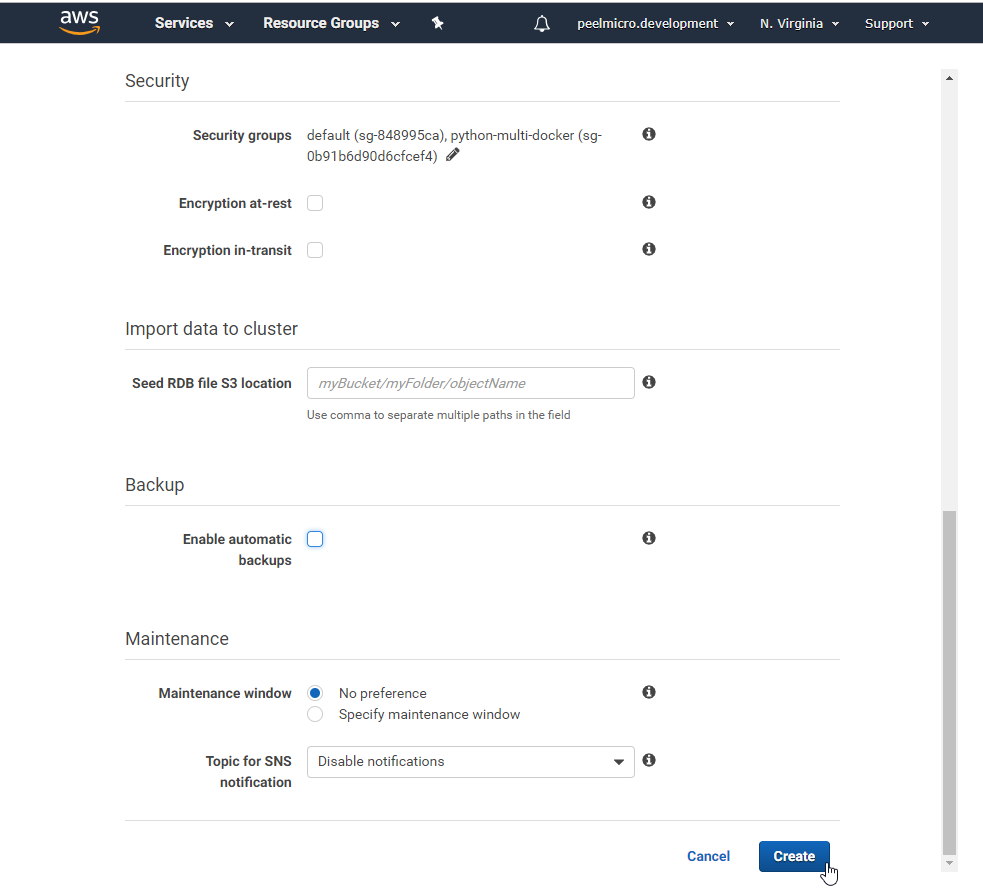
- Click on
Create
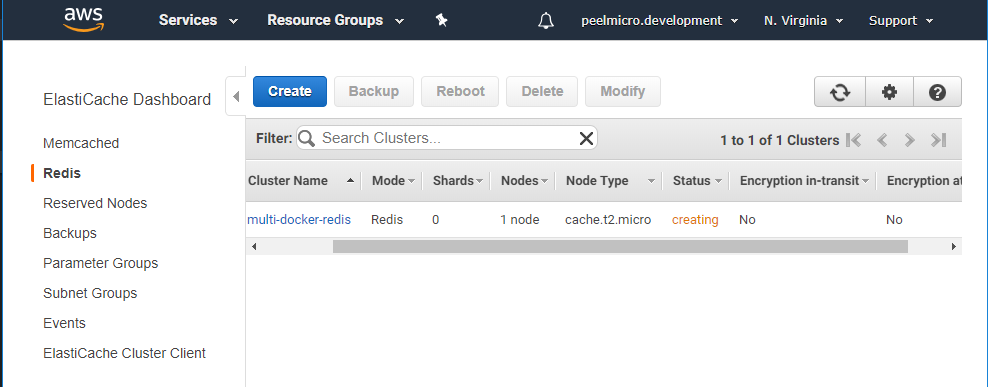
Ensure the security group previously created is assigned
- Add the setting variables on AWS
- Go to to the New PythonMultiDocker-env EB and click on the
PythonMultiDocker-envenvironment.
- Click on
Configuration
- Click on
Software -> Modify
Add the following Environment properties
REDIS_HOST: multi-docker-redis.lmrcvz.0001.use1.cache.amazonaws.com (it must be obtained from
Primary Endpointon the multi-docker-redis EC instance)REDIS_PORT: 6379
PGUSER: postgres
PGHOST: python-multi-docker-postgres.cvzlrthufo75.us-east-1.rds.amazonaws.com (it must be obtained from `Endpoint' on the java-multi-docker-postgres RDS instance)
PGDATABASE: fibvalues
PGPASSWORD: postgres_password
PGPORT: 5432
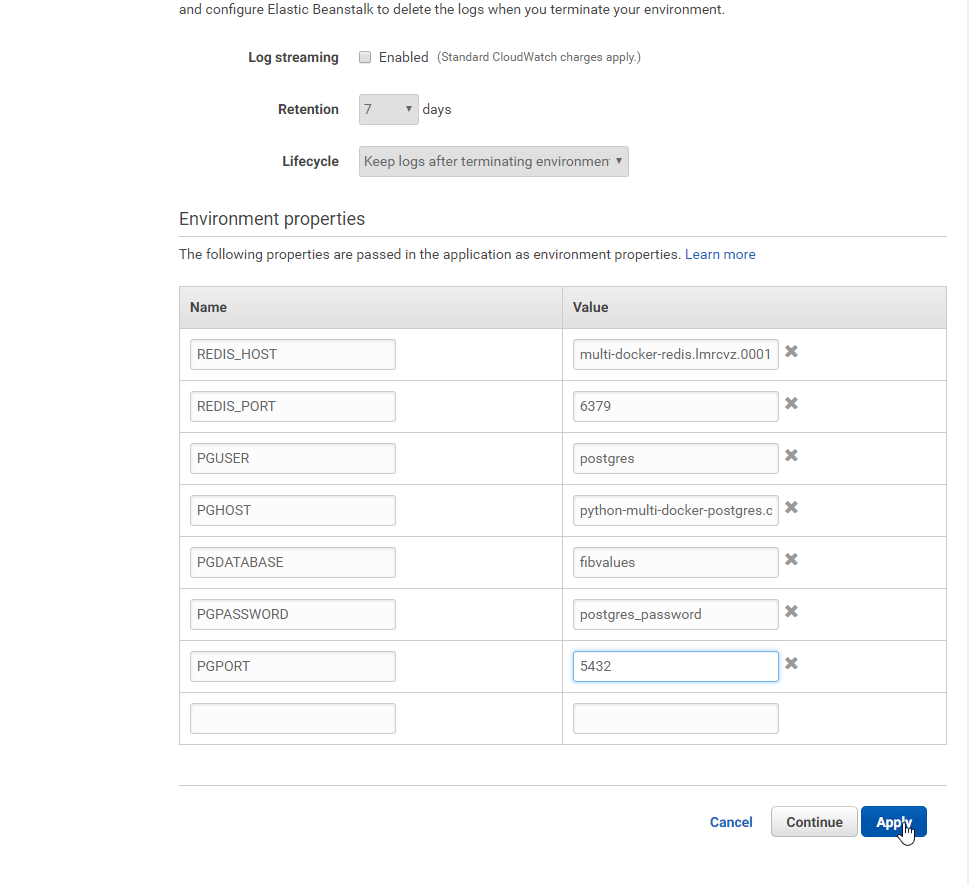
- Click on
Apply

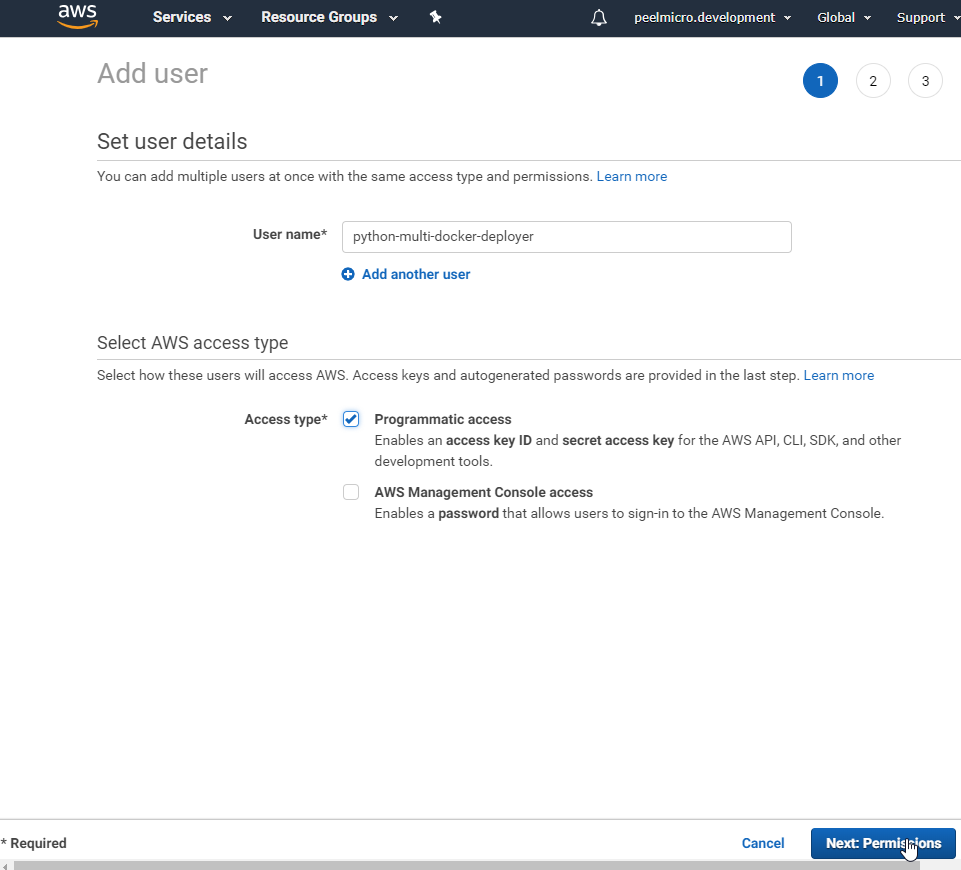
- Create the IAM Keys for Deployment
- Click on
Users
User name: python-multi-docker-deployer
Select AWS access type
Access type: [X] Programmatic access [ ] AWS Management Console access
- Click on
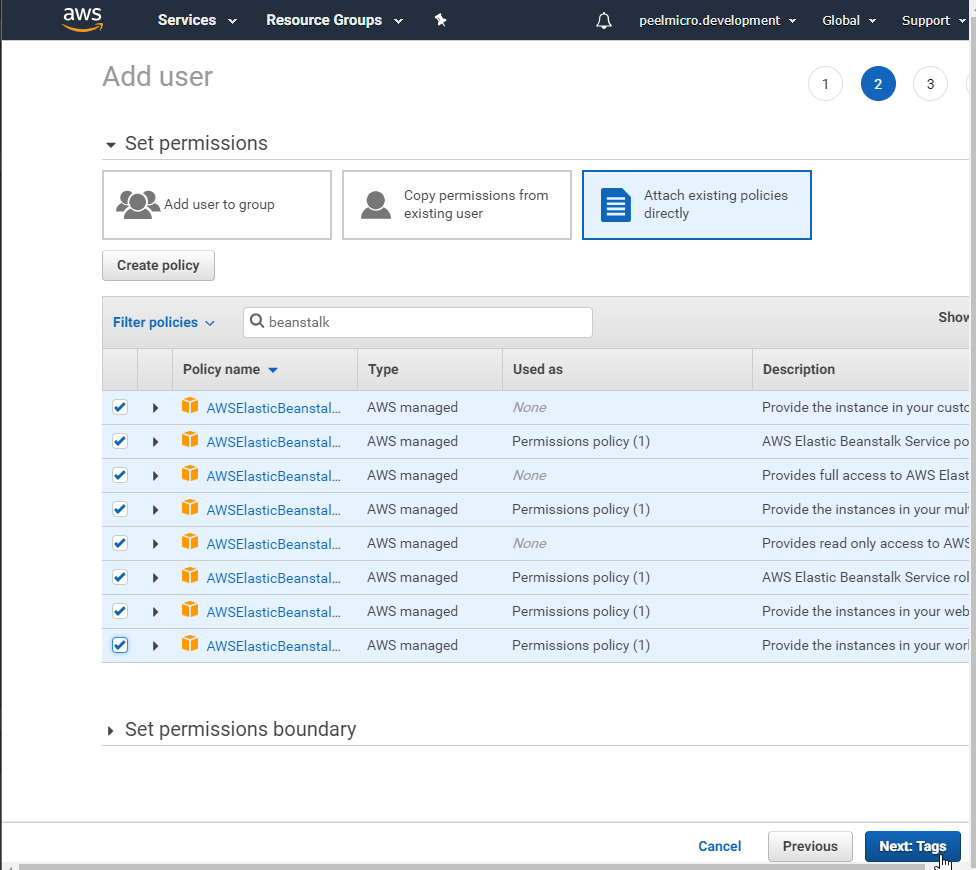
Attach existing policies directlyand search forbeanstalkand select all of them starting byAWSElasticNeanstalk
- Click on
Next Tag
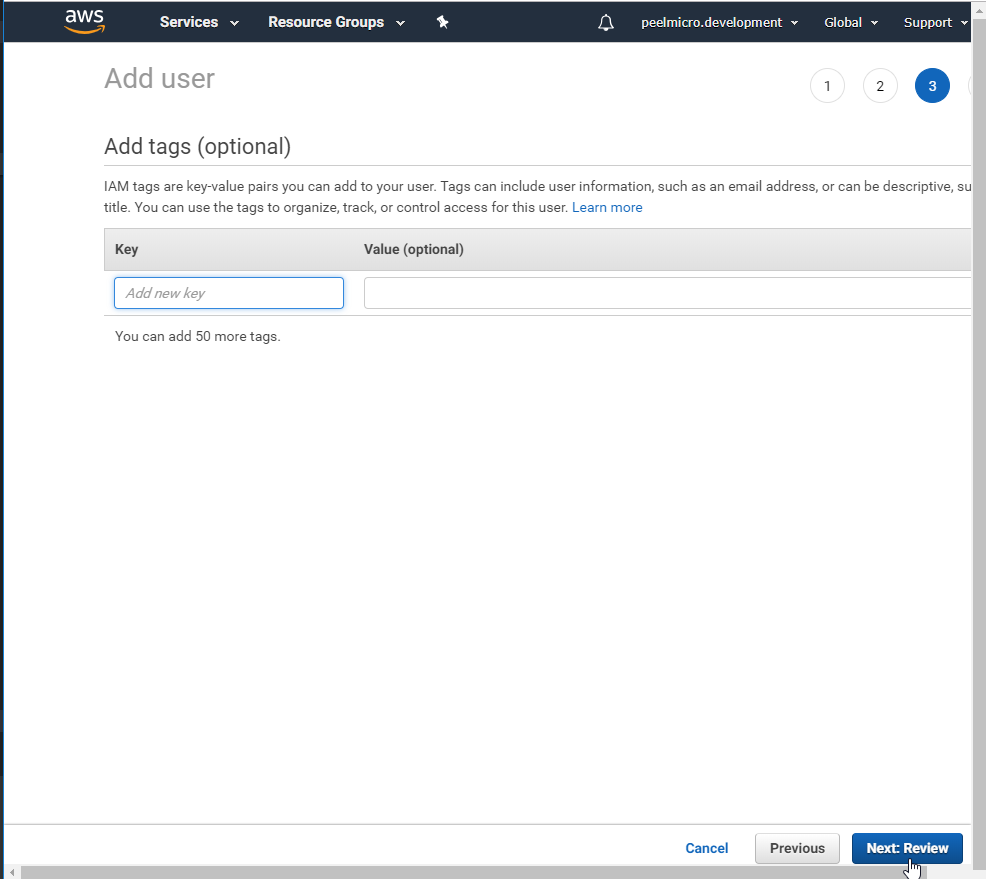
Don't put any optional tag.
- Click on
Next: Review
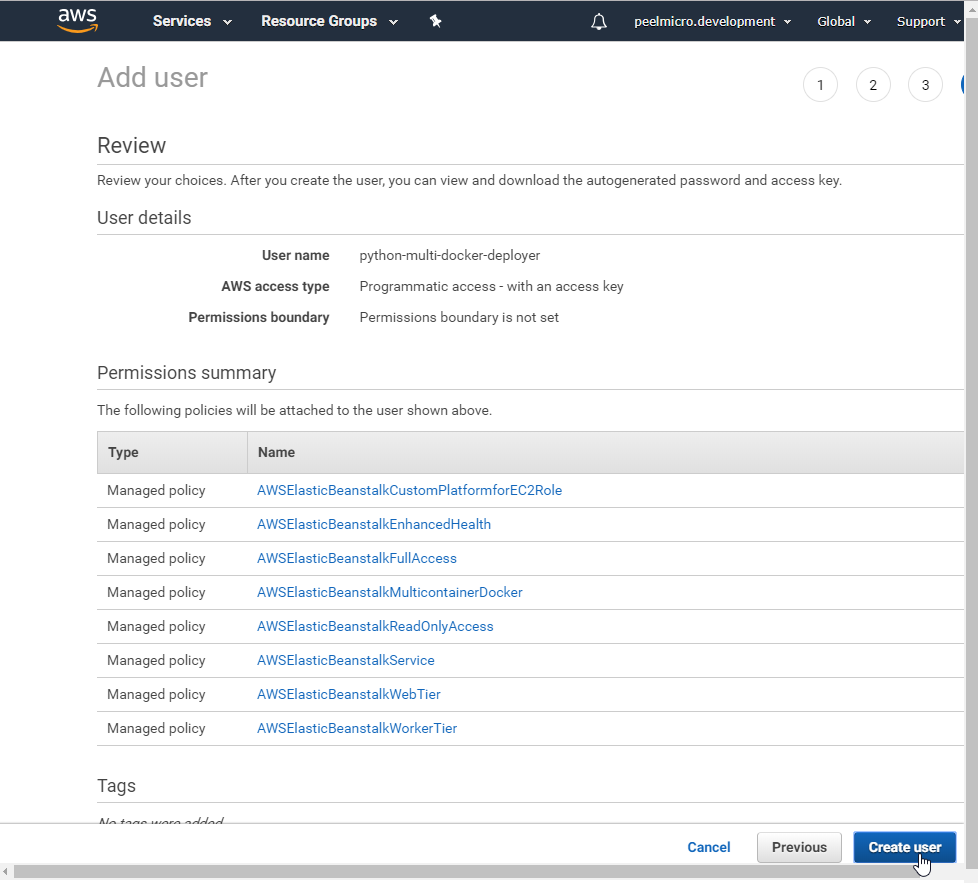
- Review the data and then click on
Create user

Click on
Showand copy theAccess key IDandSecret access keyvalues in a safe placeClick on
Close
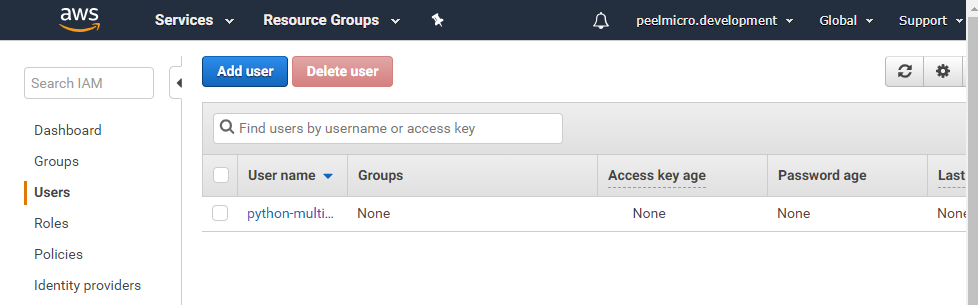
Ensure the new python-multi-docker-deployer has been created.
- Modify the
.travis.ymldocument to include the deployment on AWS
.travis.yml
sudo: required
language: node_js
node_js:
  - "8"
services:
  - docker
before_install:
  - docker build -t peelmicro/test-client -f ./client/Dockerfile.dev ./client
script:
  - docker run peelmicro/test-client npm run test -- --coverage
after_success:
  - docker build -t peelmicro/python-multi-client ./client
  - docker build -t peelmicro/python-multi-nginx ./nginx
  - docker build -t peelmicro/python-multi-server ./server
  - docker build -t peelmicro/python-multi-worker ./worker
  # Log in to the docker CLI
  - echo "$DOCKER_PASSWORD" | docker login -u "$DOCKER_ID" --password-stdin
  # Take those images and push them to docker hub
  - docker push peelmicro/python-multi-client
  - docker push peelmicro/python-multi-nginx
  - docker push peelmicro/python-multi-server
  - docker push peelmicro/python-multi-worker
deploy:
  provider: elasticbeanstalk
  region: "us-east-1"
  app: "python-multi-docker"
  env: "pythonMultiDocker-env"
  bucket_name: "elasticbeanstalk-us-east-1-972569889348"
  #bucket_path: ""
  on:
    branch: "master"
  access_key_id: $AWS_ACCESS_KEY
  secret_access_key:
    secure: "$AWS_SECRET_KEY"
- Put the
AWS_ACCESS_KEYandAWS_SECRET_KEYenvironment variables on the Travis CI repository
- Add the
Dockerrun.aws.jsondocument needed for the deployment on AWS
Dockerrun.aws.json
{
  "AWSEBDockerrunVersion": 2,
  "containerDefinitions": [
    {
      "name": "client",
      "image": "peelmicro/python-multi-client",
      "hostname": "client",
      "essential": false,
      "memory": 128
    },
    {
      "name": "server",
      "image": "peelmicro/python-multi-server",
      "hostname": "api",
      "essential": false,
      "memory": 128
    },
    {
      "name": "worker",
      "image": "peelmicro/python-multi-worker",
      "hostname": "worker",
      "essential": false,
      "memory": 128
    },
    {
      "name": "nginx",
      "image": "peelmicro/python-multi-nginx",
      "hostname": "nginx",
      "essential": true,
      "portMappings": [
        {
          "hostPort": 80,
          "containerPort": 80
        }
      ],
      "links": ["client","server"],
      "memory": 128
    }
  ]
}
- Commit and push the changes
Juan.Pablo.Perez@RIMDUB-0232 MINGW64 ~/OneDrive/Training/Docker/DockerAndKubernetes.TheCompleteGuide/python-complex (master)
$ git add .

Juan.Pablo.Perez@RIMDUB-0232 MINGW64 ~/OneDrive/Training/Docker/DockerAndKubernetes.TheCompleteGuide/python-complex (master)
$ git status
On branch master
Changes to be committed:
  (use "git reset HEAD <file>..." to unstage)

        modified:   .travis.yml
        new file:   Dockerrun.aws.json
Juan.Pablo.Perez@RIMDUB-0232 MINGW64 ~/OneDrive/Training/Docker/DockerAndKubernetes.TheCompleteGuide/python-complex (master)
$ git commit -m "AWS integration included"
[master 2f09383] AWS integration included
 2 files changed, 52 insertions(+), 12 deletions(-)
 create mode 100644 Dockerrun.aws.json
Juan.Pablo.Perez@RIMDUB-0232 MINGW64 ~/OneDrive/Training/Docker/DockerAndKubernetes.TheCompleteGuide/python-complex (master)
$ git push origin HEAD
Counting objects: 4, done.
Delta compression using up to 4 threads.
Compressing objects: 100% (4/4), done.
Writing objects: 100% (4/4), 794 bytes | 198.00 KiB/s, done.
Total 4 (delta 2), reused 0 (delta 0)
remote: Resolving deltas: 100% (2/2), completed with 2 local objects.
To https://github.com/peelmicro/python-multi-docker.git
   2b7dbe2..2f09383  HEAD -> master
- Ensure the new build on CI is created with sucess
- Go to Travis CI repository
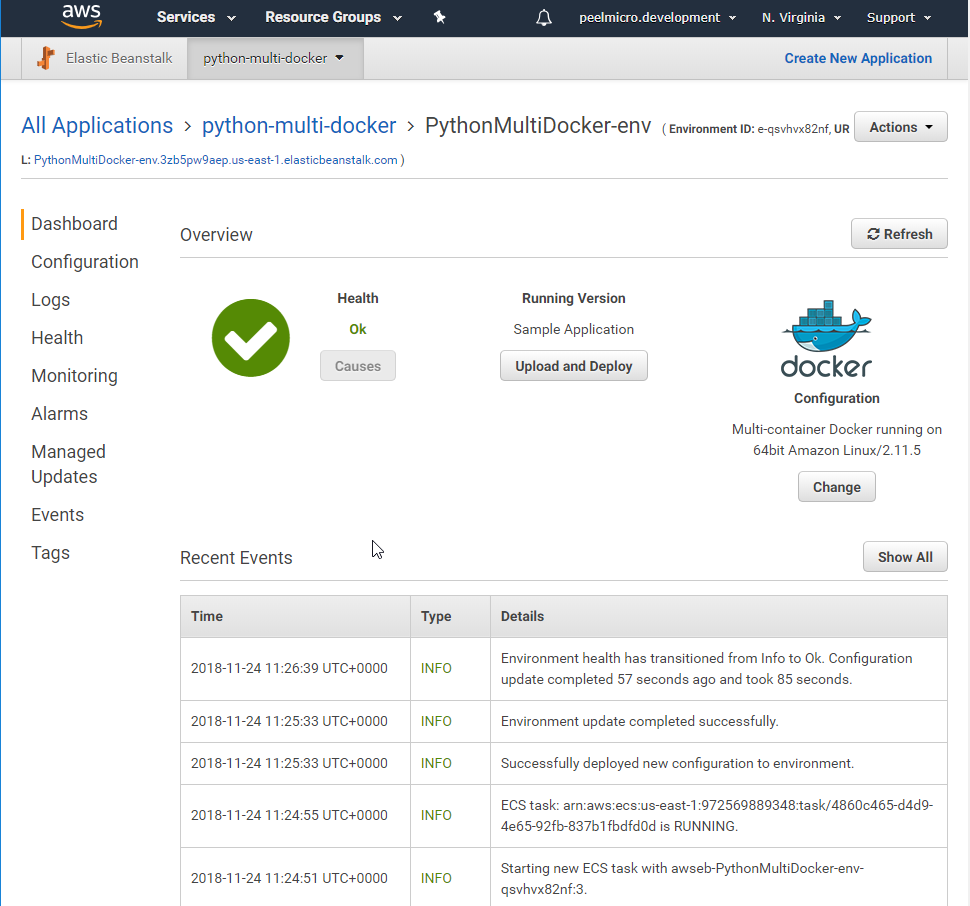
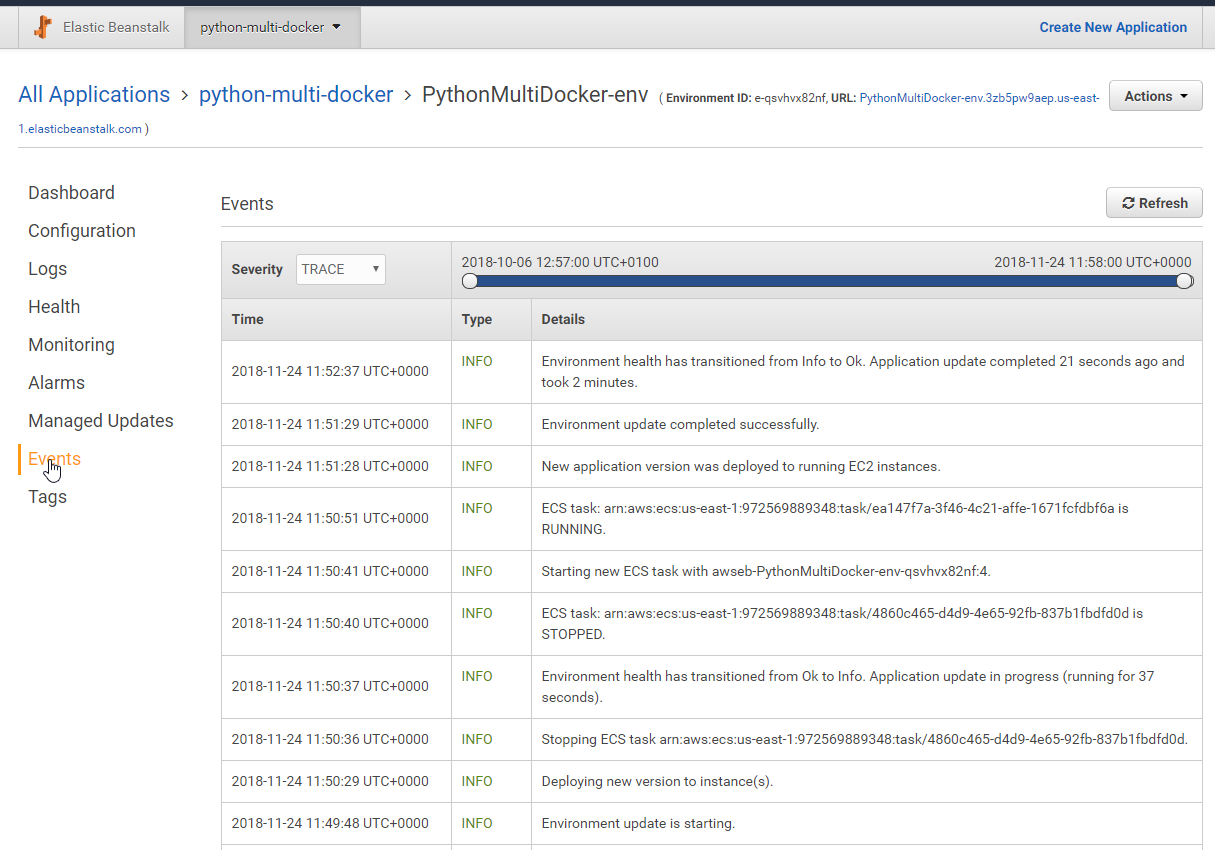
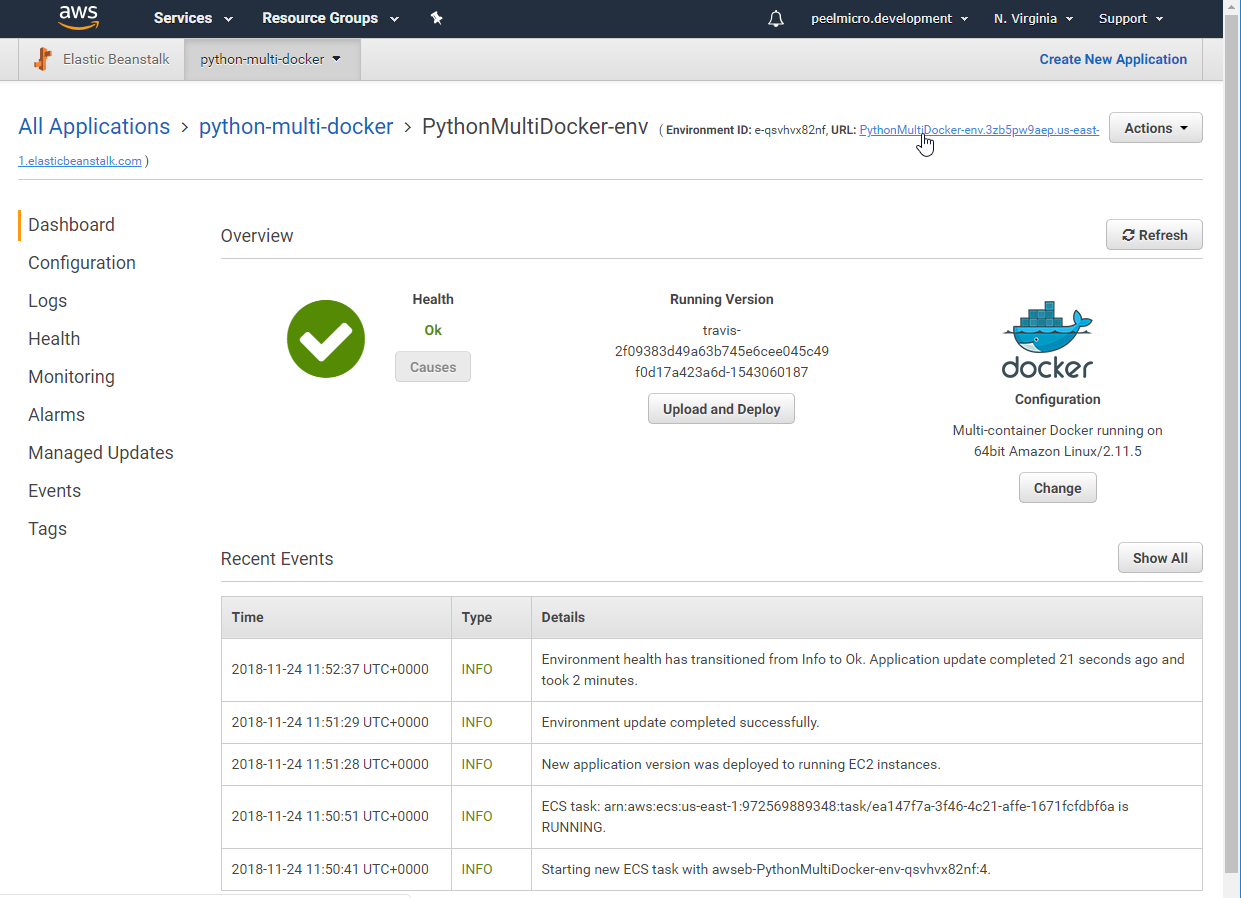
- Ensure the application is deployed correctly on AWS
- Go to to the New PythonMultiDocker-env EB
- Cleanup all the resources created on AWS
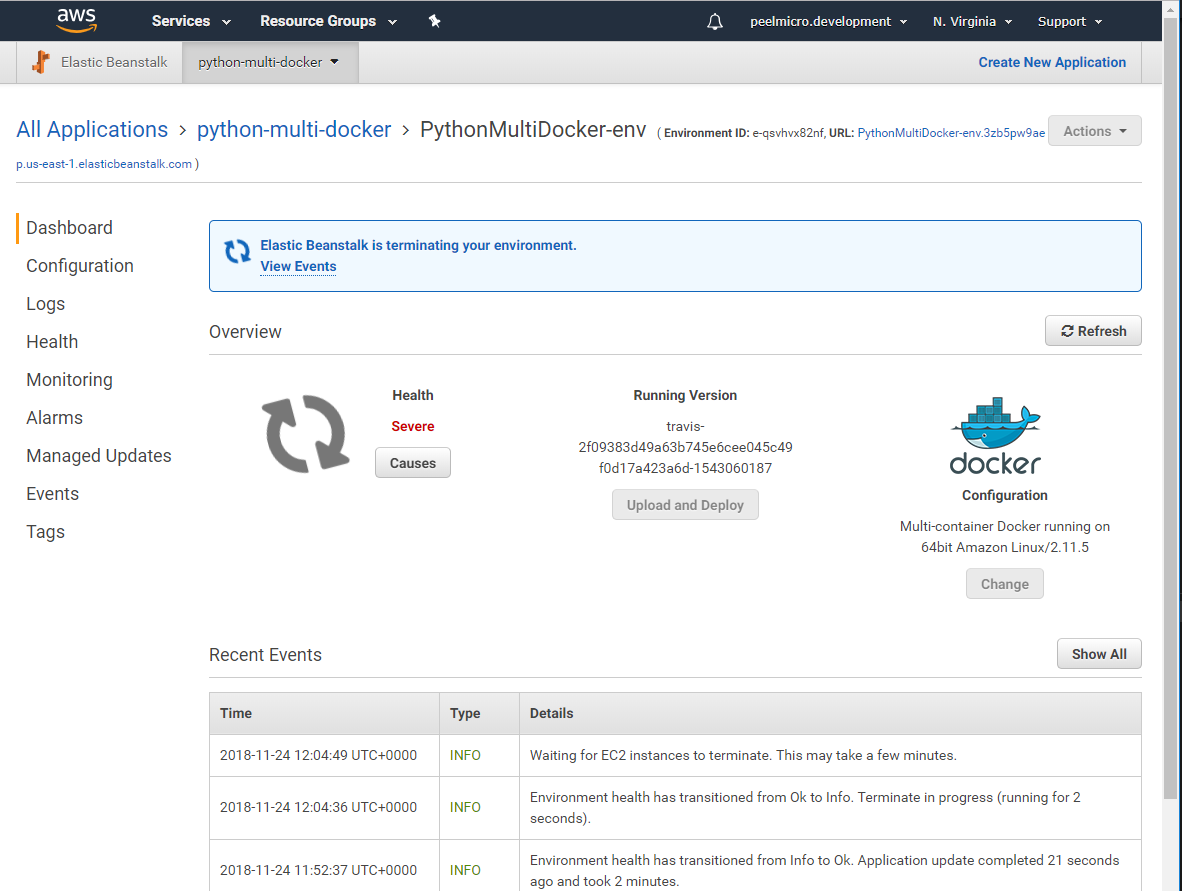
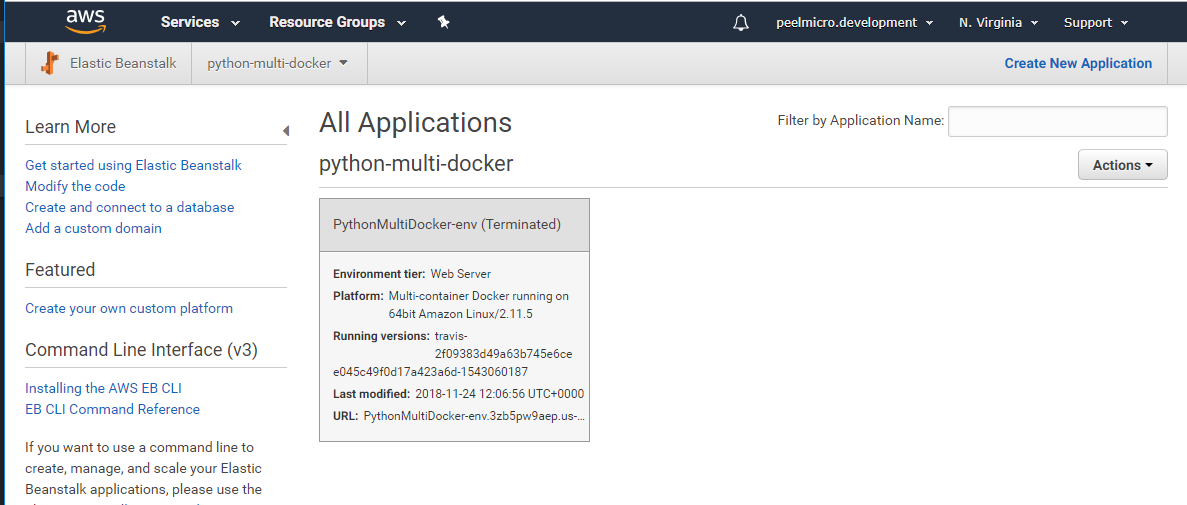
I) EB instance Go to the New PythonMultiDocker-env EB
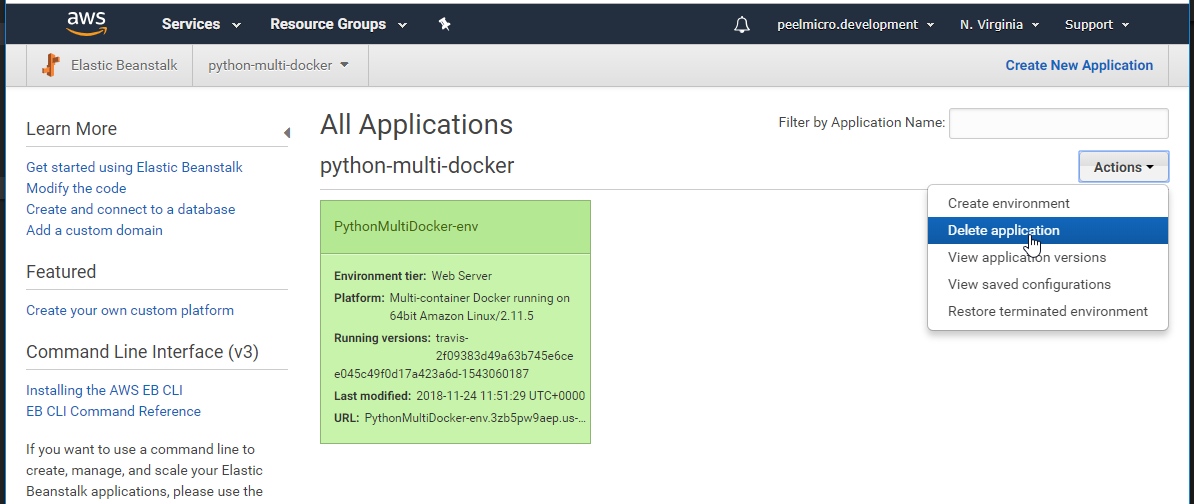
- Click on
Actions -> Delete application
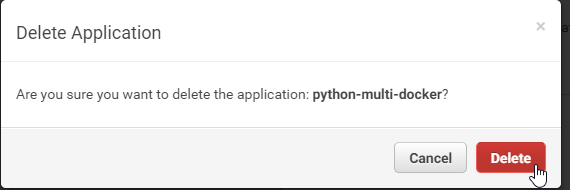
- Click on
Delete
II) RDS (Postgres)
- Go to [Amazon RDS Instances]https://console.aws.amazon.com/rds/home?region=us-east-1#dbinstances:)
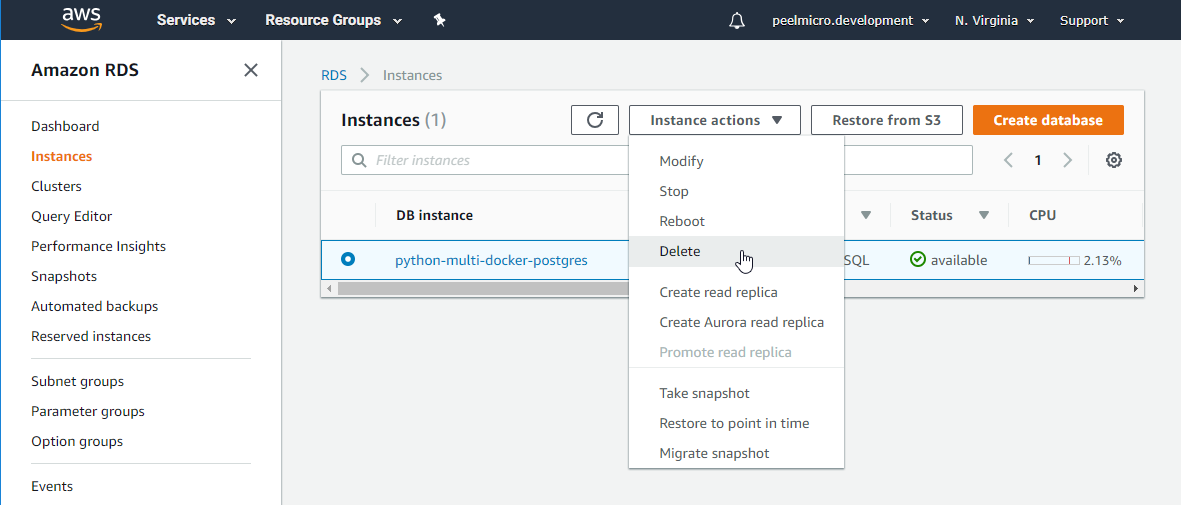
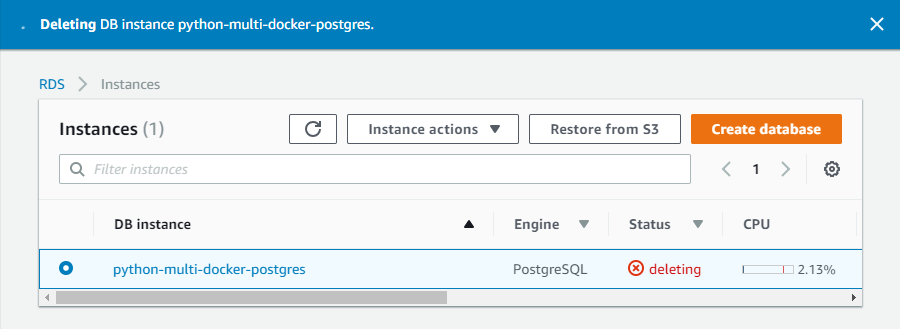
Mark the python-multi-docker-postgres one and click on Instance actions -> Delete
[ ] - Create final snapshot?
Determines whether a final DB Snapshot is created before the DB instance is deleted.
[ ] - Retain automated backups
Determines whether retaining automated backups for 7 days after deletion
[X] - I acknowledge that upon instance deletion, automated backups, including system snapshots and point-in-time recovery, will no longer be available.
To confirm deletion, type `delete me` into the field
- Clik on
Delete
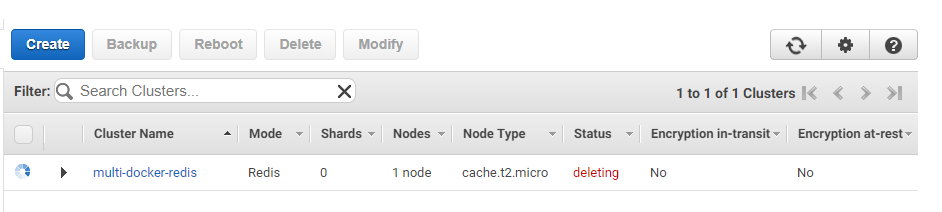
III) EC (Redis) Go to ElastiCache Redis
- Mark the
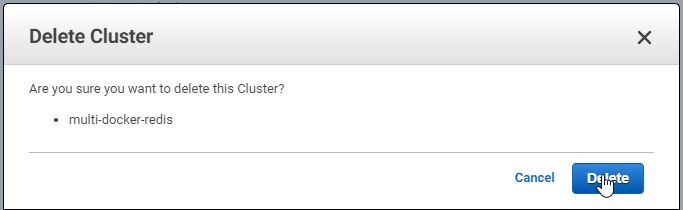
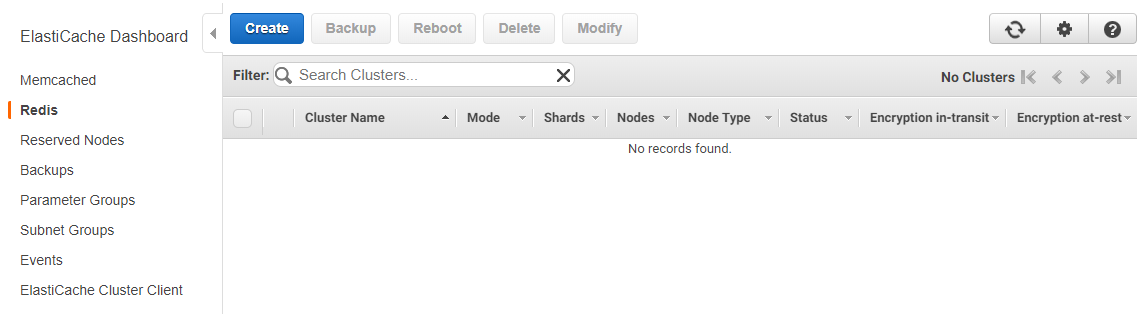
multi-docker-rediscluster and then on theDeletebutton.
- Click on
Delete
IV) Security Group (Optional) Go to the EWS Resources
- Click on
Security Groups
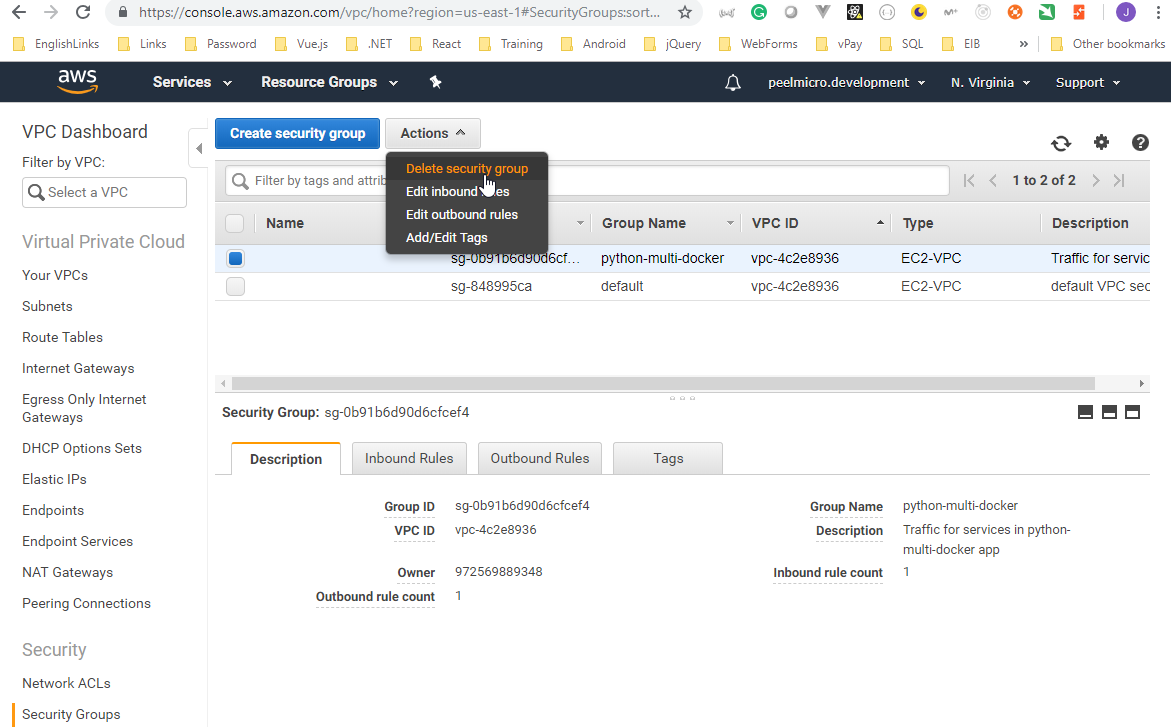
- Mark the
python-multi-dockerone and click onActions -> Delete security group
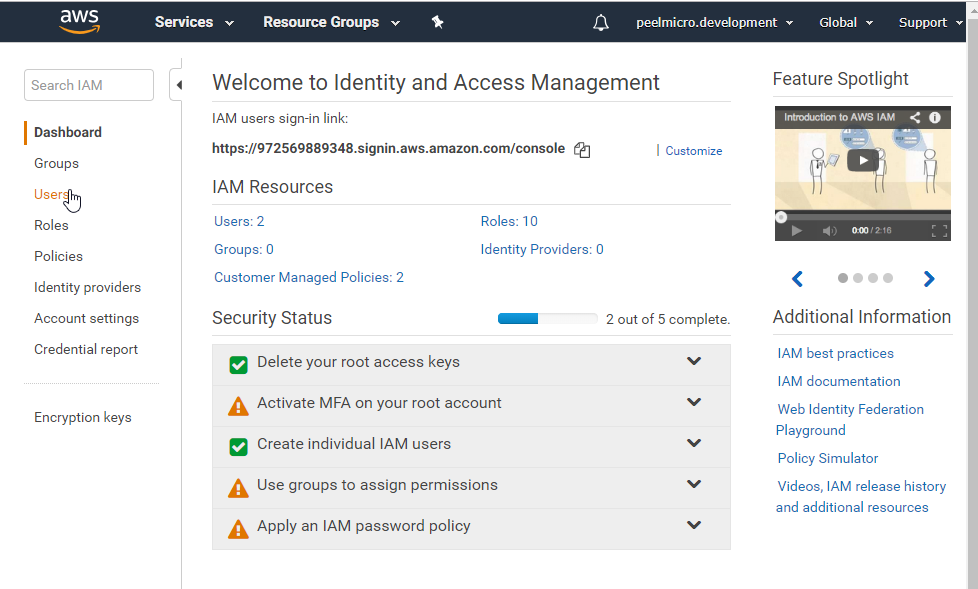
V) IAM security users (Optional) Go to Welcome to Identity and Access Managements
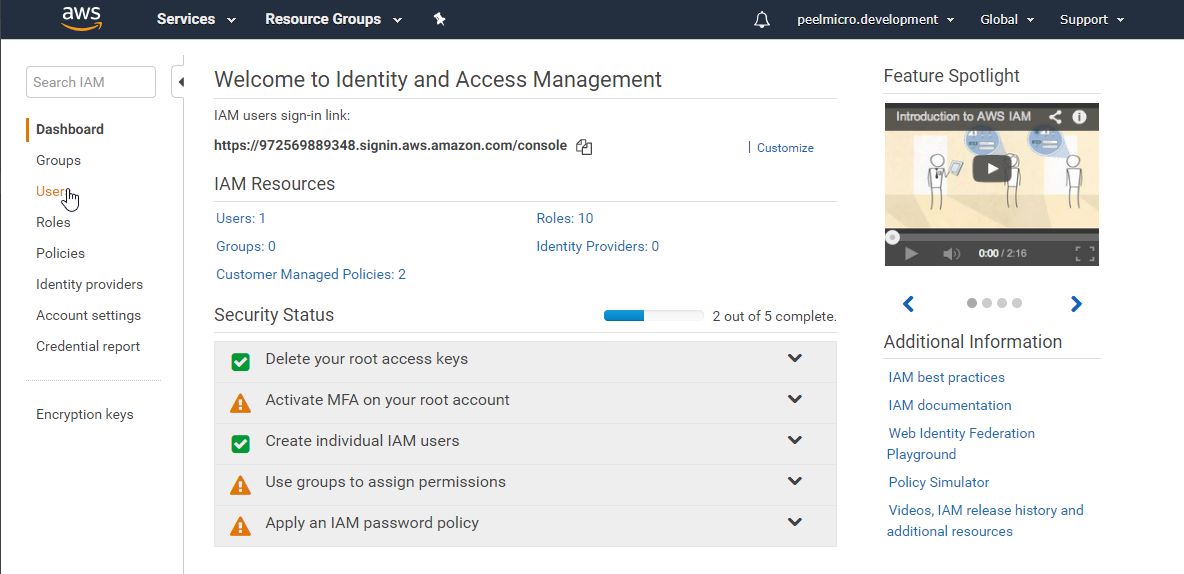
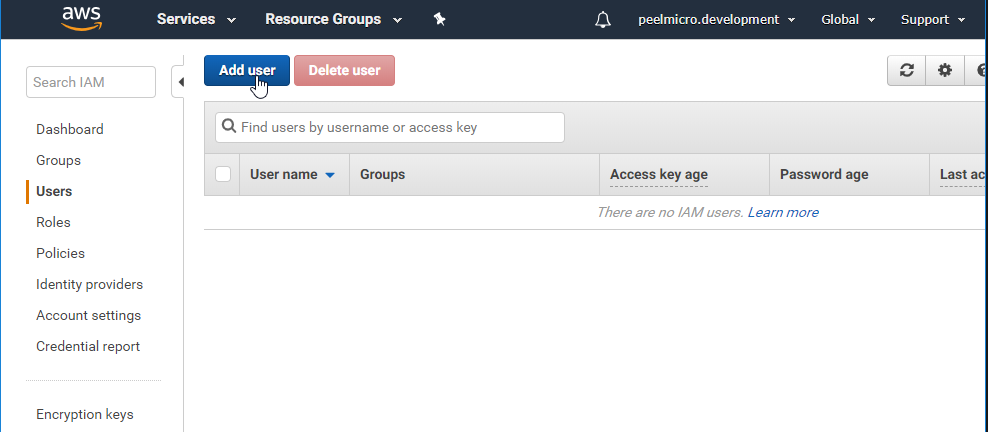
- Click on
Users
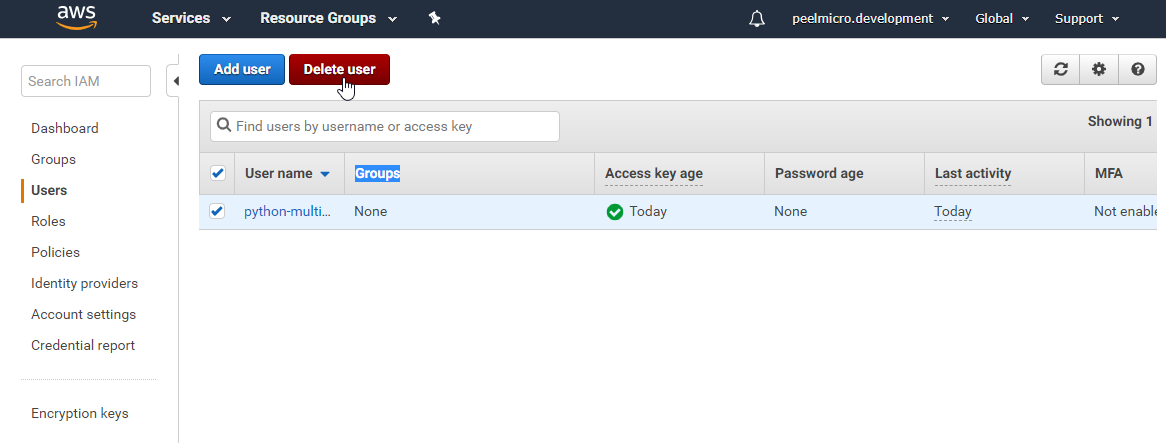
- Click on
Delete user
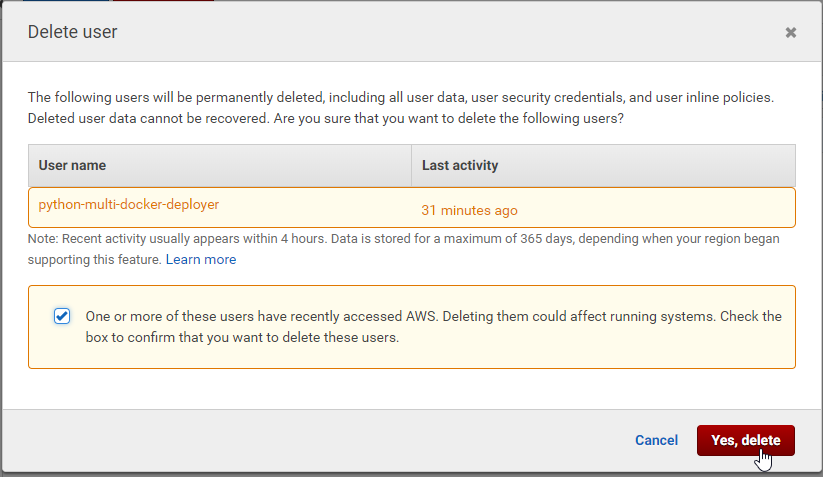
- Mark [X]
One or more of these users have recently accessed AWS. Deleting them could affect running systems. Check the box to confirm that you want to delete these users.and click onYes, delete
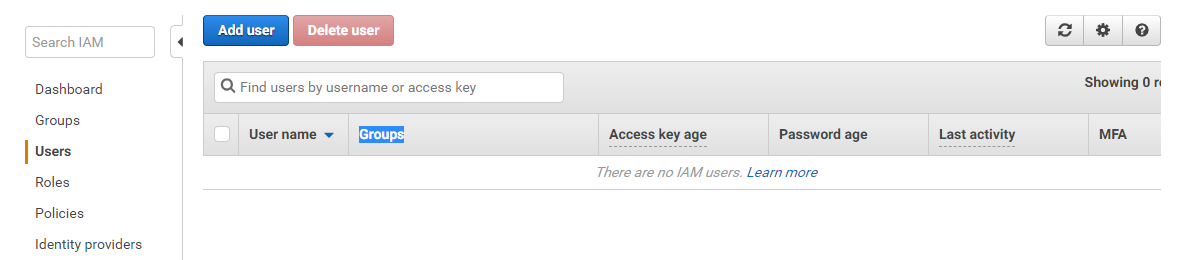
The user is deleted.
Onwards to Kubernetes!
- Modify the
client\nginx\default.conffile to avoid it fails when running it inside Kubernetes
server {
  listen 3000;

  location / {
    root /usr/share/nginx/html;
    index index.html index.htm;
    #try_files $uri $uri/ /index.html;
  }

}
- Create the
simplek8sfolder and theconfigKubernetes files
client-node-port.yaml
apiVersion: v1
kind: Service
metadata:
  name: python-client-node-port
spec:
  type: NodePort
  ports:
    - port: 3050
      targetPort: 3000
      nodePort: 31515
  selector:
    component: web
client-pod.yaml
apiVersion: v1
kind: Pod
metadata:
  name: python-client-pod
  labels:
    component: web
spec:
  containers:
    - name: client
      image: peelmicro/python-multi-client
      ports:
        - containerPort: 3000
- Create the
python-multi-clientDocker image
Juan.Pablo.Perez@RIMDUB-0232 MINGW64 ~/OneDrive/Training/Docker/DockerAndKubernetes.TheCompleteGuide/python-complex (master)$ docker build -t peelmicro/python-multi-client ./client
Sending build context to Docker daemon    341kB
Step 1/10 : FROM node:alpine as builder
 ---> 4b3c025f5508
Step 2/10 : WORKDIR /app
 ---> Using cache
 ---> 1a05d05e0b5b
Step 3/10 : COPY ./package.json ./
 ---> Using cache
 ---> 829609b8e407
Step 4/10 : RUN npm install
 ---> Using cache
 ---> a2ca727a111e
Step 5/10 : COPY . .
 ---> 1007816db89e
Step 6/10 : RUN npm run build
 ---> Running in 120bbbd7d568

> client@0.1.0 build /app
> react-scripts build

Creating an optimized production build...
Compiled successfully.

File sizes after gzip:

  47.2 KB  build/static/js/1.7b85cb19.chunk.js
  1.37 KB  build/static/js/main.c17fb642.chunk.js
  763 B    build/static/js/runtime~main.229c360f.js
  510 B    build/static/css/main.0b4a1755.chunk.css

The project was built assuming it is hosted at the server root.
You can control this with the homepage field in your package.json.
For example, add this to build it for GitHub Pages:

  "homepage" : "http://myname.github.io/myapp",

The build folder is ready to be deployed.
You may serve it with a static server:

  yarn global add serve
  serve -s build

Find out more about deployment here:

  http://bit.ly/CRA-deploy

Removing intermediate container 120bbbd7d568
 ---> ebf6d81e5d1f
Step 7/10 : FROM nginx
 ---> e81eb098537d
Step 8/10 : EXPOSE 3000
 ---> Using cache
 ---> 021956dfacb6
Step 9/10 : COPY ./nginx/default.conf /etc/nginx/conf.d/default.conf
 ---> Using cache
 ---> b206c3bc0cf7
Step 10/10 : COPY --from=builder /app/build /usr/share/nginx/html
 ---> 25047cf9798e
Successfully built 25047cf9798e
Successfully tagged peelmicro/python-multi-client:latest
SECURITY WARNING: You are building a Docker image from Windows against a non-Windows Docker host. All files and directories added to build context will have '-rwxr-xr-x' permissions. It is recommended to double check and reset permissions for sensitive files and directories.
- Push the
python-multi-clientimage toDocker Hub
Juan.Pablo.Perez@RIMDUB-0232 MINGW64 ~/OneDrive/Training/Docker/DockerAndKubernetes.TheCompleteGuide/python-complex (master)
$ docker push peelmicro/python-multi-client
The push refers to repository [docker.io/peelmicro/python-multi-client]
a0e434f5a943: Pushed
2e55e5f66dcf: Mounted from peelmicro/python-multi-client
9a8f339aeebe: Layer already exists
876456b96423: Layer already exists
ef68f6734aa4: Layer already exists
latest: digest: sha256:b347168416bf2d5802429ea9691585bb7b97ce004aa7978e43c1cc41b188b7bc size: 1365
- Create the
python-client-podpod
Juan.Pablo.Perez@RIMDUB-0232 MINGW64 ~/OneDrive/Training/Docker/DockerAndKubernetes.TheCompleteGuide/python-complex (master)
$ cd simplek8s/

Juan.Pablo.Perez@RIMDUB-0232 MINGW64 ~/OneDrive/Training/Docker/DockerAndKubernetes.TheCompleteGuide/python-complex/simplek8s (master)
$ kubectl apply -f client-pod.yaml
pod "python-client-pod" created
- Create the
python-client-node-portservice
Juan.Pablo.Perez@RIMDUB-0232 MINGW64 ~/OneDrive/Training/Docker/DockerAndKubernetes.TheCompleteGuide/python-complex/simplek8s (master)
$ kubectl apply -f client-node-port.yaml
service "python-client-node-port" created
- Confirm the IP where
minikubeis running
Juan.Pablo.Perez@RIMDUB-0232 MINGW64 ~/OneDrive/Training/Docker/DockerAndKubernetes.TheCompleteGuide/python-complex/simplek8s (master)
$ minikube status
minikube: Running
cluster: Running
kubectl: Correctly Configured: pointing to minikube-vm at 192.168.0.109
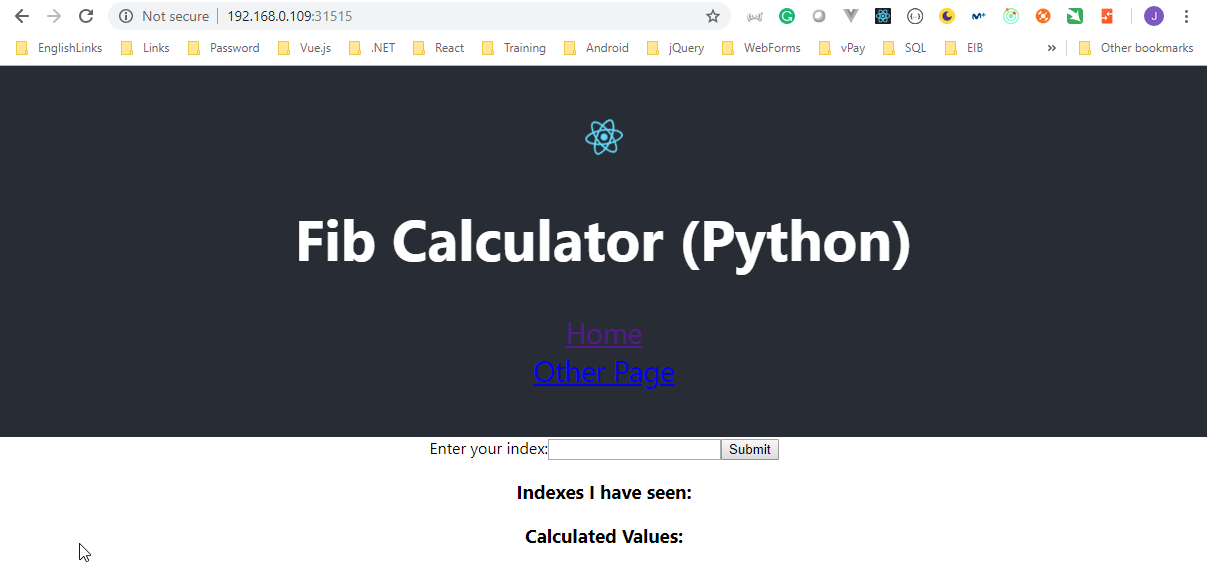
- Ensure the
clientapp is running properly
- Goto to
http://192.168.0.109:31515/
- Stop the
python-client-podpod
Juan.Pablo.Perez@RIMDUB-0232 MINGW64 ~/OneDrive/Training/Docker/DockerAndKubernetes.TheCompleteGuide/python-complex/simplek8s (master)
$ kubectl delete pod python-client-pod
pod "python-client-pod" deleted
- Stop the
python-client-node-portservice
Juan.Pablo.Perez@RIMDUB-0232 MINGW64 ~/OneDrive/Training/Docker/DockerAndKubernetes.TheCompleteGuide/python-complex/simplek8s (master)
$ kubectl delete service python-client-node-port
service "python-client-node-port" deleted
- Modify
.travis.ymlto avoid it deploys toAWS Elastic Beanstalk
sudo: required
language: node_js
node_js:
  - "8"
services:
  - docker
before_install:
  - docker build -t peelmicro/test-client -f ./client/Dockerfile.dev ./client
script:
  - docker run peelmicro/test-client npm run test -- --coverage
after_success:
  - docker build -t peelmicro/python-multi-client ./client
  - docker build -t peelmicro/python-multi-nginx ./nginx
  - docker build -t peelmicro/python-multi-server ./server
  - docker build -t peelmicro/python-multi-worker ./worker
  # Log in to the docker CLI
  - echo "$DOCKER_PASSWORD" | docker login -u "$DOCKER_ID" --password-stdin
  # Take those images and push them to docker hub
  - docker push peelmicro/python-multi-client
  - docker push peelmicro/python-multi-nginx
  - docker push peelmicro/python-multi-server
  - docker push peelmicro/python-multi-worker
# Commented out for Kubernettes
# deploy:
#   provider: elasticbeanstalk
#   region: "us-east-1"
#   app: "python-multi-docker"
#   env: "pythonMultiDocker-env"
#   bucket_name: "elasticbeanstalk-us-east-1-972569889348"
#   #bucket_path: ""
#   on:
#     branch: "master"
#   access_key_id: $AWS_ACCESS_KEY
#   secret_access_key:
#     secure: "$AWS_SECRET_KEY"
- Update
README.md
## `Python` version of the "Docker and Kubernetes: The Complete Guide" course.

> source code for the `Python`  version of the "Docker and Kubernetes: The Complete Guide" course.

## Execute it locally using

$ docker-compose up --build

Navigate to http://localhost:3050/

## Continuous Integration with Travis CI + Amazon AWS

- The repository must be created on https://github.com/

- The repository must be assigned from GitHub on https://travis-ci.com/. The following setting variables must be set up:
1) AWS_ACCESS_KEY (for 11.-Multi-Container Deployments to AWS)
2) AWS_SECRET_KEY (for 11.-Multi-Container Deployments to AWS)
3) DOCKER_ID
4) DOCKER_PASSWORD

- The following instances must be created on Amazon (for 11.-Multi-Container Deployments to AWS)
1) Elastic Beanstalk (EB)
2) Relational Database Service (RDS) for Postgres
3) ElastiCache for Redis
4) Custom Security Group
5) Identity and Access Magagement (IAM)

## Within the code you can see how to
- Create different Docket Container Types and relate all of them
  1) React Client App
  2) Python API with Flask Framework
  3) Python Console
  4) Postgres
  5) Redis
  6) NGINX
- Use Postgres from a Docker Container with Python
- Use Redis from a Docker Container with Python creating a subscription on the Web API App and subscribe to it on the Console App.
- Send dynamic JSON responses from the Python Flask Framework Web API
- Use Docker Compose to run and relate easily different Docker Components
- Use NIGIX Container to run the React Client App
- Use NIGIX Container as Reverse Proxy with Python Flask Framework Web API
- Work with different AWS Amazon service types to deploy a multi container Docker application using AWS Elastic Beanstalk
- Upload own Containers to Docker Hub and download them with the deployment
- Use Travis CI for the Continuous Integration Workflow
- Use Kubernetes
- Use Minikube to run Kubernetes locally
- Use Kubectl CLI for interacting with Kubernetes Master


## In order to get to know what has been developed follow the course on

https://www.udemy.com/docker-and-kubernetes-the-complete-guide
- Commit and push the changes to the
Githubrepository
Juan.Pablo.Perez@RIMDUB-0232 MINGW64 ~/OneDrive/Training/Docker/DockerAndKubernetes.TheCompleteGuide/python-complex (master)
$ git add .
Juan.Pablo.Perez@RIMDUB-0232 MINGW64 ~/OneDrive/Training/Docker/DockerAndKubernetes.TheCompleteGuide/python-complex (master)
$ git status
On branch master
Changes to be committed:
  (use "git reset HEAD <file>..." to unstage)

        modified:   .travis.yml
        modified:   README.md
        modified:   client/nginx/default.conf
        new file:   simplek8s/client-node-port.yaml
        new file:   simplek8s/client-pod.yaml
Juan.Pablo.Perez@RIMDUB-0232 MINGW64 ~/OneDrive/Training/Docker/DockerAndKubernetes.TheCompleteGuide/python-complex (master)
$ git commit -m "Onwards to Kubernetes!"
[master ca982c3] Onwards to Kubernetes!
 5 files changed, 49 insertions(+), 27 deletions(-)
 create mode 100644 simplek8s/client-node-port.yaml
 create mode 100644 simplek8s/client-pod.yaml
Juan.Pablo.Perez@RIMDUB-0232 MINGW64 ~/OneDrive/Training/Docker/DockerAndKubernetes.TheCompleteGuide/python-complex (master)
$ git push origin HEAD
Counting objects: 10, done.
Delta compression using up to 4 threads.
Compressing objects: 100% (9/9), done.
Writing objects: 100% (10/10), 1.27 KiB | 326.00 KiB/s, done.
Total 10 (delta 5), reused 0 (delta 0)
remote: Resolving deltas: 100% (5/5), completed with 5 local objects.
To https://github.com/peelmicro/python-multi-docker.git
   c907aea..ca982c3  HEAD -> master
Maintaining Sets of Containers with Deployments
- Create the new
client-deployment.yamlconfig file.
apiVersion: apps/v1
kind: Deployment
metadata:
  name: python-client-deployment
spec:
  replicas: 1
  selector:
    matchLabels:
      component: web
  template:
    metadata:
      labels:
        component: web
    spec:
      containers:
        - name: client
          image: peelmicro/python-multi-client
          ports:
            - containerPort: 3000
- Delete current
pods,deploymentsandservices
Juan.Pablo.Perez@RIMDUB-0232 MINGW64 ~/OneDrive/Training/Docker/DockerAndKubernetes.TheCompleteGuide/python-complex (master)$ kubectl get pods
NAME                                             READY     STATUS    RESTARTS   AGE
python-client-deployment-76cbb7f86f-dw2s7   1/1       Running   0          9m
Juan.Pablo.Perez@RIMDUB-0232 MINGW64 ~/OneDrive/Training/Docker/DockerAndKubernetes.TheCompleteGuide/python-complex (master)
$ kubectl get deployments
NAME                            DESIRED   CURRENT   UP-TO-DATE   AVAILABLE   AGE
python-client-deployment   1         1         1            1           3h
Juan.Pablo.Perez@RIMDUB-0232 MINGW64 ~/OneDrive/Training/Docker/DockerAndKubernetes.TheCompleteGuide/python-complex (master)
$ kubectl delete deployment python-client-deployment
deployment.extensions "python-client-deployment" deleted
Juan.Pablo.Perez@RIMDUB-0232 MINGW64 ~/OneDrive/Training/Docker/DockerAndKubernetes.TheCompleteGuide/python-complex (master)
$ kubectl get pods
No resources found.
Juan.Pablo.Perez@RIMDUB-0232 MINGW64 ~/OneDrive/Training/Docker/DockerAndKubernetes.TheCompleteGuide/python-complex (master)
$ kubectl get deployments
No resources found.
Juan.Pablo.Perez@RIMDUB-0232 MINGW64 ~/OneDrive/Training/Docker/DockerAndKubernetes.TheCompleteGuide/python-complex (master)
$ kubectl get services
NAME                           TYPE        CLUSTER-IP      EXTERNAL-IP   PORT(S)          AGE
python-client-node-port   NodePort    10.98.205.161   <none>        3050:31515/TCP   3h
kubernetes                     ClusterIP   10.96.0.1       <none>        443/TCP          3d
Juan.Pablo.Perez@RIMDUB-0232 MINGW64 ~/OneDrive/Training/Docker/DockerAndKubernetes.TheCompleteGuide/python-complex (master)
$ kubectl delete service python-client-node-port
service "python-client-node-port" deleted
Juan.Pablo.Perez@RIMDUB-0232 MINGW64 ~/OneDrive/Training/Docker/DockerAndKubernetes.TheCompleteGuide/python-complex (master)
$ kubectl get services
NAME         TYPE        CLUSTER-IP   EXTERNAL-IP   PORT(S)   AGE
kubernetes   ClusterIP   10.96.0.1    <none>        443/TCP   3d
- Apply the
client-deploymentconfig deployment
Juan.Pablo.Perez@RIMDUB-0232 MINGW64 ~/OneDrive/Training/Docker/DockerAndKubernetes.TheCompleteGuide/python-complex/simplek8s (master)
$ kubectl apply -f client-deployment.yaml
deployment.apps "python-client-deployment" created
Juan.Pablo.Perez@RIMDUB-0232 MINGW64 ~/OneDrive/Training/Docker/DockerAndKubernetes.TheCompleteGuide/python-complex/simplek8s (master)
$ kubectl get deployments
NAME                       DESIRED   CURRENT   UP-TO-DATE   AVAILABLE   AGE
python-client-deployment   1         1         1            1           18s
Juan.Pablo.Perez@RIMDUB-0232 MINGW64 ~/OneDrive/Training/Docker/DockerAndKubernetes.TheCompleteGuide/python-complex/simplek8s (master)
$ kubectl get pods
NAME                                        READY     STATUS    RESTARTS   AGE
python-client-deployment-6bdfc6cdc9-7b4rs   1/1       Running   0          39s
- Apply the 'client-node-port` config service
Juan.Pablo.Perez@RIMDUB-0232 MINGW64 ~/OneDrive/Training/Docker/DockerAndKubernetes.TheCompleteGuide/python-complex/simplek8s (master)
$ kubectl apply -f client-node-port.yaml
service "python-client-node-port" created
Juan.Pablo.Perez@RIMDUB-0232 MINGW64 ~/OneDrive/Training/Docker/DockerAndKubernetes.TheCompleteGuide/python-complex/simplek8s (master)
$ kubectl get services
NAME                      TYPE        CLUSTER-IP     EXTERNAL-IP   PORT(S)          AGE
kubernetes                ClusterIP   10.96.0.1      <none>        443/TCP          3d
python-client-node-port   NodePort    10.99.122.33   <none>        3050:31515/TCP   17s
- Test if the
multi-clientinstance is running properly
- Find out the current IP
Juan.Pablo.Perez@RIMDUB-0232 MINGW64 ~/OneDrive/Training/Docker/DockerAndKubernetes.TheCompleteGuide/python-complex/simplek8s (master)
$ minikube ip
192.168.0.109
- Browse to http://192.168.0.109:31515/
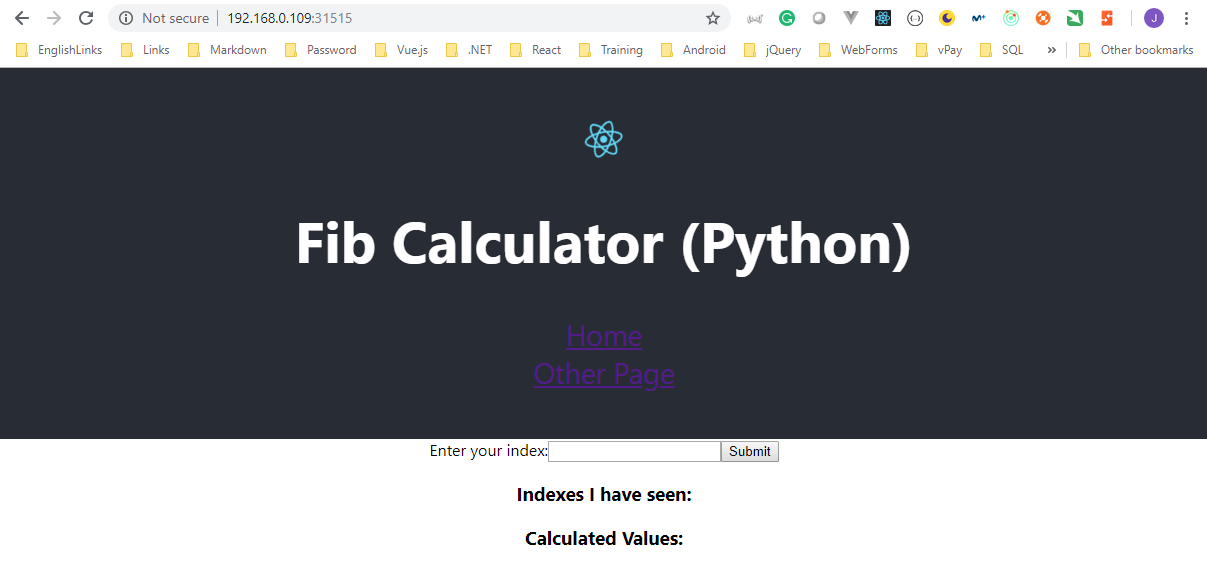
- Modify the
App.jsprogram to put another header to identify the version
import React, { Component } from 'react';
import logo from './logo.svg';
import './App.css';
import { BrowserRouter as Router, Route, Link } from 'react-router-dom';
import OtherPage from './OtherPage';
import Fib from './Fib';

class App extends Component {
  render() {
    return (
      <Router>
        <div className="App">
          <header className="App-header">
            <img src={logo} className="App-logo" alt="logo" />
            <h1 className="App-title">Fib Calculator Version 2 (Python)</h1>
            <Link to="/">Home</Link>
            <Link to="/otherpage">Other Page</Link>
          </header>
          <div>
            <Route exact path="/" component={Fib} />
            <Route path="/otherpage" component={OtherPage} />
          </div>
        </div>
      </Router>
    );
  }
}

export default App;
- Rebuild the
python-multi-clientimage with a different tag
$ docker build -t peelmicro/python-multi-client:v2 ./client
Sending build context to Docker daemon    341kB
Step 1/10 : FROM node:alpine as builder
 ---> 4b3c025f5508
Step 2/10 : WORKDIR /app
 ---> Using cache
 ---> 1a05d05e0b5b
Step 3/10 : COPY ./package.json ./
 ---> Using cache
 ---> 829609b8e407
Step 4/10 : RUN npm install
 ---> Using cache
 ---> a2ca727a111e
Step 5/10 : COPY . .
 ---> a525a727ac3b
Step 6/10 : RUN npm run build
 ---> Running in 9cb9acef102f

> client@0.1.0 build /app
> react-scripts build

Creating an optimized production build...
Compiled successfully.

File sizes after gzip:

  47.2 KB  build/static/js/1.7b85cb19.chunk.js
  1.38 KB  build/static/js/main.a826a8cd.chunk.js
  763 B    build/static/js/runtime~main.229c360f.js
  510 B    build/static/css/main.0b4a1755.chunk.css

The project was built assuming it is hosted at the server root.
You can control this with the homepage field in your package.json.
For example, add this to build it for GitHub Pages:

  "homepage" : "http://myname.github.io/myapp",

The build folder is ready to be deployed.
You may serve it with a static server:

  yarn global add serve
  serve -s build

Find out more about deployment here:

  http://bit.ly/CRA-deploy

Removing intermediate container 9cb9acef102f
 ---> e504d55df439
Step 7/10 : FROM nginx
 ---> e81eb098537d
Step 8/10 : EXPOSE 3000
 ---> Using cache
 ---> 021956dfacb6
Step 9/10 : COPY ./nginx/default.conf /etc/nginx/conf.d/default.conf
 ---> Using cache
 ---> b206c3bc0cf7
Step 10/10 : COPY --from=builder /app/build /usr/share/nginx/html
 ---> d8f9f5d651a8
Successfully built d8f9f5d651a8
Successfully tagged peelmicro/python-multi-client:v2
SECURITY WARNING: You are building a Docker image from Windows against a non-Windows Docker host. All files and directories added to build context will have '-rwxr-xr-x' permissions. It is recommended to double check and reset permissions for sensitive files and directories.
- Push the new
python-multi-clientimage toDocker Hub
Juan.Pablo.Perez@RIMDUB-0232 MINGW64 ~/OneDrive/Training/Docker/DockerAndKubernetes.TheCompleteGuide/python-complex (master)
$ docker push peelmicro/python-multi-client:v2
The push refers to repository [docker.io/peelmicro/python-multi-client]
db8ac12e8425: Pushed
2e55e5f66dcf: Layer already exists
9a8f339aeebe: Layer already exists
876456b96423: Layer already exists
ef68f6734aa4: Layer already exists
v2: digest: sha256:f65bcfb6308b12c151e4a29709017458588a13b5443d955f15b4ca29ddb2a665 size: 1365
Runa specifickubectlcommand forcing the deployment to use the theimage version
Juan.Pablo.Perez@RIMDUB-0232 MINGW64 ~/OneDrive/Training/Docker/DockerAndKubernetes.TheCompleteGuide/python-complex (master)
$ kubectl set image deployment/python-client-deployment client=peelmicro/python-multi-client:v2
deployment.apps "python-client-deployment" image updated
Juan.Pablo.Perez@RIMDUB-0232 MINGW64 ~/OneDrive/Training/Docker/DockerAndKubernetes.TheCompleteGuide/python-complex (master)
$ kubectl get deployments
NAME                       DESIRED   CURRENT   UP-TO-DATE   AVAILABLE   AGE
python-client-deployment   1         1         1            1           6m
Juan.Pablo.Perez@RIMDUB-0232 MINGW64 ~/OneDrive/Training/Docker/DockerAndKubernetes.TheCompleteGuide/python-complex (master)
$ kubectl get pods
NAME                                       READY     STATUS    RESTARTS   AGE
python-client-deployment-c7fdb5987-6xn5f   1/1       Running   0          39s
- Test if the new instance of the
muti-clientis running
- Browse to http://192.168.0.109:31515/
CommitandPushchanges to Github Repository
Juan.Pablo.Perez@RIMDUB-0232 MINGW64 ~/OneDrive/Training/Docker/DockerAndKubernetes.TheCompleteGuide/python-complex (master)
$ git add .
warning: LF will be replaced by CRLF in client/src/App.js.
The file will have its original line endings in your working directory.
Juan.Pablo.Perez@RIMDUB-0232 MINGW64 ~/OneDrive/Training/Docker/DockerAndKubernetes.TheCompleteGuide/python-complex (master)
$ git status
On branch master
Changes to be committed:
  (use "git reset HEAD <file>..." to unstage)

        modified:   client/src/App.js
        new file:   simplek8s/client-deployment.yaml
Juan.Pablo.Perez@RIMDUB-0232 MINGW64 ~/OneDrive/Training/Docker/DockerAndKubernetes.TheCompleteGuide/python-complex (master)
$ git commit -m "Maintaining Sets of Containers with Deployments"
[master 190fbfe] Maintaining Sets of Containers with Deployments
 2 files changed, 20 insertions(+), 1 deletion(-)
 create mode 100644 simplek8s/client-deployment.yaml
Juan.Pablo.Perez@RIMDUB-0232 MINGW64 ~/OneDrive/Training/Docker/DockerAndKubernetes.TheCompleteGuide/python-complex (master)
$ git push origin HEAD
Counting objects: 7, done.
Delta compression using up to 4 threads.
Compressing objects: 100% (7/7), done.
Writing objects: 100% (7/7), 818 bytes | 163.00 KiB/s, done.
Total 7 (delta 4), reused 0 (delta 0)
remote: Resolving deltas: 100% (4/4), completed with 4 local objects.
To https://github.com/peelmicro/python-multi-docker.git
   ca982c3..190fbfe  HEAD -> master
A Multi-Container App with Kubernetes
- Clean up the current objects running locally on
minikube
- Check if there are any
servicerunning
Juan.Pablo.Perez@RIMDUB-0232 MINGW64 ~/OneDrive/Training/Docker/DockerAndKubernetes.TheCompleteGuide/python-complex (master)
$ kubectl get all
NAME                                                   READY     STATUS    RESTARTS   AGE
pod/dotnet-core-client-deployment-7b4f7756df-cq5rf     1/1       Running   0          38m
pod/dotnet-core-client-deployment-7b4f7756df-qhkw7     1/1       Running   0          38m
pod/dotnet-core-client-deployment-7b4f7756df-z9htd     1/1       Running   0          38m
pod/dotnet-core-postgres-deployment-6c4b98478d-88rkp   1/1       Running   0          38m
pod/dotnet-core-redis-deployment-666bf96bdd-mfwx7      1/1       Running   0          38m
pod/dotnet-core-server-deployment-545bb75676-9vtsw     1/1       Running   1          38m
pod/dotnet-core-server-deployment-545bb75676-h4dvp     1/1       Running   1          38m
pod/dotnet-core-server-deployment-545bb75676-nw4xd     1/1       Running   0          38m
pod/dotnet-core-worker-deployment-7b5d67dc7f-gk6zm     1/1       Running   0          38m

NAME                                              TYPE        CLUSTER-IP       EXTERNAL-IP   PORT(S)    AGE
service/dotnet-core-client-cluster-ip-service     ClusterIP   10.104.239.99    <none>        3000/TCP   38m
service/dotnet-core-postgres-cluster-ip-service   ClusterIP   10.111.75.44     <none>        5432/TCP   38m
service/dotnet-core-redis-cluster-ip-service      ClusterIP   10.96.174.32     <none>        6379/TCP   38m
service/dotnet-core-server-cluster-ip-service     ClusterIP   10.104.117.208   <none>        5000/TCP   38m
service/kubernetes                                ClusterIP   10.96.0.1        <none>        443/TCP    42m

NAME                                              DESIRED   CURRENT   UP-TO-DATE   AVAILABLE   AGE
deployment.apps/dotnet-core-client-deployment     3         3         3            3           38m
deployment.apps/dotnet-core-postgres-deployment   1         1         1            1           38m
deployment.apps/dotnet-core-redis-deployment      1         1         1            1           38m
deployment.apps/dotnet-core-server-deployment     3         3         3            3           38m
deployment.apps/dotnet-core-worker-deployment     1         1         1            1           38m

NAME                                                         DESIRED   CURRENT   READY     AGE
replicaset.apps/dotnet-core-client-deployment-7b4f7756df     3         3         3         38m
replicaset.apps/dotnet-core-postgres-deployment-6c4b98478d   1         1         1         38m
replicaset.apps/dotnet-core-redis-deployment-666bf96bdd      1         1         1         38m
replicaset.apps/dotnet-core-server-deployment-545bb75676     3         3         3         38m
replicaset.apps/dotnet-core-worker-deployment-7b5d67dc7f     1         1         1         38m
Juan.Pablo.Perez@RIMDUB-0232 MINGW64 ~/OneDrive/Training/Docker/DockerAndKubernetes.TheCompleteGuide/python-complex (master)
$ kubectl get storageclass
NAME                 PROVISIONER                AGE
standard (default)   k8s.io/minikube-hostpath   6d
- Execute the
kubectl delete daemonsets,replicasets,services,deployments,pods,rc,pv,pvc,namespaces,secrets,ingresses --allcommand to remove all theKubernetes objects
Juan.Pablo.Perez@RIMDUB-0232 MINGW64 ~/OneDrive/Training/Docker/DockerAndKubernetes.TheCompleteGuide/python-complex (master)
$ kubectl delete daemonsets,replicasets,services,deployments,pods,rc,pv,pvc,namespaces,secrets,ingresses --all
replicaset.extensions "dotnet-core-client-deployment-7b4f7756df" deleted
replicaset.extensions "dotnet-core-postgres-deployment-6c4b98478d" deleted
replicaset.extensions "dotnet-core-redis-deployment-666bf96bdd" deleted
replicaset.extensions "dotnet-core-server-deployment-545bb75676" deleted
replicaset.extensions "dotnet-core-worker-deployment-7b5d67dc7f" deleted
service "dotnet-core-client-cluster-ip-service" deleted
service "dotnet-core-postgres-cluster-ip-service" deleted
service "dotnet-core-redis-cluster-ip-service" deleted
service "dotnet-core-server-cluster-ip-service" deleted
service "kubernetes" deleted
deployment.extensions "dotnet-core-client-deployment" deleted
deployment.extensions "dotnet-core-postgres-deployment" deleted
deployment.extensions "dotnet-core-redis-deployment" deleted
deployment.extensions "dotnet-core-server-deployment" deleted
deployment.extensions "dotnet-core-worker-deployment" deleted
pod "dotnet-core-redis-deployment-666bf96bdd-fx6kc" deleted
pod "dotnet-core-server-deployment-545bb75676-5tj85" deleted
pod "dotnet-core-server-deployment-545bb75676-66hv7" deleted
pod "dotnet-core-server-deployment-545bb75676-g7x8x" deleted
pod "dotnet-core-worker-deployment-7b5d67dc7f-q9tpq" deleted
persistentvolume "pvc-3344c934-f726-11e8-9cb5-00155dc00118" deleted
persistentvolumeclaim "dotnet-core-database-persistent-volume-claim" deleted
namespace "ingress-nginx" deleted
secret "default-token-26mqb" deleted
secret "pgpassword" deleted
ingress.extensions "dotnet-core-ingress-service" deleted
Error from server (Forbidden): namespaces "default" is forbidden: this namespace may not be deleted
Error from server (Forbidden): namespaces "kube-public" is forbidden: this namespace may not be deleted
Error from server (Forbidden): namespaces "kube-system" is forbidden: this namespace may not be deleted
Juan.Pablo.Perez@RIMDUB-0232 MINGW64 ~/OneDrive/Training/Docker/DockerAndKubernetes.TheCompleteGuide/python-complex (master)
$ kubectl get all
NAME                 TYPE        CLUSTER-IP   EXTERNAL-IP   PORT(S)   AGE
service/kubernetes   ClusterIP   10.96.0.1    <none>        443/TCP   3m
- Make a copy of the whole solution on the
elastic-beanstalkfolder
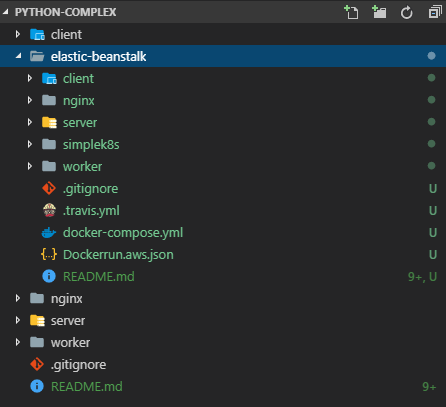
- Remove the
.travis.yml,docker-compose.ymlandDockerrun.aws.jsonfiles and thenginxandsimplek8sfolders.
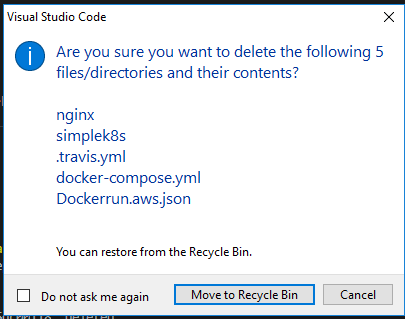
- Copy the
k8sfolder from theDotnet Coreversion.
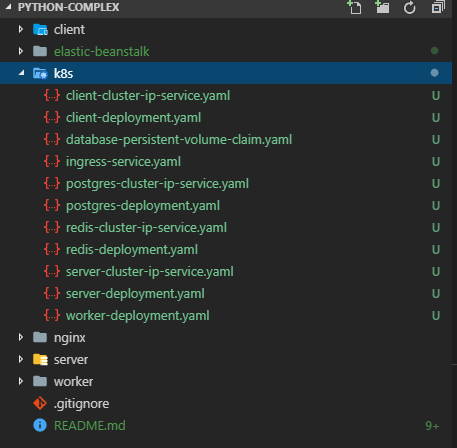
- Modify all the
configurationfiles.
client-cluster-ip-service.yaml
apiVersion: v1
kind: Service
metadata:
  name: python-client-cluster-ip-service
spec:
  type: ClusterIP
  selector:
    component: web
  ports:
    - port: 3000
      targetPort: 3000
client-deployment.yaml
apiVersion: apps/v1
kind: Deployment
metadata:
  name: python-client-deployment
spec:
  replicas: 3
  selector:
    matchLabels:
      component: web
  template:
    metadata:
      labels:
        component: web
    spec:
      containers:
        - name: client
          image: peelmicro/python-multi-client
          ports:
            - containerPort: 3000
database-persistent-volume-claim.yaml
apiVersion: v1
kind: PersistentVolumeClaim
metadata:
  name: python-database-persistent-volume-claim
spec:
  accessModes:
    - ReadWriteOnce
  resources:
    requests:
      storage: 2Gi
ingress-service.yaml
apiVersion: extensions/v1beta1
kind: Ingress
metadata:
  name: python-ingress-service
  annotations:
    kubernetes.io/ingress.class: nginx
    nginx.ingress.kubernetes.io/rewrite-target: /
spec:
  rules:
    - http:
        paths:
          - path: /
            backend:
              serviceName: python-client-cluster-ip-service
              servicePort: 3000
          - path: /api/
            backend:
              serviceName: python-server-cluster-ip-service
              servicePort: 5000
postgres-cluster-ip-service.yaml
apiVersion: v1
kind: Service
metadata:
  name: python-postgres-cluster-ip-service
spec:
  type: ClusterIP
  selector:
    component: postgres
  ports:
    - port: 5432
      targetPort: 5432
postgres-deployment.yaml
apiVersion: apps/v1
kind: Deployment
metadata:
  name: python-postgres-deployment
spec:
  replicas: 1
  selector:
    matchLabels:
      component: postgres
  template:
    metadata:
      labels:
        component: postgres
    spec:
      volumes:
        - name: postgres-storage
          persistentVolumeClaim:
            claimName: python-database-persistent-volume-claim
      containers:
        - name: postgres
          image: postgres
          ports:
            - containerPort: 5432
          volumeMounts:
            - name: postgres-storage
              mountPath: /var/lib/postgresql/data
              subPath: postgres
          env:
            - name: PGPASSWORD
              valueFrom:
                secretKeyRef:
                  name: pgpassword
                  key: PGPASSWORD
redis-cluster-ip-service.yaml
apiVersion: v1
kind: Service
metadata:
  name: python-redis-cluster-ip-service
spec:
  type: ClusterIP
  selector:
    component: redis
  ports:
    - port: 6379
      targetPort: 6379
redis-deployment.yaml
apiVersion: apps/v1
kind: Deployment
metadata:
  name: python-redis-deployment
spec:
  replicas: 1
  selector:
    matchLabels:
      component: redis
  template:
    metadata:
      labels:
        component: redis
    spec:
      containers:
        - name: redis
          image: redis
          ports:
            - containerPort: 6379
server-cluster-ip-service.yaml
apiVersion: v1
kind: Service
metadata:
  name: python-server-cluster-ip-service
spec:
  type: ClusterIP
  selector:
    component: server
  ports:
    - port: 5000
      targetPort: 5000
server-deployment.yaml
apiVersion: apps/v1
kind: Deployment
metadata:
  name: python-server-deployment
spec:
  replicas: 3
  selector:
    matchLabels:
      component: server
  template:
    metadata:
      labels:
        component: server
    spec:
      containers:
        - name: server
          image: peelmicro/python-multi-server
          ports:
            - containerPort: 5000
          env:
            - name: REDIS_HOST
              value: python-redis-cluster-ip-service
            - name: REDIS_PORT
              value: '6379'
            - name: PGUSER
              value: postgres
            - name: PGHOST
              value: python-postgres-cluster-ip-service
            - name: PGDATABASE
              value: postgres
            - name: PGPORT
              value: '5432'
            - name: PGPASSWORD
              valueFrom:
                secretKeyRef:
                  name: pgpassword
                  key: PGPASSWORD
worker-deployment.yaml
apiVersion: apps/v1
kind: Deployment
metadata:
  name: python-worker-deployment
spec:
  replicas: 1
  selector:
    matchLabels:
      component: worker
  template:
    metadata:
      labels:
        component: worker
    spec:
      containers:
        - name: worker
          image: peelmicro/python-multi-worker
          env:
              - name: REDIS_HOST
                value: python-redis-cluster-ip-service
              - name: REDIS_PORT
                value: '6379'
- Create the
secretsfor thepostgrespassword
Juan.Pablo.Perez@RIMDUB-0232 MINGW64 ~/OneDrive/Training/Docker/DockerAndKubernetes.TheCompleteGuide/python-complex (master)
$ kubectl create secret generic pgpassword --from-literal PGPASSWORD=postgres_password
secret "pgpassword" created
Juan.Pablo.Perez@RIMDUB-0232 MINGW64 ~/OneDrive/Training/Docker/DockerAndKubernetes.TheCompleteGuide/python-complex (master)
$ kubectl get secrets
NAME                  TYPE                                  DATA      AGE
default-token-8zs44   kubernetes.io/service-account-token   3         7m
pgpassword            Opaque                                1         12s
- Execute the
mandatorykubectl apply -f https://raw.githubusercontent.com/kubernetes/ingress-nginx/master/deploy/mandatory.yamlIngress Nginxandminikube addons enable ingressMinikubecommands.
Juan.Pablo.Perez@RIMDUB-0232 MINGW64 ~/OneDrive/Training/Docker/DockerAndKubernetes.TheCompleteGuide/python-complex (master)
$ kubectl apply -f https://raw.githubusercontent.com/kubernetes/ingress-nginx/master/deploy/mandatory.yaml
namespace "ingress-nginx" created
configmap "nginx-configuration" created
serviceaccount "nginx-ingress-serviceaccount" created
clusterrole.rbac.authorization.k8s.io "nginx-ingress-clusterrole" configured
role.rbac.authorization.k8s.io "nginx-ingress-role" created
rolebinding.rbac.authorization.k8s.io "nginx-ingress-role-nisa-binding" created
clusterrolebinding.rbac.authorization.k8s.io "nginx-ingress-clusterrole-nisa-binding" configured
deployment.extensions "nginx-ingress-controller" created
Juan.Pablo.Perez@RIMDUB-0232 MINGW64 ~/OneDrive/Training/Docker/DockerAndKubernetes.TheCompleteGuide/python-complex (master)
$ minikube addons enable ingress
ingress was successfully enabled
- Install all the
Kubernetes objects
Juan.Pablo.Perez@RIMDUB-0232 MINGW64 ~/OneDrive/Training/Docker/DockerAndKubernetes.TheCompleteGuide/python-complex (master)
$ kubectl apply -f k8s
service "python-client-cluster-ip-service" created
deployment.apps "python-client-deployment" created
persistentvolumeclaim "python-database-persistent-volume-claim" created
ingress.extensions "python-ingress-service" created
service "python-postgres-cluster-ip-service" created
deployment.apps "python-postgres-deployment" created
service "python-redis-cluster-ip-service" created
deployment.apps "python-redis-deployment" created
service "python-server-cluster-ip-service" created
deployment.apps "python-server-deployment" created
deployment.apps "python-worker-deployment" created
- Check if the services are available
Juan.Pablo.Perez@RIMDUB-0232 MINGW64 ~/OneDrive/Training/Docker/DockerAndKubernetes.TheCompleteGuide/python-complex (master)
$ kubectl get all
NAME                                              READY     STATUS              RESTARTS   AGE
pod/python-client-deployment-6bdfc6cdc9-7mbfb     0/1       ContainerCreating   0          15s
pod/python-client-deployment-6bdfc6cdc9-82thg     0/1       ContainerCreating   0          14s
pod/python-client-deployment-6bdfc6cdc9-sq48c     0/1       ContainerCreating   0          14s
pod/python-postgres-deployment-7cc5c8d56d-4h989   0/1       ContainerCreating   0          14s
pod/python-redis-deployment-666bf96bdd-pw9l2      0/1       ContainerCreating   0          13s
pod/python-server-deployment-6fbb7ddd8-mdpgw      0/1       ContainerCreating   0          12s
pod/python-server-deployment-6fbb7ddd8-n7c6g      0/1       ContainerCreating   0          12s
pod/python-server-deployment-6fbb7ddd8-nzx78      0/1       ContainerCreating   0          12s
pod/python-worker-deployment-787789cc6f-5pkdg     0/1       ContainerCreating   0          11s

NAME                                         TYPE        CLUSTER-IP       EXTERNAL-IP   PORT(S)    AGE
service/kubernetes                           ClusterIP   10.96.0.1        <none>        443/TCP    10m
service/python-client-cluster-ip-service     ClusterIP   10.105.219.201   <none>        3000/TCP   15s
service/python-postgres-cluster-ip-service   ClusterIP   10.104.110.88    <none>        5432/TCP   14s
service/python-redis-cluster-ip-service      ClusterIP   10.97.32.47      <none>        6379/TCP   13s
service/python-server-cluster-ip-service     ClusterIP   10.106.105.146   <none>        5000/TCP   12s

NAME                                         DESIRED   CURRENT   UP-TO-DATE   AVAILABLE   AGE
deployment.apps/python-client-deployment     3         3         3            0           15s
deployment.apps/python-postgres-deployment   1         1         1            0           14s
deployment.apps/python-redis-deployment      1         1         1            0           13s
deployment.apps/python-server-deployment     3         3         3            0           12s
deployment.apps/python-worker-deployment     1         1         1            0           12s

NAME                                                    DESIRED   CURRENT   READY     AGE
replicaset.apps/python-client-deployment-6bdfc6cdc9     3         3         0         15s
replicaset.apps/python-postgres-deployment-7cc5c8d56d   1         1         0         14s
replicaset.apps/python-redis-deployment-666bf96bdd      1         1         0         13s
replicaset.apps/python-server-deployment-6fbb7ddd8      3         3         0         12s
replicaset.apps/python-worker-deployment-787789cc6f     1         1         0         12s
Juan.Pablo.Perez@RIMDUB-0232 MINGW64 ~/OneDrive/Training/Docker/DockerAndKubernetes.TheCompleteGuide/python-complex (master)
$ kubectl get ing
NAME                     HOSTS     ADDRESS   PORTS     AGE
python-ingress-service   *                   80        1m
Juan.Pablo.Perez@RIMDUB-0232 MINGW64 ~/OneDrive/Training/Docker/DockerAndKubernetes.TheCompleteGuide/python-complex (master)
$ kubectl get all
NAME                                              READY     STATUS    RESTARTS   AGE
pod/python-client-deployment-6bdfc6cdc9-7mbfb     1/1       Running   0          4m
pod/python-client-deployment-6bdfc6cdc9-82thg     1/1       Running   0          4m
pod/python-client-deployment-6bdfc6cdc9-sq48c     1/1       Running   0          4m
pod/python-postgres-deployment-7cc5c8d56d-4h989   1/1       Running   0          4m
pod/python-redis-deployment-666bf96bdd-pw9l2      1/1       Running   0          4m
pod/python-server-deployment-6fbb7ddd8-mdpgw      1/1       Running   0          4m
pod/python-server-deployment-6fbb7ddd8-n7c6g      1/1       Running   0          4m
pod/python-server-deployment-6fbb7ddd8-nzx78      1/1       Running   0          4m
pod/python-worker-deployment-787789cc6f-5pkdg     1/1       Running   0          4m

NAME                                         TYPE        CLUSTER-IP       EXTERNAL-IP   PORT(S)    AGE
service/kubernetes                           ClusterIP   10.96.0.1        <none>        443/TCP    14m
service/python-client-cluster-ip-service     ClusterIP   10.105.219.201   <none>        3000/TCP   4m
service/python-postgres-cluster-ip-service   ClusterIP   10.104.110.88    <none>        5432/TCP   4m
service/python-redis-cluster-ip-service      ClusterIP   10.97.32.47      <none>        6379/TCP   4m
service/python-server-cluster-ip-service     ClusterIP   10.106.105.146   <none>        5000/TCP   4m

NAME                                         DESIRED   CURRENT   UP-TO-DATE   AVAILABLE   AGE
deployment.apps/python-client-deployment     3         3         3            3           4m
deployment.apps/python-postgres-deployment   1         1         1            1           4m
deployment.apps/python-redis-deployment      1         1         1            1           4m
deployment.apps/python-server-deployment     3         3         3            3           4m
deployment.apps/python-worker-deployment     1         1         1            1           4m

NAME                                                    DESIRED   CURRENT   READY     AGE
replicaset.apps/python-client-deployment-6bdfc6cdc9     3         3         3         4m
replicaset.apps/python-postgres-deployment-7cc5c8d56d   1         1         1         4m
replicaset.apps/python-redis-deployment-666bf96bdd      1         1         1         4m
replicaset.apps/python-server-deployment-6fbb7ddd8      3         3         3         4m
replicaset.apps/python-worker-deployment-787789cc6f     1         1         1         4m
- Run
minikubelocally
Juan.Pablo.Perez@RIMDUB-0232 MINGW64 ~/OneDrive/Training/Docker/DockerAndKubernetes.TheCompleteGuide/python-complex (master)
$ minikube ip
192.168.0.107
- Browse to
https://192.168.0.107/
- Click on
ADVANCED
- Click on
Proceed to 192.168.0.107 (unsafe)
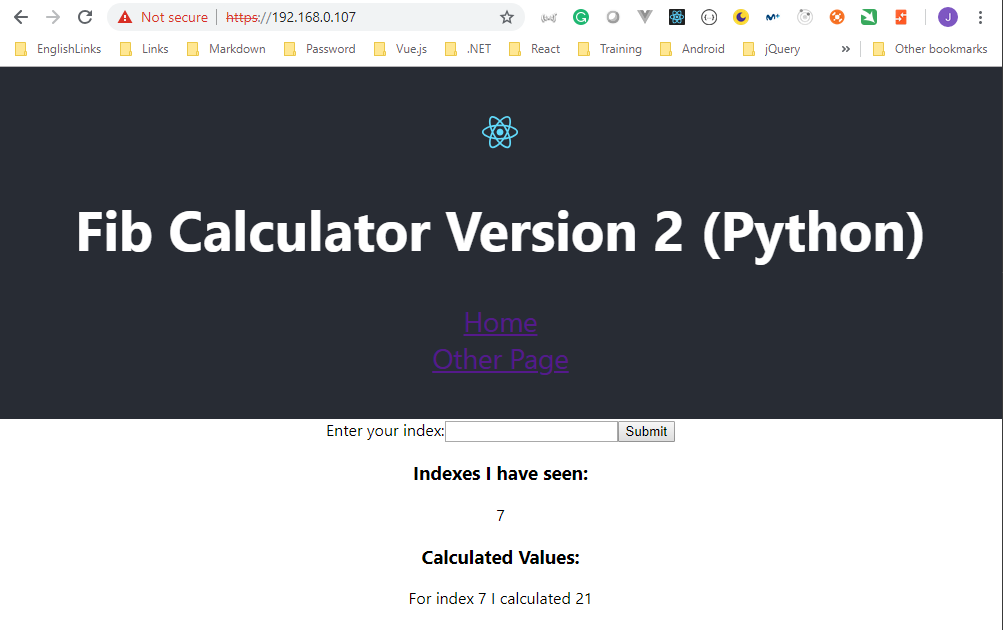
- Have a look at the `Minikube Dashboard'
- Execute the
minikube dashboardcommand
Juan.Pablo.Perez@RIMDUB-0232 MINGW64 ~/OneDrive/Training/Docker/DockerAndKubernetes.TheCompleteGuide/python-complex (master)
$ minikube dashboard
Opening `http://127.0.0.1:53572/api/v1/namespaces/kube-system/services/http:kubernetes-dashboard:/proxy/` in your default browser...
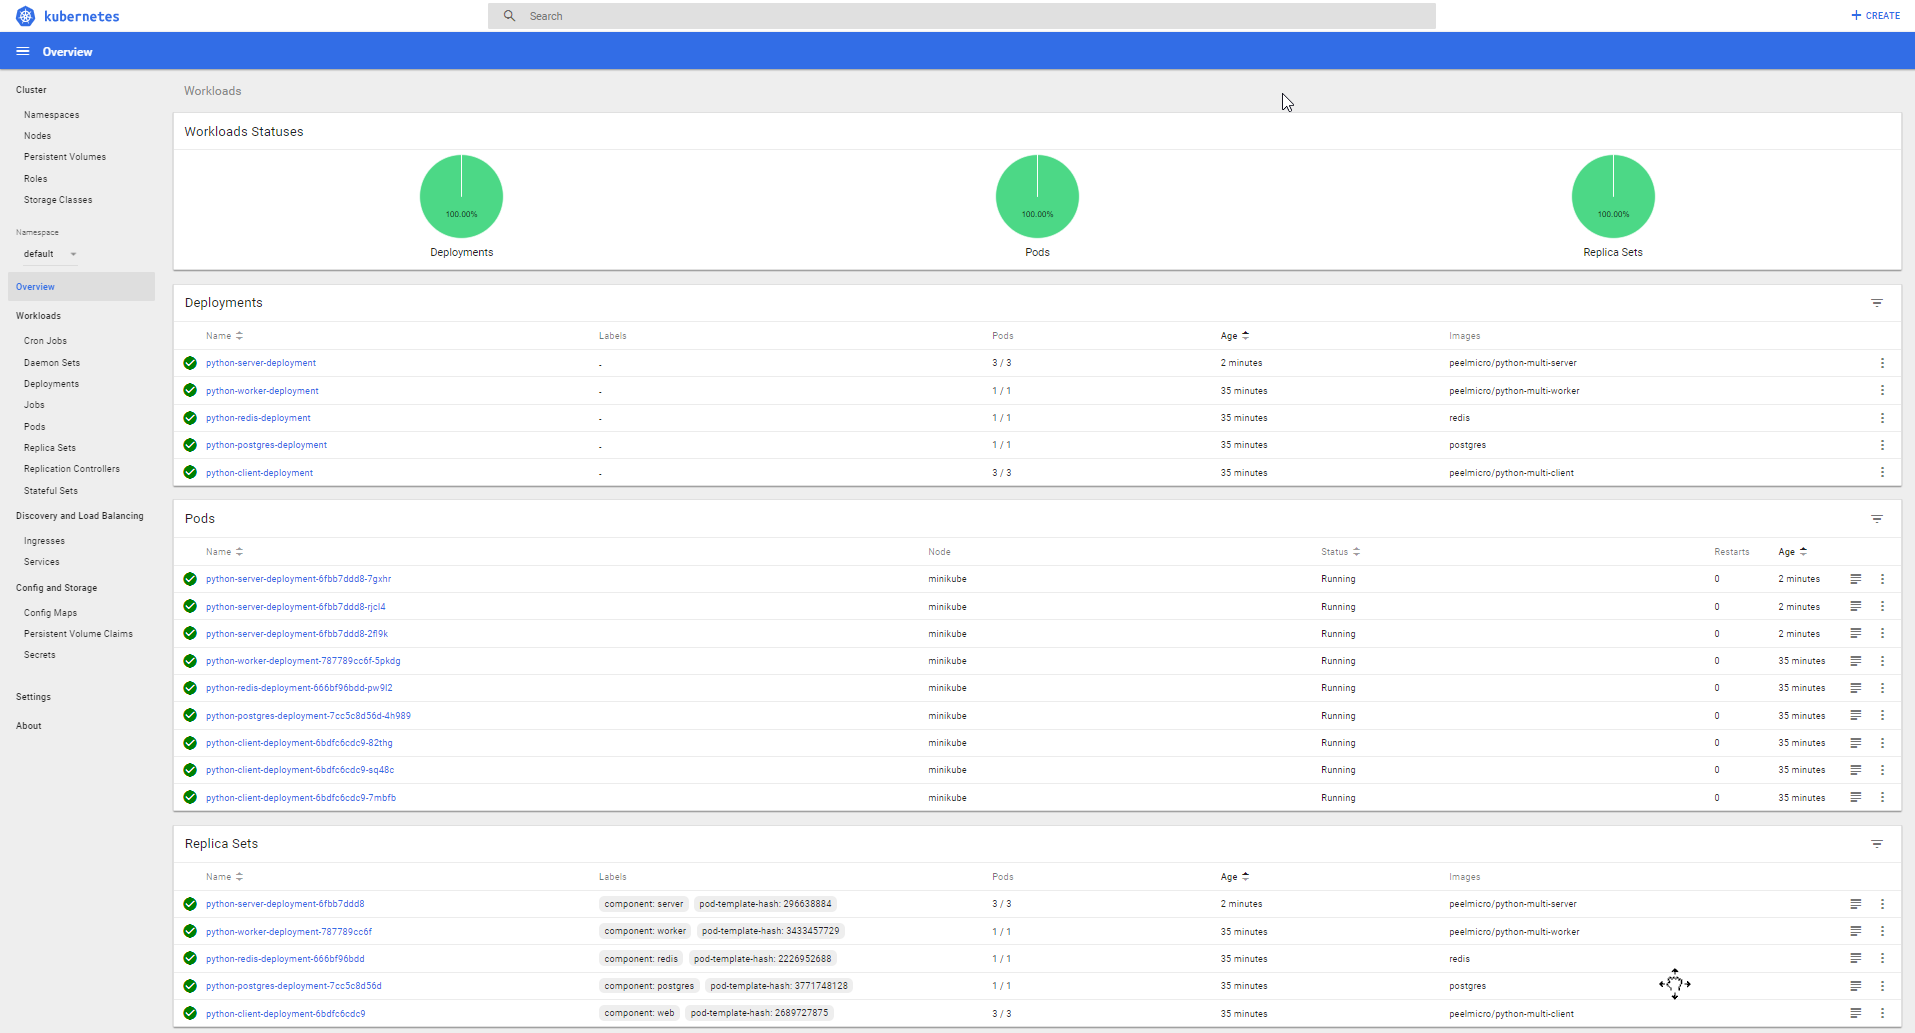
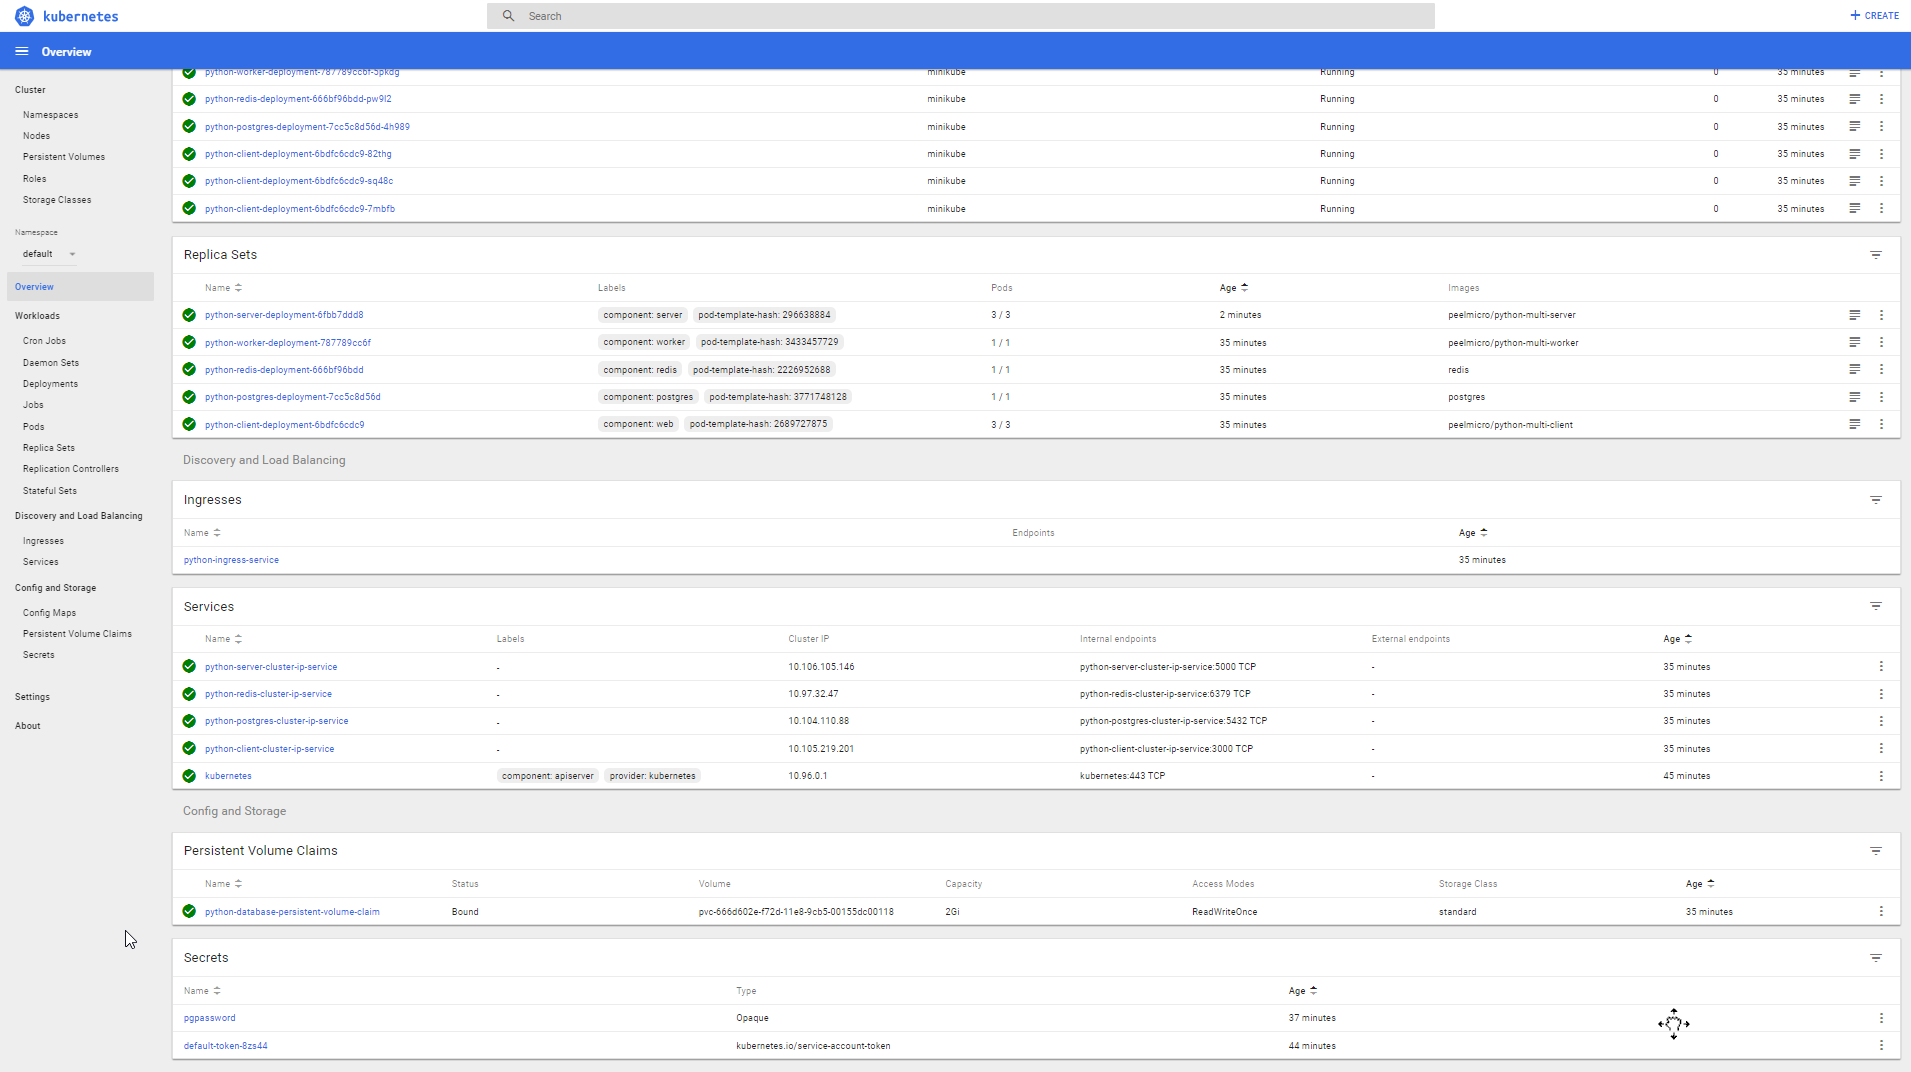
- Update the
README.mddocument
## `Python` version of the "Docker and Kubernetes: The Complete Guide" course.

> source code for the `Python`  version of the "Docker and Kubernetes: The Complete Guide" course.

## AWS Elastic Beanstalk version (Up to `11.-Multi-Container Deployments to AWS` section) is on the `elastic-beanstalk` subfolder:
### Execute it locally using

$ cd elastic-beanstalk

$ docker-compose up --build

Navigate to http://localhost:3050/

### Continuous Integration with Travis CI + Amazon AWS

- The repository must be created on https://github.com/

- The repository must be assigned from GitHub on https://travis-ci.com/. The following setting variables must be set up:
1) AWS_ACCESS_KEY (for 11.-Multi-Container Deployments to AWS)
2) AWS_SECRET_KEY (for 11.-Multi-Container Deployments to AWS)
3) DOCKER_ID
4) DOCKER_PASSWORD

- The following instances must be created on Amazon (for 11.-Multi-Container Deployments to AWS)
1) Elastic Beanstalk (EB)
2) Relational Database Service (RDS) for Postgres
3) ElastiCache for Redis
4) Custom Security Group
5) Identity and Access Magagement (IAM)

## Kubernetes version (From `12.-Onwards to Kubernetes!`) is on the root folder:
1. Create the `secrets` for the `postgres` password: `kubectl create secret generic pgpassword --from-literal PGPASSWORD=postgres_password`
2. Execute the `mandatory` `kubectl apply -f https://raw.githubusercontent.com/kubernetes/ingress-nginx/master/deploy/mandatory.yaml` `Ingress Nginx` command
3. Enable Ingress using `minikube addons enable ingress`
4. Install all the `Kubernetes objects` with `kubectl apply -f k8s`
5. Get the local IP with `minikube IP`
6. Browse to the local IP

## Within the code you can see how to
- Create different Docket Container Types and relate all of them
  1) React Client App
  2) Python API with Flask Framework
  3) Python Console
  4) Postgres
  5) Redis
  6) NGINX
- Use Postgres from a Docker Container with Python
- Use Redis from a Docker Container with Python creating a subscription on the Web API App and subscribe to it on the Console App.
- Send dynamic JSON responses from the Python Flask Framework Web API
- Use Docker Compose to run and relate easily different Docker Components
- Use NIGIX Container to run the React Client App
- Use NIGIX Container as Reverse Proxy with Python Flask Framework Web API
- Work with different AWS Amazon service types to deploy a multi container Docker application using AWS Elastic Beanstalk
- Upload own Containers to Docker Hub and download them with the deployment
- Use Travis CI for the Continuous Integration Workflow
- Use Kubernetes to run the same multi container application
- Use Minikube to run Kubernetes locally
- Use Kubectl CLI for interacting with Kubernetes Master


## In order to get to know what has been developed follow the course on

https://www.udemy.com/docker-and-kubernetes-the-complete-guide
CommitandPushthe changes to Github Repository
Juan.Pablo.Perez@RIMDUB-0232 MINGW64 ~/OneDrive/Training/Docker/DockerAndKubernetes.TheCompleteGuide/python-complex (master)
$ git add .
warning: LF will be replaced by CRLF in elastic-beanstalk/.gitignore.
The file will have its original line endings in your working directory.
warning: LF will be replaced by CRLF in elastic-beanstalk/client/.gitignore.
The file will have its original line endings in your working directory.
warning: LF will be replaced by CRLF in elastic-beanstalk/client/README.md.
The file will have its original line endings in your working directory.
warning: LF will be replaced by CRLF in elastic-beanstalk/client/package.json.
The file will have its original line endings in your working directory.
warning: LF will be replaced by CRLF in elastic-beanstalk/client/public/index.html.
The file will have its original line endings in your working directory.
warning: LF will be replaced by CRLF in elastic-beanstalk/client/public/manifest.json.
The file will have its original line endings in your working directory.
warning: LF will be replaced by CRLF in elastic-beanstalk/client/src/App.css.
The file will have its original line endings in your working directory.
warning: LF will be replaced by CRLF in elastic-beanstalk/client/src/App.js.
The file will have its original line endings in your working directory.
warning: LF will be replaced by CRLF in elastic-beanstalk/client/src/App.test.js.
The file will have its original line endings in your working directory.
warning: LF will be replaced by CRLF in elastic-beanstalk/client/src/Fib.js.
The file will have its original line endings in your working directory.
warning: LF will be replaced by CRLF in elastic-beanstalk/client/src/OtherPage.js.
The file will have its original line endings in your working directory.
warning: LF will be replaced by CRLF in elastic-beanstalk/client/src/index.css.
The file will have its original line endings in your working directory.
warning: LF will be replaced by CRLF in elastic-beanstalk/client/src/index.js.
The file will have its original line endings in your working directory.
warning: LF will be replaced by CRLF in elastic-beanstalk/client/src/logo.svg.
The file will have its original line endings in your working directory.
warning: LF will be replaced by CRLF in elastic-beanstalk/client/src/serviceWorker.js.
The file will have its original line endings in your working directory.
warning: LF will be replaced by CRLF in elastic-beanstalk/client/yarn.lock.
The file will have its original line endings in your working directory.
Juan.Pablo.Perez@RIMDUB-0232 MINGW64 ~/OneDrive/Training/Docker/DockerAndKubernetes.TheCompleteGuide/python-complex (master)
$ git status
On branch master
Changes to be committed:
  (use "git reset HEAD <file>..." to unstage)

        modified:   README.md
        new file:   elastic-beanstalk/.gitignore
        renamed:    .travis.yml -> elastic-beanstalk/.travis.yml
        renamed:    Dockerrun.aws.json -> elastic-beanstalk/Dockerrun.aws.json
        new file:   elastic-beanstalk/README.md
        new file:   elastic-beanstalk/client/.gitignore
        new file:   elastic-beanstalk/client/Dockerfile
        new file:   elastic-beanstalk/client/Dockerfile.dev
        new file:   elastic-beanstalk/client/README.md
        new file:   elastic-beanstalk/client/nginx/default.conf
        new file:   elastic-beanstalk/client/package.json
        new file:   elastic-beanstalk/client/public/favicon.ico
        new file:   elastic-beanstalk/client/public/index.html
        new file:   elastic-beanstalk/client/public/manifest.json
        new file:   elastic-beanstalk/client/src/App.css
        new file:   elastic-beanstalk/client/src/App.js
        new file:   elastic-beanstalk/client/src/App.test.js
        new file:   elastic-beanstalk/client/src/Fib.js
        new file:   elastic-beanstalk/client/src/OtherPage.js
        new file:   elastic-beanstalk/client/src/index.css
        new file:   elastic-beanstalk/client/src/index.js
        new file:   elastic-beanstalk/client/src/logo.svg
        new file:   elastic-beanstalk/client/src/serviceWorker.js
        new file:   elastic-beanstalk/client/yarn.lock
        renamed:    docker-compose.yml -> elastic-beanstalk/docker-compose.yml
        new file:   elastic-beanstalk/nginx/Dockerfile
        new file:   elastic-beanstalk/nginx/Dockerfile.dev
        new file:   elastic-beanstalk/nginx/default.conf
        new file:   elastic-beanstalk/server/.vscode/launch.json
        new file:   elastic-beanstalk/server/Dockerfile
        new file:   elastic-beanstalk/server/app.py
        new file:   elastic-beanstalk/server/requirements.txt
        renamed:    simplek8s/client-deployment.yaml -> elastic-beanstalk/simplek8s/client-deployment.yaml
        renamed:    simplek8s/client-node-port.yaml -> elastic-beanstalk/simplek8s/client-node-port.yaml
        renamed:    simplek8s/client-pod.yaml -> elastic-beanstalk/simplek8s/client-pod.yaml
        new file:   elastic-beanstalk/worker/.vscode/launch.json
        new file:   elastic-beanstalk/worker/Dockerfile
        new file:   elastic-beanstalk/worker/app.py
        new file:   elastic-beanstalk/worker/requirements.txt
        new file:   k8s/client-cluster-ip-service.yaml
        new file:   k8s/client-deployment.yaml
        new file:   k8s/database-persistent-volume-claim.yaml
        new file:   k8s/ingress-service.yaml
        new file:   k8s/postgres-cluster-ip-service.yaml
        new file:   k8s/postgres-deployment.yaml
        new file:   k8s/redis-cluster-ip-service.yaml
        new file:   k8s/redis-deployment.yaml
        new file:   k8s/server-cluster-ip-service.yaml
        new file:   k8s/server-deployment.yaml
        new file:   k8s/worker-deployment.yaml
Juan.Pablo.Perez@RIMDUB-0232 MINGW64 ~/OneDrive/Training/Docker/DockerAndKubernetes.TheCompleteGuide/python-complex (master)
$ git commit -m "A Multi-Container App with Kubernetes"
[master 1fb8f53] A Multi-Container App with Kubernetes
 50 files changed, 9643 insertions(+), 3 deletions(-)
 create mode 100644 elastic-beanstalk/.gitignore
 rename .travis.yml => elastic-beanstalk/.travis.yml (100%)
 rename Dockerrun.aws.json => elastic-beanstalk/Dockerrun.aws.json (100%)
 create mode 100644 elastic-beanstalk/README.md
 create mode 100644 elastic-beanstalk/client/.gitignore
 create mode 100644 elastic-beanstalk/client/Dockerfile
 create mode 100644 elastic-beanstalk/client/Dockerfile.dev
 create mode 100644 elastic-beanstalk/client/README.md
 create mode 100644 elastic-beanstalk/client/nginx/default.conf
 create mode 100644 elastic-beanstalk/client/package.json
 create mode 100644 elastic-beanstalk/client/public/favicon.ico
 create mode 100644 elastic-beanstalk/client/public/index.html
 create mode 100644 elastic-beanstalk/client/public/manifest.json
 create mode 100644 elastic-beanstalk/client/src/App.css
 create mode 100644 elastic-beanstalk/client/src/App.js
 create mode 100644 elastic-beanstalk/client/src/App.test.js
 create mode 100644 elastic-beanstalk/client/src/Fib.js
 create mode 100644 elastic-beanstalk/client/src/OtherPage.js
 create mode 100644 elastic-beanstalk/client/src/index.css
 create mode 100644 elastic-beanstalk/client/src/index.js
 create mode 100644 elastic-beanstalk/client/src/logo.svg
 create mode 100644 elastic-beanstalk/client/src/serviceWorker.js
 create mode 100644 elastic-beanstalk/client/yarn.lock
 rename docker-compose.yml => elastic-beanstalk/docker-compose.yml (100%)
 create mode 100644 elastic-beanstalk/nginx/Dockerfile
 create mode 100644 elastic-beanstalk/nginx/Dockerfile.dev
 create mode 100644 elastic-beanstalk/nginx/default.conf
 create mode 100644 elastic-beanstalk/server/.vscode/launch.json
 create mode 100644 elastic-beanstalk/server/Dockerfile
 create mode 100644 elastic-beanstalk/server/app.py
 create mode 100644 elastic-beanstalk/server/requirements.txt
 rename {simplek8s => elastic-beanstalk/simplek8s}/client-deployment.yaml (100%)
 rename {simplek8s => elastic-beanstalk/simplek8s}/client-node-port.yaml (100%)
 rename {simplek8s => elastic-beanstalk/simplek8s}/client-pod.yaml (100%)
 create mode 100644 elastic-beanstalk/worker/.vscode/launch.json
 create mode 100644 elastic-beanstalk/worker/Dockerfile
 create mode 100644 elastic-beanstalk/worker/app.py
 create mode 100644 elastic-beanstalk/worker/requirements.txt
 create mode 100644 k8s/client-cluster-ip-service.yaml
 create mode 100644 k8s/client-deployment.yaml
 create mode 100644 k8s/database-persistent-volume-claim.yaml
 create mode 100644 k8s/ingress-service.yaml
 create mode 100644 k8s/postgres-cluster-ip-service.yaml
 create mode 100644 k8s/postgres-deployment.yaml
 create mode 100644 k8s/redis-cluster-ip-service.yaml
 create mode 100644 k8s/redis-deployment.yaml
 create mode 100644 k8s/server-cluster-ip-service.yaml
 create mode 100644 k8s/server-deployment.yaml
 create mode 100644 k8s/worker-deployment.yaml
Juan.Pablo.Perez@RIMDUB-0232 MINGW64 ~/OneDrive/Training/Docker/DockerAndKubernetes.TheCompleteGuide/python-complex (master)
$ git push origin HEAD
Counting objects: 3, done.
Delta compression using up to 4 threads.
Compressing objects: 100% (3/3), done.
Writing objects: 100% (3/3), 327 bytes | 65.00 KiB/s, done.
Total 3 (delta 2), reused 0 (delta 0)
remote: Resolving deltas: 100% (2/2), completed with 2 local objects.
To https://github.com/peelmicro/python-multi-docker.git
   1fb8f53..06dcaff  HEAD -> master
Kubernetes Production Deployment
- Add a tag to the current
Githubrepository
Juan.Pablo.Perez@RIMDUB-0232 MINGW64 ~/OneDrive/Training/Docker/DockerAndKubernetes.TheCompleteGuide/python-complex (master)$ git tag MultiContainerAppWithKubernetes
Juan.Pablo.Perez@RIMDUB-0232 MINGW64 ~/OneDrive/Training/Docker/DockerAndKubernetes.TheCompleteGuide/python-complex (master)
$ git push origin --tags
Total 0 (delta 0), reused 0 (delta 0)
To https://github.com/peelmicro/python-multi-docker.git
 * [new tag]         MultiContainerAppWithKubernetes -> MultiContainerAppWithKubernetes
- Create the
multi-container-minikubefolder
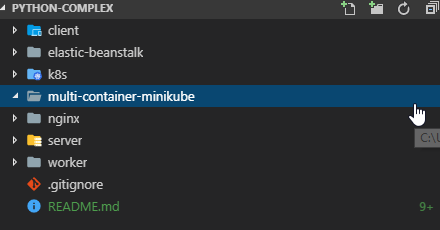
- Copy the current project to the new folder
- Copy all the
yamlKubernetes config files from theJavasolution.
- Delete the current files
- Copy from the
Javasolution
- Update the following
yamlKubernetes config files
client-deployment.yaml
apiVersion: apps/v1
kind: Deployment
metadata:
  name: client-deployment
spec:
  replicas: 3
  selector:
    matchLabels:
      component: web
  template:
    metadata:
      labels:
        component: web
    spec:
      containers:
        - name: client
          image: peelmicro/python-multi-client
          ports:
            - containerPort: 3000
server-deployment.yaml
apiVersion: apps/v1
kind: Deployment
metadata:
  name: server-deployment
spec:
  replicas: 3
  selector:
    matchLabels:
      component: server
  template:
    metadata:
      labels:
        component: server
    spec:
      containers:
        - name: server
          image: peelmicro/python-multi-server
          ports:
            - containerPort: 5000
          env:
            - name: REDIS_HOST
              value: redis-cluster-ip-service
            - name: REDIS_PORT
              value: '6379'
            - name: PGUSER
              value: postgres
            - name: PGHOST
              value: postgres-cluster-ip-service
            - name: PGDATABASE
              value: postgres
            - name: PGPORT
              value: '5432'
            - name: PGPASSWORD
              valueFrom:
                secretKeyRef:
                  name: pgpassword
                  key: PGPASSWORD
worker-deployment.yaml
apiVersion: apps/v1
kind: Deployment
metadata:
  name: worker-deployment
spec:
  replicas: 1
  selector:
    matchLabels:
      component: worker
  template:
    metadata:
      labels:
        component: worker
    spec:
      containers:
        - name: worker
          image: peelmicro/python-multi-worker
          env:
              - name: REDIS_HOST
                value: redis-cluster-ip-service
              - name: REDIS_PORT
                value: '6379'
- Copy the
.travis.ymlfile from theJavasolution
sudo: required
language: node_js
node_js:
  - "8"
services:
  - docker
env:
  global:
    # Get an unique value of the latest commit to be used to identify the images
    - SHA=$(git rev-parse HEAD)
    # Tell Google Cloud CLI not to display any prompts
    - CLOUDSDK_CORE_DISABLE_PROMPTS=1
before_install:
  # Decrypt the encrypted Google Cloud Keys and copy locally
  - openssl aes-256-cbc -K $encrypted_0c35eebf403c_key -iv $encrypted_0c35eebf403c_iv -in service-account.json.enc -out service-account.json -d
  # Install the Google Cloud SDK CLI
  - curl https://sdk.cloud.google.com | bash > /dev/null;
  # Apply additional configuration inside Travis CI instance
  - source $HOME/google-cloud-sdk/path.bash.inc
  # Install kubectl
  - gcloud components update kubectl
  # Authentication with Google Cloud using the decrypted json key file
  - gcloud auth activate-service-account --key-file service-account.json
  # Select the Google Cloud project that we're going to use
  - gcloud config set project multi-k8s-224518
  # Select the zone where the Kubernetes Cluster is installed
  - gcloud config set compute/zone us-central1-a
  # Select the Google Kubernetes Cluster
  - gcloud container clusters get-credentials multi-cluster
  # Log in to the docker CLI
  - echo "$DOCKER_PASSWORD" | docker login -u "$DOCKER_ID" --password-stdin
  # Build the 'test' version of multi-client
  - docker build -t peelmicro/test-client -f ./client/Dockerfile.dev ./client
script:
  # Run the current test
  - docker run peelmicro/test-client npm run test -- --coverage
# Exceute an external script to do the deployment to Google Cloud
deploy:
  provider: script
  script: bash ./deploy.sh
  on:
    branch: master
- Copy and update the
deploy.shfile
# Create the Docker Images
docker build -t peelmicro/python-multi-client:latest -t peelmicro/python-multi-client:$SHA -f ./client/Dockerfile ./client
docker build -t peelmicro/python-multi-server:latest -t peelmicro/python-multi-server:$SHA -f ./server/Dockerfile ./server
docker build -t peelmicro/python-multi-worker:latest -t peelmicro/python-multi-worker:$SHA -f ./worker/Dockerfile ./worker

# Take those images and push them to docker hub
docker push peelmicro/python-multi-client:latest
docker push peelmicro/python-multi-client:$SHA
docker push peelmicro/python-multi-server:latest
docker push peelmicro/python-multi-server:$SHA
docker push peelmicro/python-multi-worker:latest
docker push peelmicro/python-multi-worker:$SHA
# Apply all configs in the 'k8s' folder
kubectl apply -f k8s
# Imperatively set lastest images on each deployment
kubectl set image deployments/client-deployment client=peelmicro/python-multi-client:$SHA
kubectl set image deployments/server-deployment server=peelmicro/python-multi-server:$SHA
kubectl set image deployments/worker-deployment worker=peelmicro/python-multi-worker:$SHA
- Link the
python-multi-dockerrepository to travis-ci.org
- Browse to https://travis-ci.org/account/repositories

- Click on the button to link

- Go to
Settings - Add the
DOCKER_IDandDOCKER_PASSWORDenvironment variables
- Copy the
service-account.jsonfile fromJavaand add it to the.gitignorefile. - Generate the
service-account.json.encfile withTravis CI CLIusingPowerShell
PS C:\WINDOWS\system32> cd C:\Users\juan.pablo.perez\OneDrive\Training\Docker\DockerAndKubernetes.TheCompleteGuide\python-complex
PS C:\Users\juan.pablo.perez\OneDrive\Training\Docker\DockerAndKubernetes.TheCompleteGuide\python-complex> docker run -it -v ${pwd}:/app ruby:2.3 sh
# ls
app  bin  boot  dev  etc  home  lib  lib64  media  mnt  opt  proc  root  run  sbin  srv  sys  tmp  usr  var
# cd app
# ls
README.md  client  deploy.sh  elastic-beanstalk  k8s  multi-container-minikube  server  service-account.json  worker
# gem install travis --no-rdoc --no-ri
Fetching: multipart-post-2.0.0.gem (100%)
Successfully installed multipart-post-2.0.0
Fetching: faraday-0.15.4.gem (100%)
Successfully installed faraday-0.15.4
Fetching: faraday_middleware-0.12.2.gem (100%)
Successfully installed faraday_middleware-0.12.2
Fetching: highline-1.7.10.gem (100%)
Successfully installed highline-1.7.10
Fetching: backports-3.11.4.gem (100%)
Successfully installed backports-3.11.4
Fetching: multi_json-1.13.1.gem (100%)
Successfully installed multi_json-1.13.1
Fetching: addressable-2.4.0.gem (100%)
Successfully installed addressable-2.4.0
Fetching: net-http-persistent-2.9.4.gem (100%)
Successfully installed net-http-persistent-2.9.4
Fetching: net-http-pipeline-1.0.1.gem (100%)
Successfully installed net-http-pipeline-1.0.1
Fetching: gh-0.15.1.gem (100%)
Successfully installed gh-0.15.1
Fetching: launchy-2.4.3.gem (100%)
Successfully installed launchy-2.4.3
Fetching: ffi-1.9.25.gem (100%)
Building native extensions. This could take a while...
Successfully installed ffi-1.9.25
Fetching: ethon-0.11.0.gem (100%)
Successfully installed ethon-0.11.0
Fetching: typhoeus-0.8.0.gem (100%)
Successfully installed typhoeus-0.8.0
Fetching: websocket-1.2.8.gem (100%)
Successfully installed websocket-1.2.8
Fetching: pusher-client-0.6.2.gem (100%)
Successfully installed pusher-client-0.6.2
Fetching: travis-1.8.9.gem (100%)
Successfully installed travis-1.8.9
17 gems installed
# travis
Shell completion not installed. Would you like to install it now? |y| n
Usage: travis COMMAND ...

Available commands:

        accounts       displays accounts and their subscription status
        branches       displays the most recent build for each branch
        cache          lists or deletes repository caches
        cancel         cancels a job or build
        console        interactive shell
        disable        disables a project
        enable         enables a project
        encrypt        encrypts values for the .travis.yml
        encrypt-file   encrypts a file and adds decryption steps to .travis.yml
        endpoint       displays or changes the API endpoint
        env            show or modify build environment variables
        help           helps you out when in dire need of information
        history        displays a projects build history
        init           generates a .travis.yml and enables the project
        lint           display warnings for a .travis.yml
        login          authenticates against the API and stores the token
        logout         deletes the stored API token
        logs           streams test logs
        monitor        live monitor for what's going on
        open           opens a build or job in the browser
        pubkey         prints out a repository's public key
        raw            makes an (authenticated) API call and prints out the result
        report         generates a report useful for filing issues
        repos          lists repositories the user has certain permissions on
        requests       lists recent requests
        restart        restarts a build or job
        settings       access repository settings
        setup          sets up an addon or deploy target
        show           displays a build or job
        sshkey         checks, updates or deletes an SSH key
        status         checks status of the latest build
        sync           triggers a new sync with GitHub
        token          outputs the secret API token
        version        outputs the client version
        whatsup        lists most recent builds
        whoami         outputs the current user

run `/usr/local/bundle/bin/travis help COMMAND` for more infos
# travis login
We need your GitHub login to identify you.
This information will not be sent to Travis CI, only to api.github.com.
The password will not be displayed.

Try running with --github-token or --auto if you don't want to enter your password anyway.

Username: peelmicro
Password for peelmicro: *********************
Successfully logged in as peelmicro!
Successfully logged in as peelmicro!
# travis encrypt-file service-account.json -r peelmicro/python-multi-docker
encrypting service-account.json for peelmicro/multi-docker
storing result as service-account.json.enc
storing secure env variables for decryption

Please add the following to your build script (before_install stage in your .travis.yml, for instance):

    openssl aes-256-cbc -K $encrypted_0c35eebf403c_key -iv $encrypted_0c35eebf403c_iv -in service-account.json.enc -out service-account.json -d

Pro Tip: You can add it automatically by running with --add.

Make sure to add service-account.json.enc to the git repository.
Make sure not to add service-account.json to the git repository.
Commit all changes to your .travis.yml.
- Ensure the Travis CI encryption setting variables have been created.
- Ensure the
service-account.json.encfile has been created
- Update the
README.mdfile
## `Python` version of the "Docker and Kubernetes: The Complete Guide" course.

> source code for the `Python`  version of the "Docker and Kubernetes: The Complete Guide" course.

## AWS Elastic Beanstalk version (Up to `11.-Multi-Container Deployments to AWS` section) is on the `elastic-beanstalk` subfolder:
### Execute it locally using

$ cd elastic-beanstalk

$ docker-compose up --build

Navigate to http://localhost:3050/

### Continuous Integration with Travis CI + Amazon AWS

- The repository must be created on https://github.com/

- The repository must be assigned from GitHub on https://travis-ci.com/. The following setting variables must be set up:
1) AWS_ACCESS_KEY (for 11.-Multi-Container Deployments to AWS)
2) AWS_SECRET_KEY (for 11.-Multi-Container Deployments to AWS)
3) DOCKER_ID
4) DOCKER_PASSWORD

- The following instances must be created on Amazon (for 11.-Multi-Container Deployments to AWS)
1) Elastic Beanstalk (EB)
2) Relational Database Service (RDS) for Postgres
3) ElastiCache for Redis
4) Custom Security Group
5) Identity and Access Magagement (IAM)

## Kubernetes minkube local version (From `12.-Onwards to Kubernetes!`) is on the `multi-container-minikube` folder:

### Execute it locally
1. Create the `secrets` for the `postgres` password: `kubectl create secret generic pgpassword --from-literal PGPASSWORD=postgres_password`
2. Execute the `mandatory` `kubectl apply -f https://raw.githubusercontent.com/kubernetes/ingress-nginx/master/deploy/mandatory.yaml` `Ingress Nginx` command
3. Enable Ingress using `minikube addons enable ingress`
4. Install all the `Kubernetes objects` with `kubectl apply -f k8s`
5. Get the local IP with `minikube IP`
6. Browse to the local IP

## Kubernetes `Google Cloud` version (From `12.-Onwards to Kubernetes!`) is on the root folder:

- The repository must be assigned from GitHub on https://travis-ci.org/. The following setting variables must be set up:
1) DOCKER_ID
2) DOCKER_PASSWORD

## Within the code you can see how to
- Create different Docket Container Types and relate all of them
  1) React Client App
  2) Python API with Flask Framework
  3) Python Console
  4) Postgres
  5) Redis
  6) NGINX
- Use Postgres from a Docker Container with Python
- Use Redis from a Docker Container with Python creating a subscription on the Web API App and subscribe to it on the Console App.
- Send dynamic JSON responses from the Python Flask Framework Web API
- Use Docker Compose to run and relate easily different Docker Components
- Use NIGIX Container to run the React Client App
- Use NIGIX Container as Reverse Proxy with Python Flask Framework Web API
- Work with different AWS Amazon service types to deploy a multi container Docker application using AWS Elastic Beanstalk
- Upload own Containers to Docker Hub and download them with the deployment
- Use Travis CI for the Continuous Integration Workflow
- Use Kubernetes to run the same multi container application
- Use Minikube to run Kubernetes locally
- Use Kubectl CLI for interacting with Kubernetes Master
- Use Google Kubernetes Engine to run the Kubernetes Cluster on the Cloud
- Run the Ruby Travis CI CLI from a Docker container locally
- How to manage the automatic creation and renewal of a TLS certificate using Kubernetes to run the application with HTTPS

## In order to get to know what has been developed follow the course on

https://www.udemy.com/docker-and-kubernetes-the-complete-guide
- Commit the code
Juan.Pablo.Perez@RIMDUB-0232 MINGW64 ~/OneDrive/Training/Docker/DockerAndKubernetes.TheCompleteGuide/python-complex (master)
$ git add .
Juan.Pablo.Perez@RIMDUB-0232 MINGW64 ~/OneDrive/Training/Docker/DockerAndKubernetes.TheCompleteGuide/python-complex (master)
$ git status
On branch master
Changes to be committed:
  (use "git reset HEAD <file>..." to unstage)

        modified:   .gitignore
        new file:   .travis.yml
        modified:   README.md
        new file:   deploy.sh
        new file:   k8s/certificate.yaml
        modified:   k8s/client-cluster-ip-service.yaml
        modified:   k8s/client-deployment.yaml
        modified:   k8s/database-persistent-volume-claim.yaml
        modified:   k8s/ingress-service.yaml
        new file:   k8s/issuer.yaml
        modified:   k8s/postgres-cluster-ip-service.yaml
        modified:   k8s/postgres-deployment.yaml
        modified:   k8s/redis-cluster-ip-service.yaml
        modified:   k8s/redis-deployment.yaml
        modified:   k8s/server-cluster-ip-service.yaml
        modified:   k8s/server-deployment.yaml
        modified:   k8s/worker-deployment.yaml
        new file:   multi-container-minikube/.gitignore
        new file:   multi-container-minikube/README.md
        new file:   multi-container-minikube/client/.gitignore
        new file:   multi-container-minikube/client/Dockerfile
        new file:   multi-container-minikube/client/Dockerfile.dev
        new file:   multi-container-minikube/client/README.md
        new file:   multi-container-minikube/client/nginx/default.conf
        new file:   multi-container-minikube/client/package.json
        new file:   multi-container-minikube/client/public/favicon.ico
        new file:   multi-container-minikube/client/public/index.html
        new file:   multi-container-minikube/client/public/manifest.json
        new file:   multi-container-minikube/client/src/App.css
        new file:   multi-container-minikube/client/src/App.js
        new file:   multi-container-minikube/client/src/App.test.js
        new file:   multi-container-minikube/client/src/Fib.js
        new file:   multi-container-minikube/client/src/OtherPage.js
        new file:   multi-container-minikube/client/src/index.css
        new file:   multi-container-minikube/client/src/index.js
        new file:   multi-container-minikube/client/src/logo.svg
        new file:   multi-container-minikube/client/src/serviceWorker.js
        new file:   multi-container-minikube/client/yarn.lock
        new file:   multi-container-minikube/k8s/client-cluster-ip-service.yaml
        new file:   multi-container-minikube/k8s/client-deployment.yaml
        new file:   multi-container-minikube/k8s/database-persistent-volume-claim.yaml
        new file:   multi-container-minikube/k8s/ingress-service.yaml
        new file:   multi-container-minikube/k8s/postgres-cluster-ip-service.yaml
        new file:   multi-container-minikube/k8s/postgres-deployment.yaml
        new file:   multi-container-minikube/k8s/redis-cluster-ip-service.yaml
        new file:   multi-container-minikube/k8s/redis-deployment.yaml
        new file:   multi-container-minikube/k8s/server-cluster-ip-service.yaml
        new file:   multi-container-minikube/k8s/server-deployment.yaml
        new file:   multi-container-minikube/k8s/worker-deployment.yaml
        renamed:    nginx/Dockerfile -> multi-container-minikube/nginx/Dockerfile
        renamed:    nginx/Dockerfile.dev -> multi-container-minikube/nginx/Dockerfile.dev
        renamed:    nginx/default.conf -> multi-container-minikube/nginx/default.conf
        new file:   multi-container-minikube/server/.vscode/launch.json
        new file:   multi-container-minikube/server/Dockerfile
        new file:   multi-container-minikube/server/app.py
        new file:   multi-container-minikube/server/requirements.txt
        new file:   multi-container-minikube/worker/.vscode/launch.json
        new file:   multi-container-minikube/worker/Dockerfile
        new file:   multi-container-minikube/worker/app.py
        new file:   multi-container-minikube/worker/requirements.txt
        new file:   service-account.json.enc
Juan.Pablo.Perez@RIMDUB-0232 MINGW64 ~/OneDrive/Training/Docker/DockerAndKubernetes.TheCompleteGuide/python-complex (master)
$ git commit -m "Added Google Kubernetes Engine configuration"
[master ae13df9] Added Google Kubernetes Engine configuration
 61 files changed, 9746 insertions(+), 22 deletions(-)
 create mode 100644 .travis.yml
 create mode 100644 deploy.sh
 create mode 100644 k8s/certificate.yaml
 create mode 100644 k8s/issuer.yaml
 create mode 100644 multi-container-minikube/.gitignore
 create mode 100644 multi-container-minikube/README.md
 create mode 100644 multi-container-minikube/client/.gitignore
 create mode 100644 multi-container-minikube/client/Dockerfile
 create mode 100644 multi-container-minikube/client/Dockerfile.dev
 create mode 100644 multi-container-minikube/client/README.md
 create mode 100644 multi-container-minikube/client/nginx/default.conf
 create mode 100644 multi-container-minikube/client/package.json
 create mode 100644 multi-container-minikube/client/public/favicon.ico
 create mode 100644 multi-container-minikube/client/public/index.html
 create mode 100644 multi-container-minikube/client/public/manifest.json
 create mode 100644 multi-container-minikube/client/src/App.css
 create mode 100644 multi-container-minikube/client/src/App.js
 create mode 100644 multi-container-minikube/client/src/App.test.js
 create mode 100644 multi-container-minikube/client/src/Fib.js
 create mode 100644 multi-container-minikube/client/src/OtherPage.js
 create mode 100644 multi-container-minikube/client/src/index.css
 create mode 100644 multi-container-minikube/client/src/index.js
 create mode 100644 multi-container-minikube/client/src/logo.svg
 create mode 100644 multi-container-minikube/client/src/serviceWorker.js
 create mode 100644 multi-container-minikube/client/yarn.lock
 create mode 100644 multi-container-minikube/k8s/client-cluster-ip-service.yaml
 create mode 100644 multi-container-minikube/k8s/client-deployment.yaml
 create mode 100644 multi-container-minikube/k8s/database-persistent-volume-claim.yaml
 create mode 100644 multi-container-minikube/k8s/ingress-service.yaml
 create mode 100644 multi-container-minikube/k8s/postgres-cluster-ip-service.yaml
 create mode 100644 multi-container-minikube/k8s/postgres-deployment.yaml
 create mode 100644 multi-container-minikube/k8s/redis-cluster-ip-service.yaml
 create mode 100644 multi-container-minikube/k8s/redis-deployment.yaml
 create mode 100644 multi-container-minikube/k8s/server-cluster-ip-service.yaml
 create mode 100644 multi-container-minikube/k8s/server-deployment.yaml
 create mode 100644 multi-container-minikube/k8s/worker-deployment.yaml
 rename {nginx => multi-container-minikube/nginx}/Dockerfile (100%)
 rename {nginx => multi-container-minikube/nginx}/Dockerfile.dev (100%)
 rename {nginx => multi-container-minikube/nginx}/default.conf (100%)
 create mode 100644 multi-container-minikube/server/.vscode/launch.json
 create mode 100644 multi-container-minikube/server/Dockerfile
 create mode 100644 multi-container-minikube/server/app.py
 create mode 100644 multi-container-minikube/server/requirements.txt
 create mode 100644 multi-container-minikube/worker/.vscode/launch.json
 create mode 100644 multi-container-minikube/worker/Dockerfile
 create mode 100644 multi-container-minikube/worker/app.py
 create mode 100644 multi-container-minikube/worker/requirements.txt
 create mode 100644 service-account.json.enc
Juan.Pablo.Perez@RIMDUB-0232 MINGW64 ~/OneDrive/Training/Docker/DockerAndKubernetes.TheCompleteGuide/python-complex (master)
$ git push origin HEAD
Counting objects: 22, done.
Delta compression using up to 4 threads.
Compressing objects: 100% (22/22), done.
Writing objects: 100% (22/22), 7.04 KiB | 313.00 KiB/s, done.
Total 22 (delta 8), reused 0 (delta 0)
remote: Resolving deltas: 100% (8/8), completed with 4 local objects.
To https://github.com/peelmicro/python-multi-docker.git
   06dcaff..ae13df9  HEAD -> master
- Check if it has been installed correctly
- Ensure it has been deployed correctly with
Travis CI
certificate.certmanager.k8s.io "k8s-multi-com-tls" configured
service "client-cluster-ip-service" unchanged
deployment.apps "client-deployment" configured
persistentvolumeclaim "database-persistent-volume-claim" unchanged
ingress.extensions "ingress-service" unchanged
clusterissuer.certmanager.k8s.io "letsencrypt-prod" configured
service "postgres-cluster-ip-service" unchanged
deployment.apps "postgres-deployment" unchanged
service "redis-cluster-ip-service" unchanged
deployment.apps "redis-deployment" unchanged
service "server-cluster-ip-service" unchanged
deployment.apps "server-deployment" configured
deployment.apps "worker-deployment" configured
deployment.apps "client-deployment" image updated
deployment.apps "server-deployment" image updated
deployment.apps "worker-deployment" image updated
Already up to date!
HEAD detached at ae13df9
nothing to commit, working tree clean
Dropped refs/stash@{0} (b7049f5bd8e03e7cf699ee239a4d439cf071e414)
Done. Your build exited with 0.
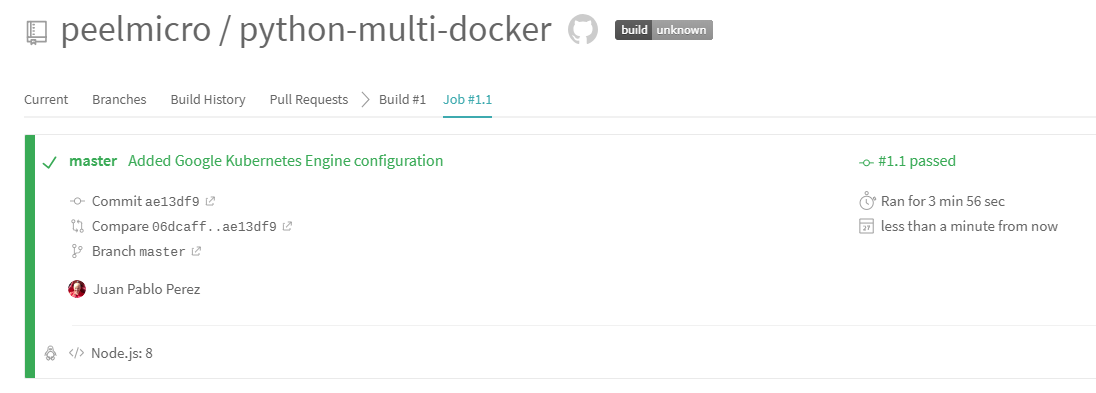
- Browse to Google Cloud Platform